
Hands up if you wanna handstand! Yes, yes, yes *waves hands in air like teacher’s pet with all the answers* me, me, me!
I’m pretty sure ‘handstand’ is on every poler’s trick wish-list and—unless someone has injuries that make handstands inappropriate—I would always encourage polers to start working on handstand progressions because, quite simply:
Handstand training will make you a better poler!
If you learn how to handstand, you’ll also improve your overall strength, body control and spatial awareness – all of which transfers seamlessly to everything else you do on the pole.
However, there are many different components to a handstand, whether you’re doing them against a wall, on a pole or in the middle of the room, and a strong handstand requires much more than strength – you’ll also need good mobility in the wrists, shoulders and hamstrings as well as core stability and balance.
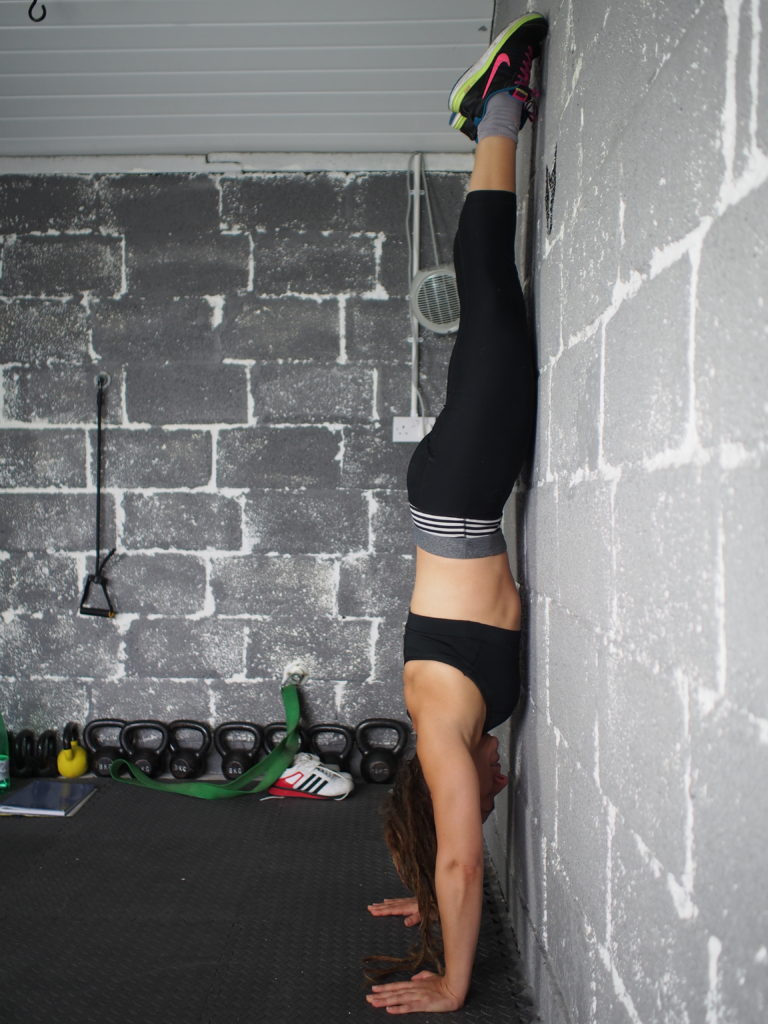
Let’s have a quick look at some of the key things that are involved. This is a twisted grip pole handstand, but the same general principles apply for all handstand variations…
As you can see, there is a lot going on with the humble handstand!
Today, I want to focus on just one of those elements: shoulder mobility.
In this blog, I’m going to show you why shoulder mobility is so important for your handstands, how you can screen your shoulders to check if you have any mobility restrictions that might affect your handstand positioning and give you some exercises you can do to address it.
The straight line handstand
Firstly, let me explain what I mean by a ‘straight line handstand’ and why it’s important.
Now, I’m no gymnast and my handstand is by no means perfect. It’s a work in progress (isn’t everything?). But in the picture below, hopefully you can see what I mean by ‘straight line’. Can you see how my wrists, shoulders and hips are stacked in a straight line?
In lieu of the necessary shoulder mobility to get this straight line position, the ribs may flare and lower back arch to compensate, there will be a ‘break’ in the shoulder line and the body will likely take an angle that looks more like the red line in the picture below…
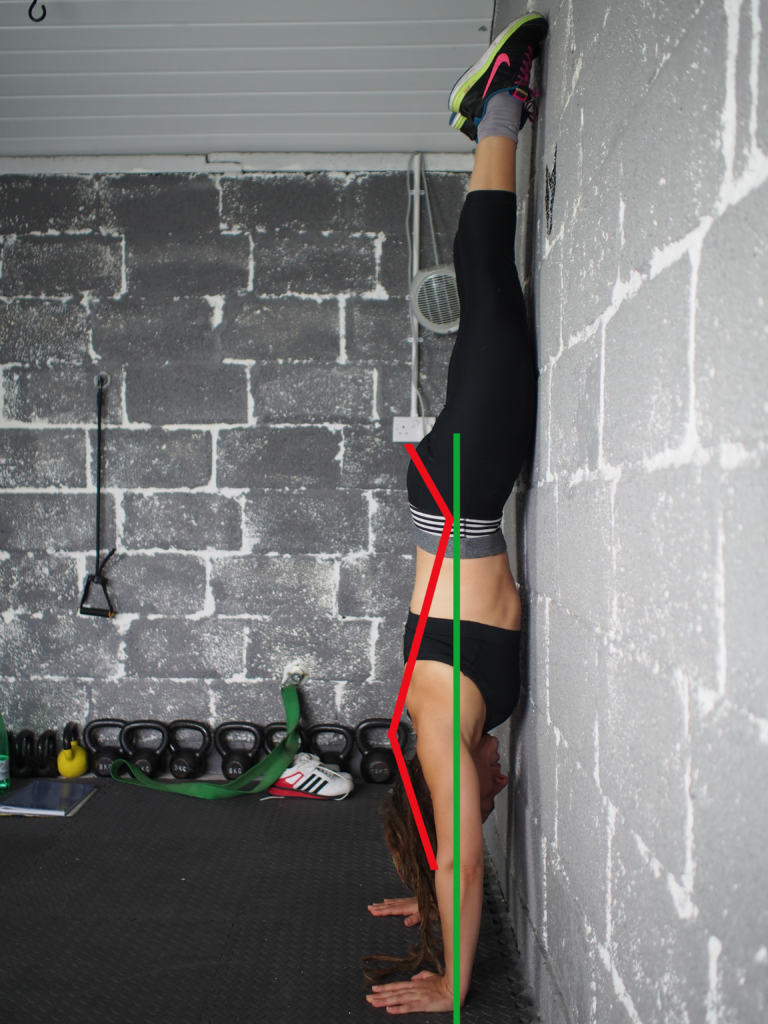
Although it is entirely possible to do a handstand without the wrists, shoulders and hips stacked (and, hey, arched back handstands can look incredibly beautiful, especially when transferred to dance/pole), this stacking of our joints is the safest and most efficient way to transfer forces. If you aren’t stacking your handstand, it can place more stress on your joints which, over time, can lead to injuries. So following the correct progressions to get that straight alignment nailed first, before you start playing with pretty shapes, will result in a much stronger hand balance in the long run.
It will also give you the most transferable benefits for pole – a stronger core, solid overall body strength, body control, spatial awareness, flexible shoulders and a safe, well protected back.
That’s why my advice is always to focus on the straight line handstand first and then once those basics are sold, move on to other variations. Don’t settle for a ‘banana back’ handstand – achieving a straight line handstand is well worth the extra effort!
Screening your overhead shoulder mobility
Note that shoulder mobility is important to be able to achieve a straight line handstand, but it’s not the only cause of ‘banana back’ handstand issues. Wrist mobility and core strength also play a big part in getting the joints stacked in a straight line.
The screening test below is just one of a few different diagnostic tests you can carry out to see if your shoulder mobility might be holding you back from achieving your handstand goals. I’ll cover wrist mobility screening another time!
To see if your overhead mobility might be a stumbling block in your handstand progression, sit down in front of a wall, with knees tucked and hands in front of you, shoulder distance apart. Keeping your back in contact with the wall and the core engaged, lift your arms out in front of you and then above your head towards the wall – without letting your ribs flare and without arching your back! We’re performing this test in a more ‘neutral’ position, so have your palms facing each other.
If you can’t get your hands to the wall above you, or your hands need to track wider than your shoulders to get there, it’s a sign that you probably need to work on your overhead shoulder mobility. It’s a good idea to film this exercise from the front and from the side so you can watch it back and see how far away your hands are from the wall (plus, this means you can retest it later and ‘mire dem mobility gainz).
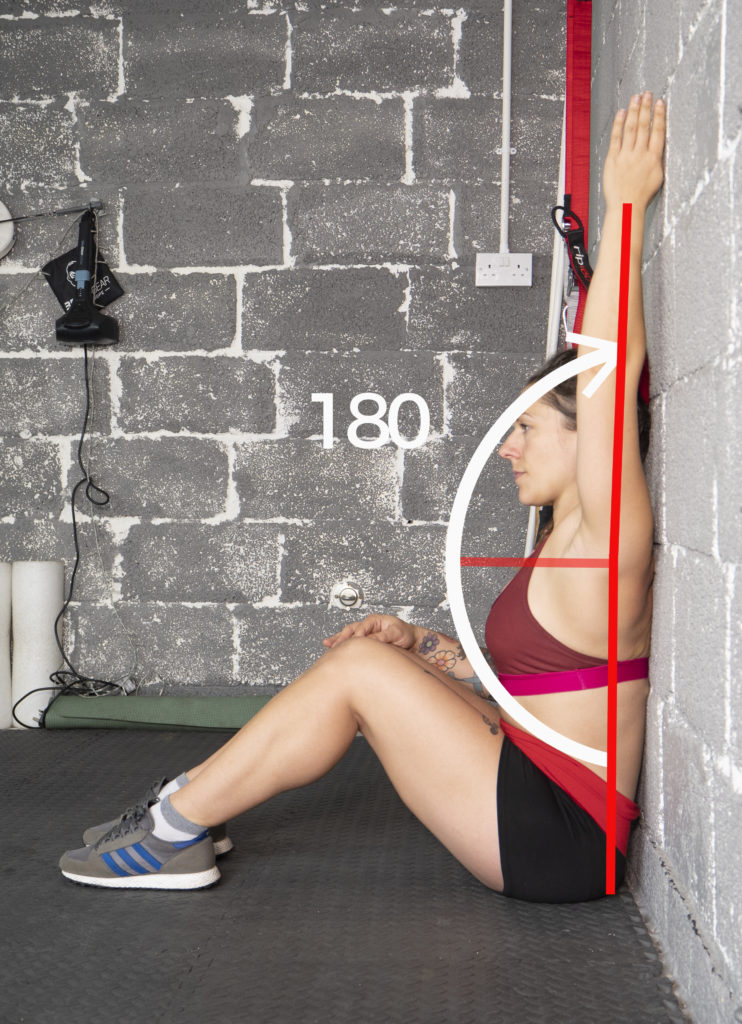
If you can’t get your hands to touch the wall without arching your back, it doesn’t necessarily mean you won’t be able to do a handstand, but it will stop you from doing a straight line handstand and it can make achieving your handstand more challenging, especially if you want to deadlift it eventually.
A restriction in overhead shoulder mobility can also cause issues in loads of other pole moves too, like the Ayesha! (More on Ayesha overhead mobility in my post The #1 Reason your Ayesha Sucks!)
How to improve shoulder mobility for handstands
The way I typically address overhead mobility issues with my clients is in two steps. Firstly, by reducing muscle tightness (through soft tissue mobility work like foam rolling) to increase range of motion and, secondly, by reinforcing that newly-gained range of motion by building strength in it.
Step 1: Foam rolling lats and pecs to increase soft tissue mobility
As polers, we generally tend to be tight in the lats, pecs and teres major. This tightness can cause that restriction in overhead mobility.
Here’s how you can release some of that tightness.
Spend a minute or two working on each side.
Foam rolling lats
Ignore my face, I was trying to pretend this didn’t hurt like a mo fo. #teamtightlats
Self myofascial release – pecs
Use a mobility ball for this (or a tennis ball or rubber dog ball – woof!).
Step 2: Building strength and control with your new-found mobility
This stage is all about slowly moving through the new range of motion you are able to access from releasing the soft tissue with foam rolling. You can stretch and mobilise with the foam roller/mobility balls until the cows come home, but if you don’t work in that newly released mobility range, it will only ever be temporary.
There are so many great exercises for this, but here are 3 of my go-tos…
Aim for 10 repetitions of each one. Rest for 30 seconds. Then repeat twice more through, resting in between each set.
Child’s pose arm lifts
Floor angels
When you first start these, you might not even be able to get your hands right to the floor, that’s fine. In time, as your mobility improves, you will eventually be able to get the hands flat against the floor.
Dolphin holds (with external rotation)
Hold for 4 – 5 deep breaths. Stay active!
After you’ve worked through both Steps 1 and 2 above, retest your range of motion again with the strap and I’ll bet you will see a difference even after just one session of this. Do it regularly and you’ll be all over those handstands like barnacles on a rock.
Please let me know how you get on – tag me on social media so I can see! And, as always, if you have any questions just holla!
The above videos are taken from my online training programmes which you can find here.
If you want to start a regular shoulder care practice for your pole shoulders that will help you to reduce risk of injury and improve your shoulder strength and mobility so you can progress to more advanced moves – check out my Pole Proof Shoulders program! A 6-week training program you can download and start today! >>>Pole proof shoulders – the ultimate shoulder care and strength package for pole dancers!<<<
PS. If you wanna work on your handstand deadlift, checkout my 6-week handstand deadlift programme – 6-weeks of on-the-pole, in-the-gym and at-home workouts all designed to help you build the strength and mobility you need to get your handstand deadlift safe and strong!
Join my mailing list for free training advice direct to your inbox!
…including my FREE EBOOK “Grip Gainz – Grip Training for Pole Athletes” – with training drills and programming to help you achieve a vice-like pole grip.
I hate spam, too! When you join my mailing list, I’ll also notify you about new blogs and Pole PT updates that I think you might be interested in, but I’ll keep it to a minimum! You can unsubscribe at any time!


As a professionally trained handstander this is very valuable information targeting the main and biggest issues that newbies will encounter.
I would also idolise shoulder exercises in correlation to core / body alinement as these often work independently to each other.
Awesome work ! Thank you for sharing.
Jon
Thanks, Jonathan, for your kind comments. ????