![Lemme leg hang! [Anatomy of Pole – outside leg hang]](https://www.thepolept.com/wp-content/uploads/2021/09/Leg-hang-anatomy-of-pole-copy-scaled.jpg)
With so many combos and movements born from this one shape – the outside leg hang just has to be one of the most fundamental movements of pole dance.
But what is actually happening when we leg hang?
In which areas do we need strength and flexibility to achieve this move?
And why does my leg hang look different to your leg hang?
Onward – let’s leg-hang-nerd…
Biomechanics of the outside leg hang
If you’d rather watch than read, the video below contains a summary of the main biomechanical elements of the outside leg hang.
Side note: I think my 3D animation skillz are slowly improving, what do you reckon?
Top leg – leg hang anatomy
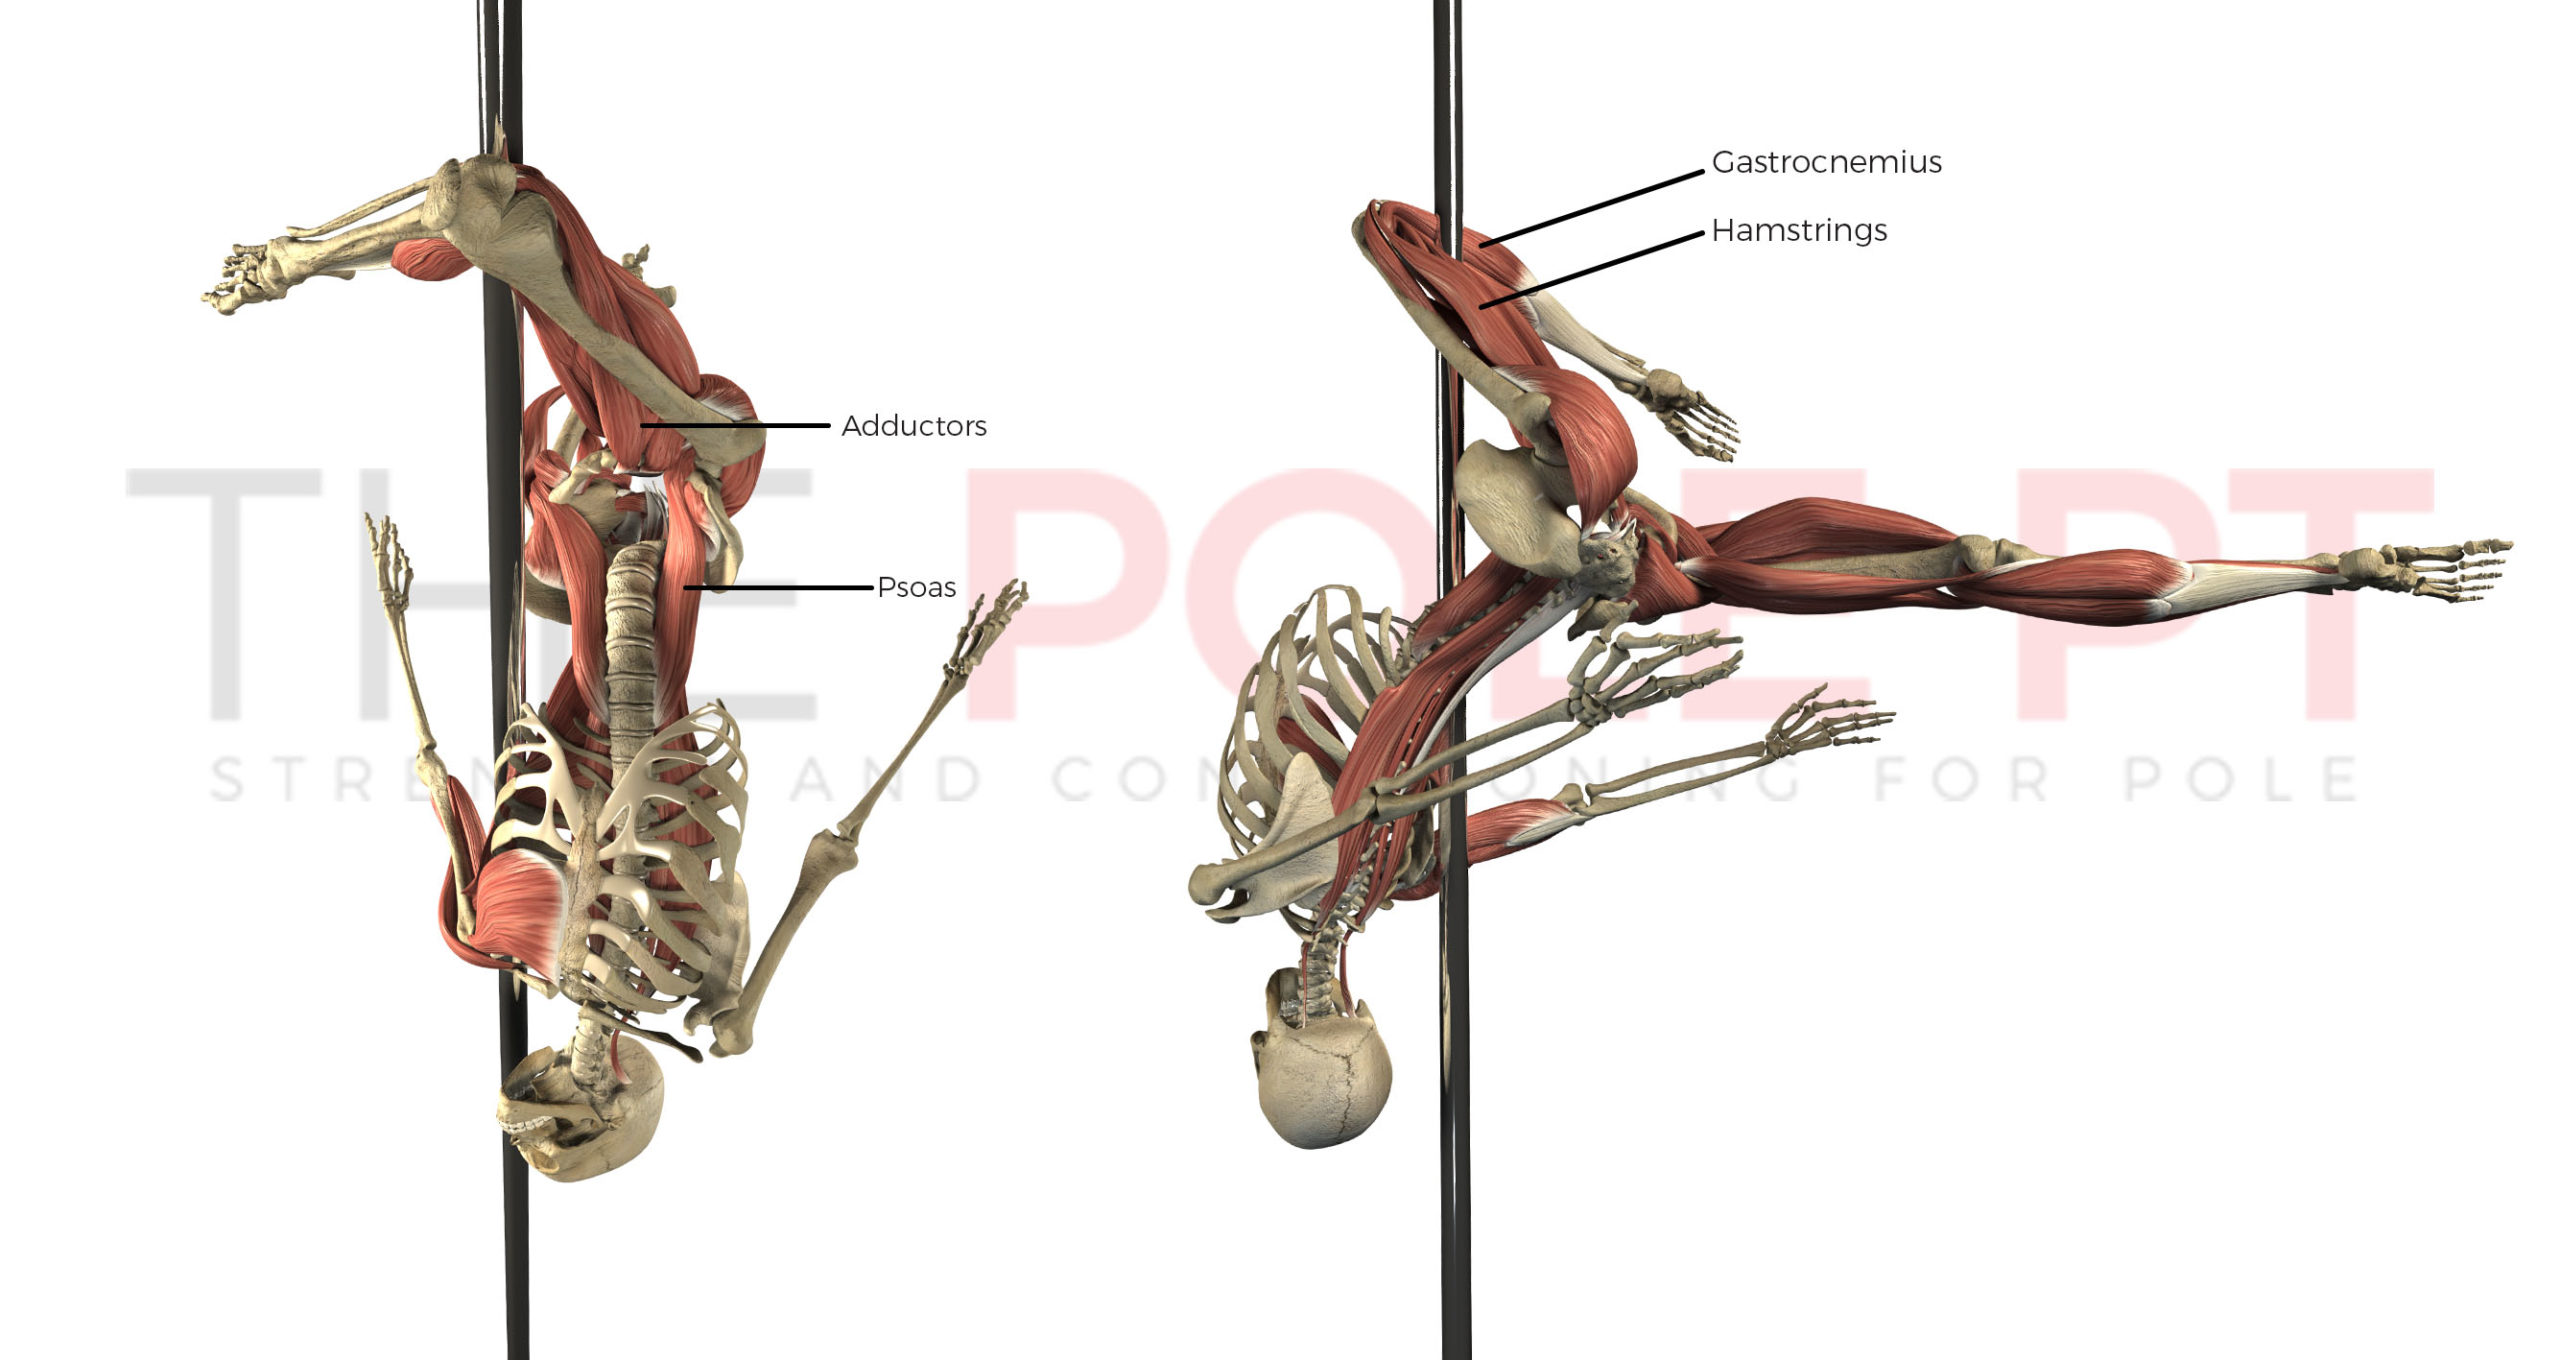
The top leg – the one that’s doing all the ‘leg hanging’ in our leg hang – is in a position of hip flexion. It’s externally rotated and the knee is flexed around the pole. The leg is also adducted towards the midline of the body.
To create and then hold this movement, the primary hip flexor is the iliopsoas (iliacus and psoas major) which is working to bring the knee towards our torso.
The deep hip rotators and glutes are stabilising the leg in that externally rotated position, but actively pressing towards internal rotation to grip the pole and the adductors (pectineus, adductor longus, gracilis, adductor brevis and adductor magnus) are working to bring the leg towards the pole and the midline of our body as well.
But it’s the hamstrings (semitendinosus, semimembranosus and biceps femoris) and calf muscle (gastrocenemius) that are the real heroes in this move, working hard to keep that knee bent around the pole and secure the grip.
Bottom leg – leg hang anatomy
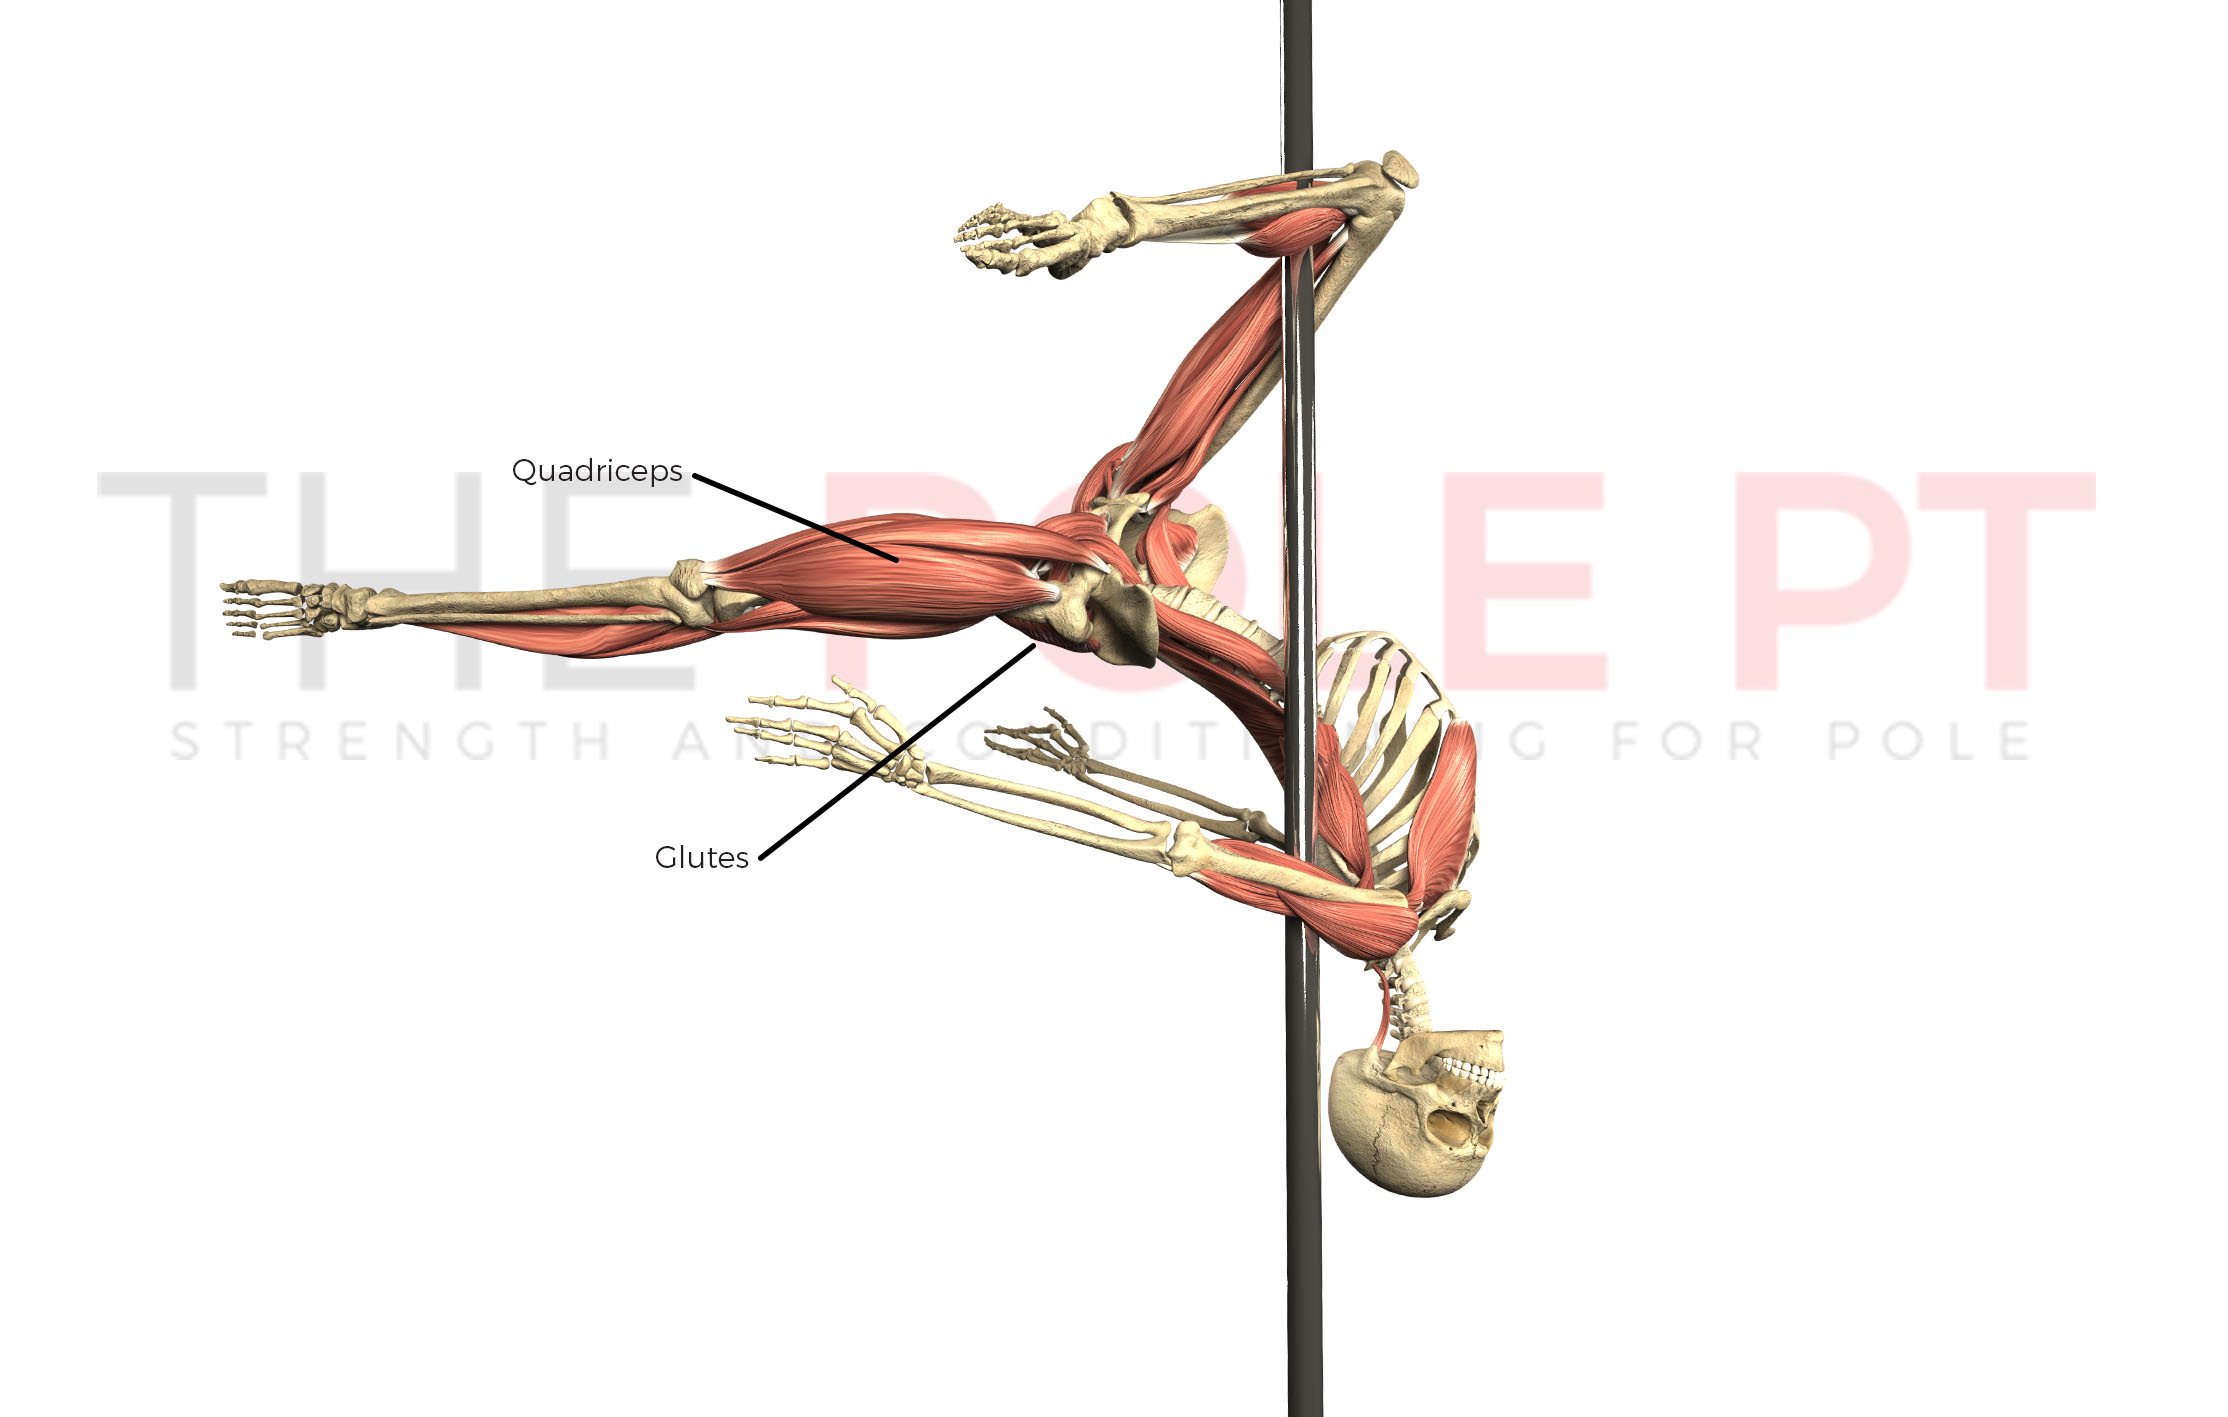
While our top leg is doing most of the heavy lifting in this move, our bottom leg is working on those all important lines.
That beautiful leg hang line is created by the engagement of our hip extensors (glute max and hamstrings), which are contracting to bring the bottom leg into a position of hip extension, putting our hip flexors on the opposite side of the leg (Iliacus, psoas, rectus femoris, pectineus) into a lengthened position.
Again, our deep hip rotators (piriformis, gemellus superior, obturator internus, gemellus inferior, quadratus femoris and the obturator externus) work to stabilise the leg in an externally rotated position while the quads (vastus lateralis, vastus medialis, vastus intermedius and rectus femoris) work to keep our leg straight, assuming we’re doing the straight leg version like our poling skellibob here.
Inside arm – leg hang anatomy
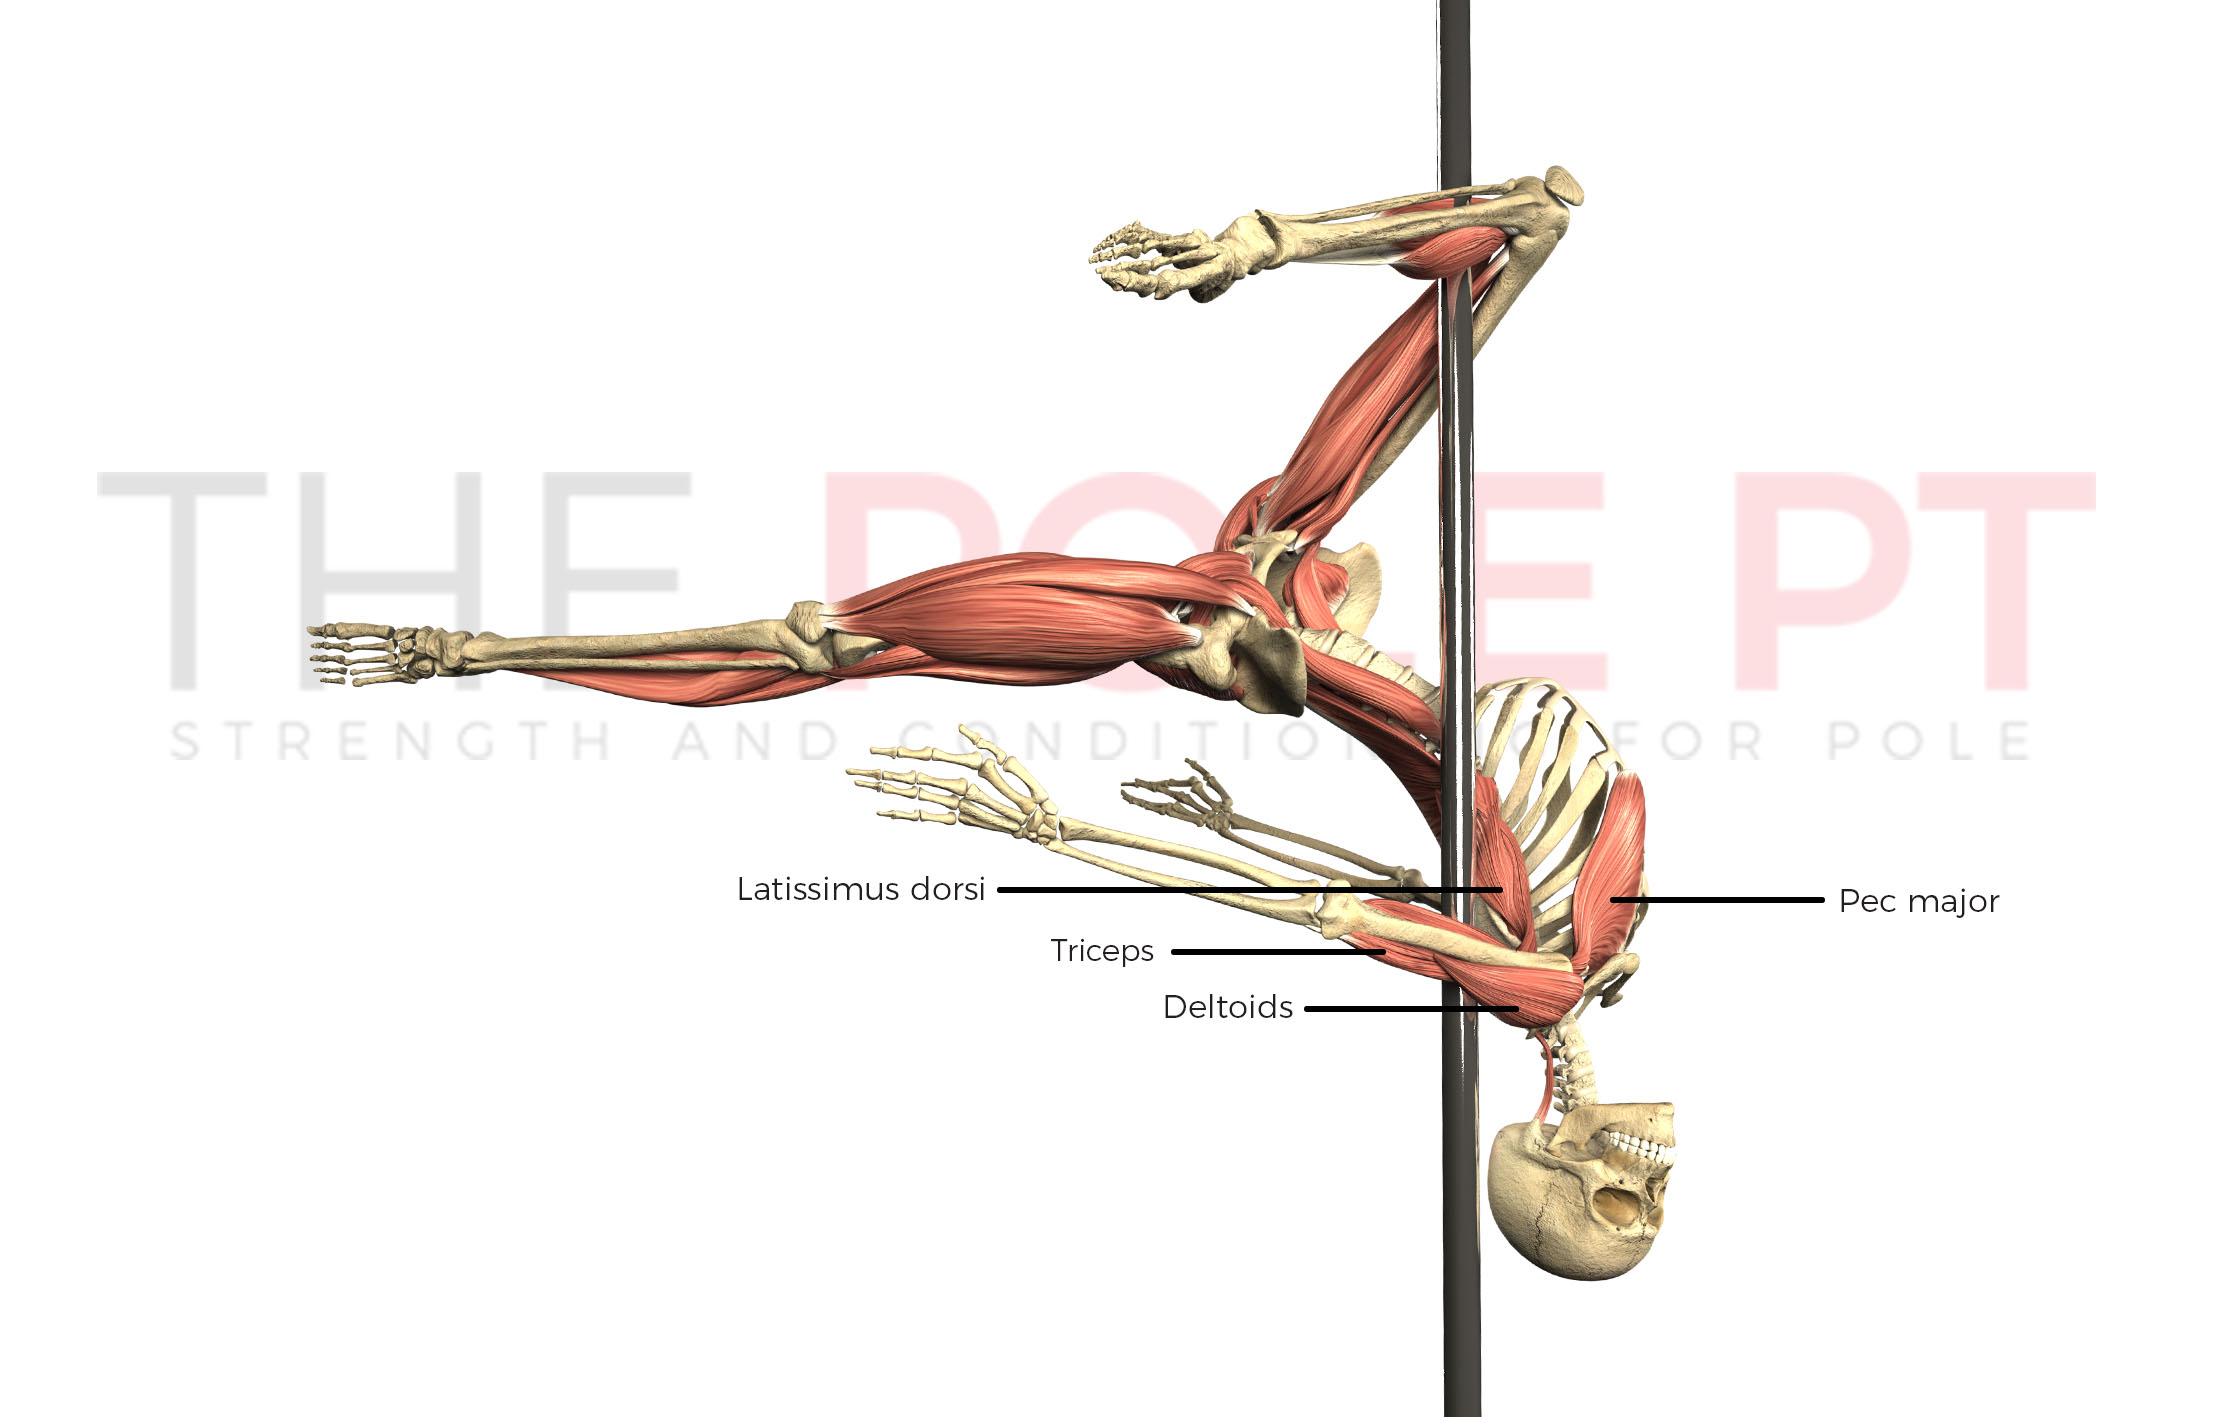
Both arms are in a position of extension (behind our torso), with the inside arm pressing in towards the pole (pressing into adduction) to assist with grip! The key muscles working for this extension and adduction are the posterior deltoid, triceps, latissimus dorsi, pectoralis major and teres major.
Spine – leg hang anatomy
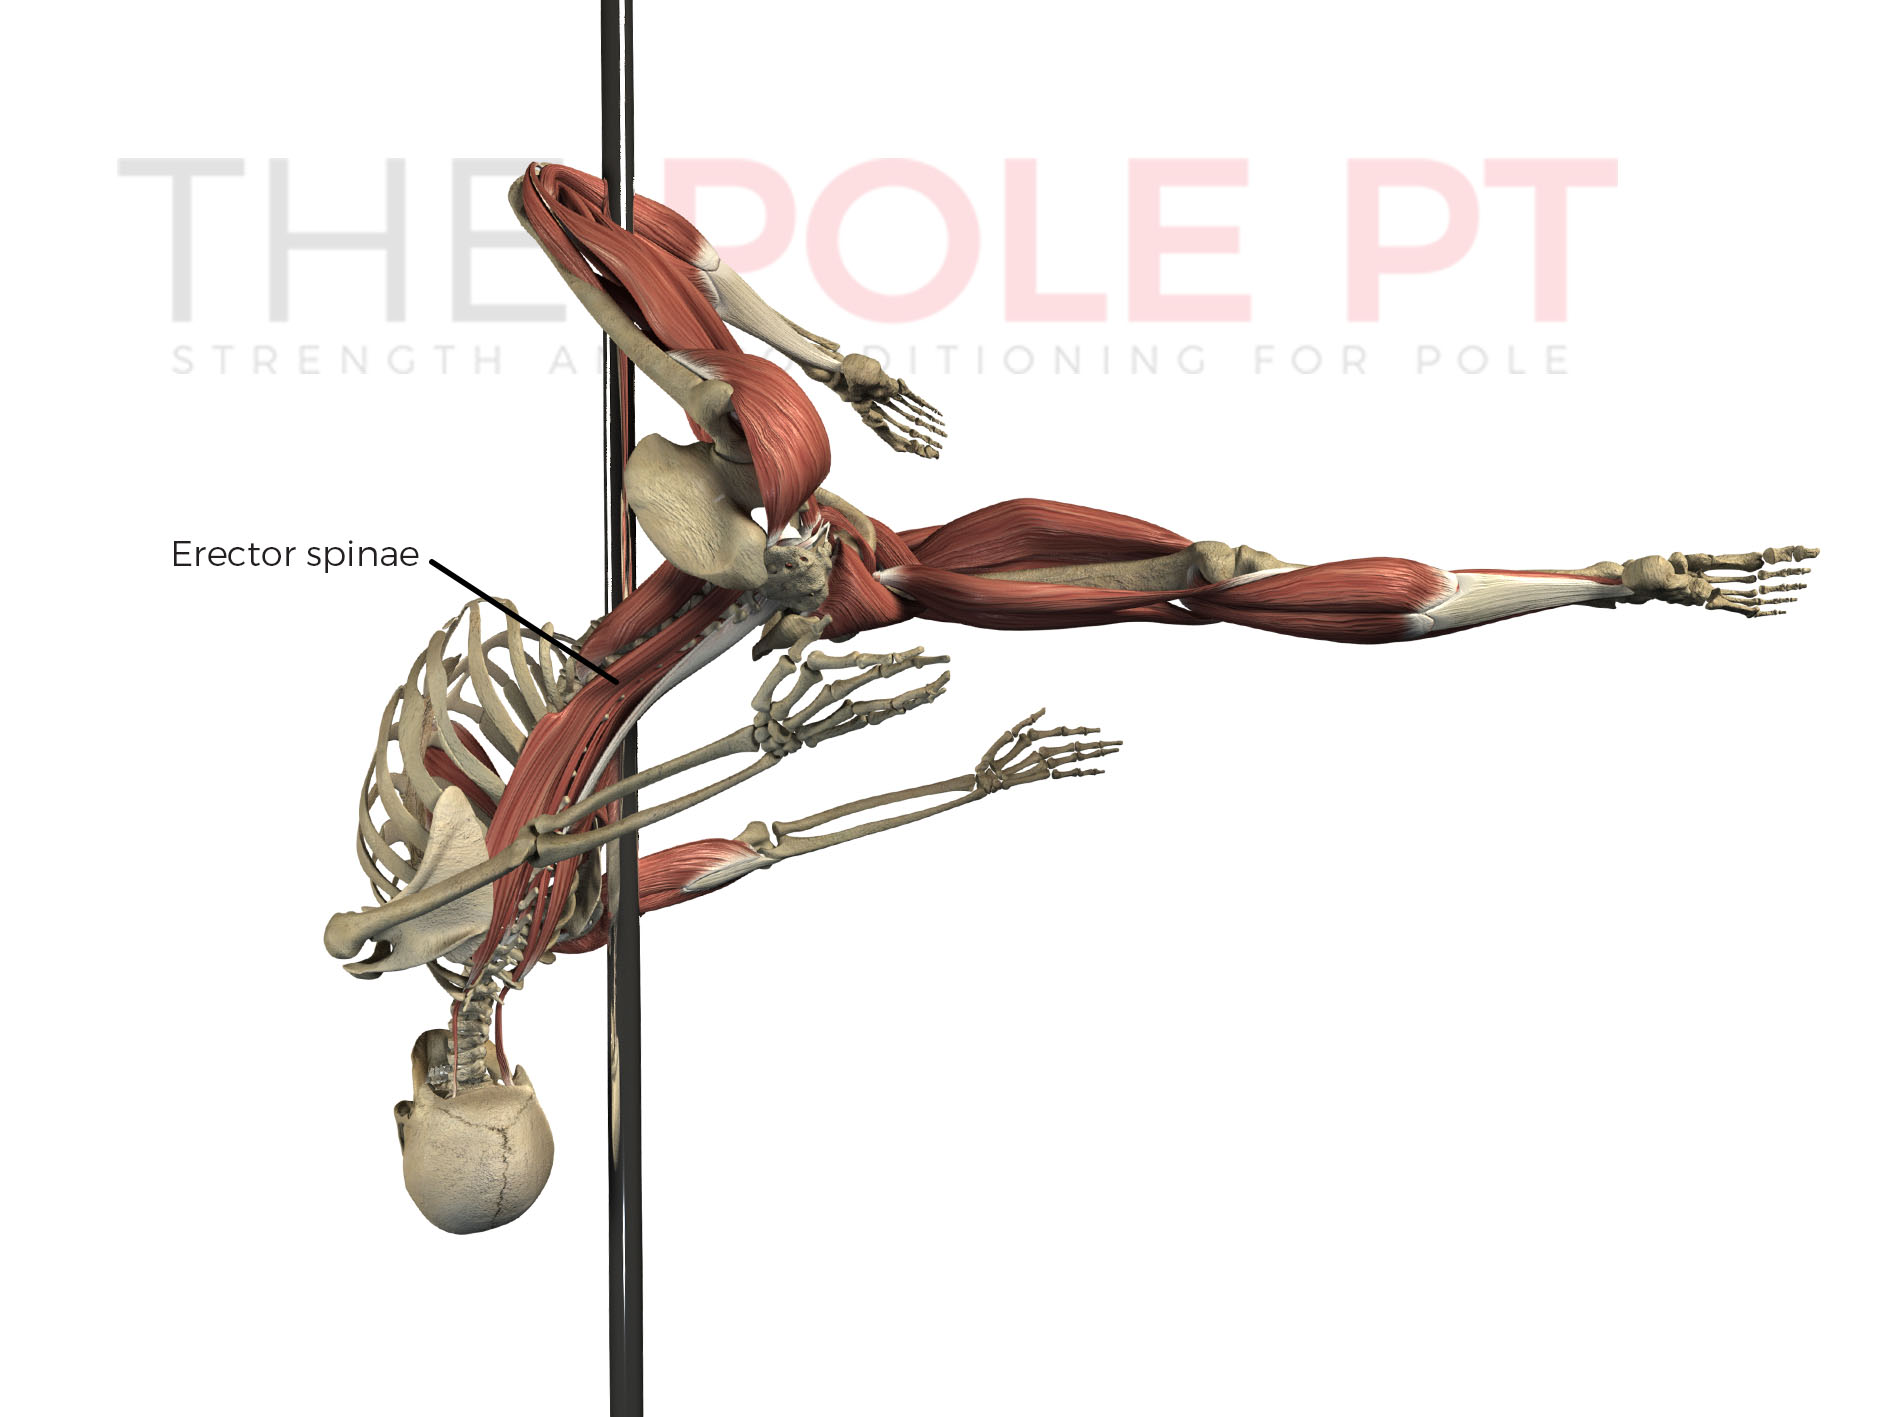
In a leg hang, our spine is in an extended position, which is created by the engagement of our erector spinaie muscles (spinalis, longissimus and iliocostalis). To a lesser extent, due to the asymmetrical nature of the movement, there is also some lateral flexion (side bending) and probably some rotation involved, too.
Something important to note is that the leg hang you see our skelly perform here is based on an advanced pole dancer *thank you Colleen Jolly for being the most awesome anatomy model*. If you don’t have the same high level of mobility in spinal extension, hip extension (bottom leg), hip flexion and external rotation (top leg), your leg hang is gonna look a little different.
In lieu of mobility/strength in those positions, your torso may look ‘flatter’, your top leg less bent and/or you might find that you need to create more rotation through the spine by tilting your hips towards the pole, so they are in a more open position, rather than keeping them (roughly) square like our skelly.
That doesn’t make one way ‘wrong’ and another one ‘right’. You know me – I rarely speak in such absolutes. Our bodies are all unique and so are our leg hangs, but if you know where your strengths and weaknesses are in these key areas and want to work on achieving or exploring your leg hang positioning, my hope is this post has given you some clues about which direction to go in on your quest for the leg hang lines of your dreams!
If you like nerding about pole dance, I think you’ll love my new book Pole Anatomy – it covers over 60 different pole tricks with access to the nerdiest 3D anatomy models you’ll ever see! Come pole nerd with me!
Happy poling, pole frens!
Join my mailing list for free training advice direct to your inbox!
…including my FREE EBOOK “Grip Gainz – Grip Training for Pole Athletes” – with training drills and programming to help you achieve a vice-like pole grip.
I hate spam, too! When you join my mailing list, I’ll also notify you about new blogs and Pole PT updates that I think you might be interested in, but I’ll keep it to a minimum! You can unsubscribe at any time!