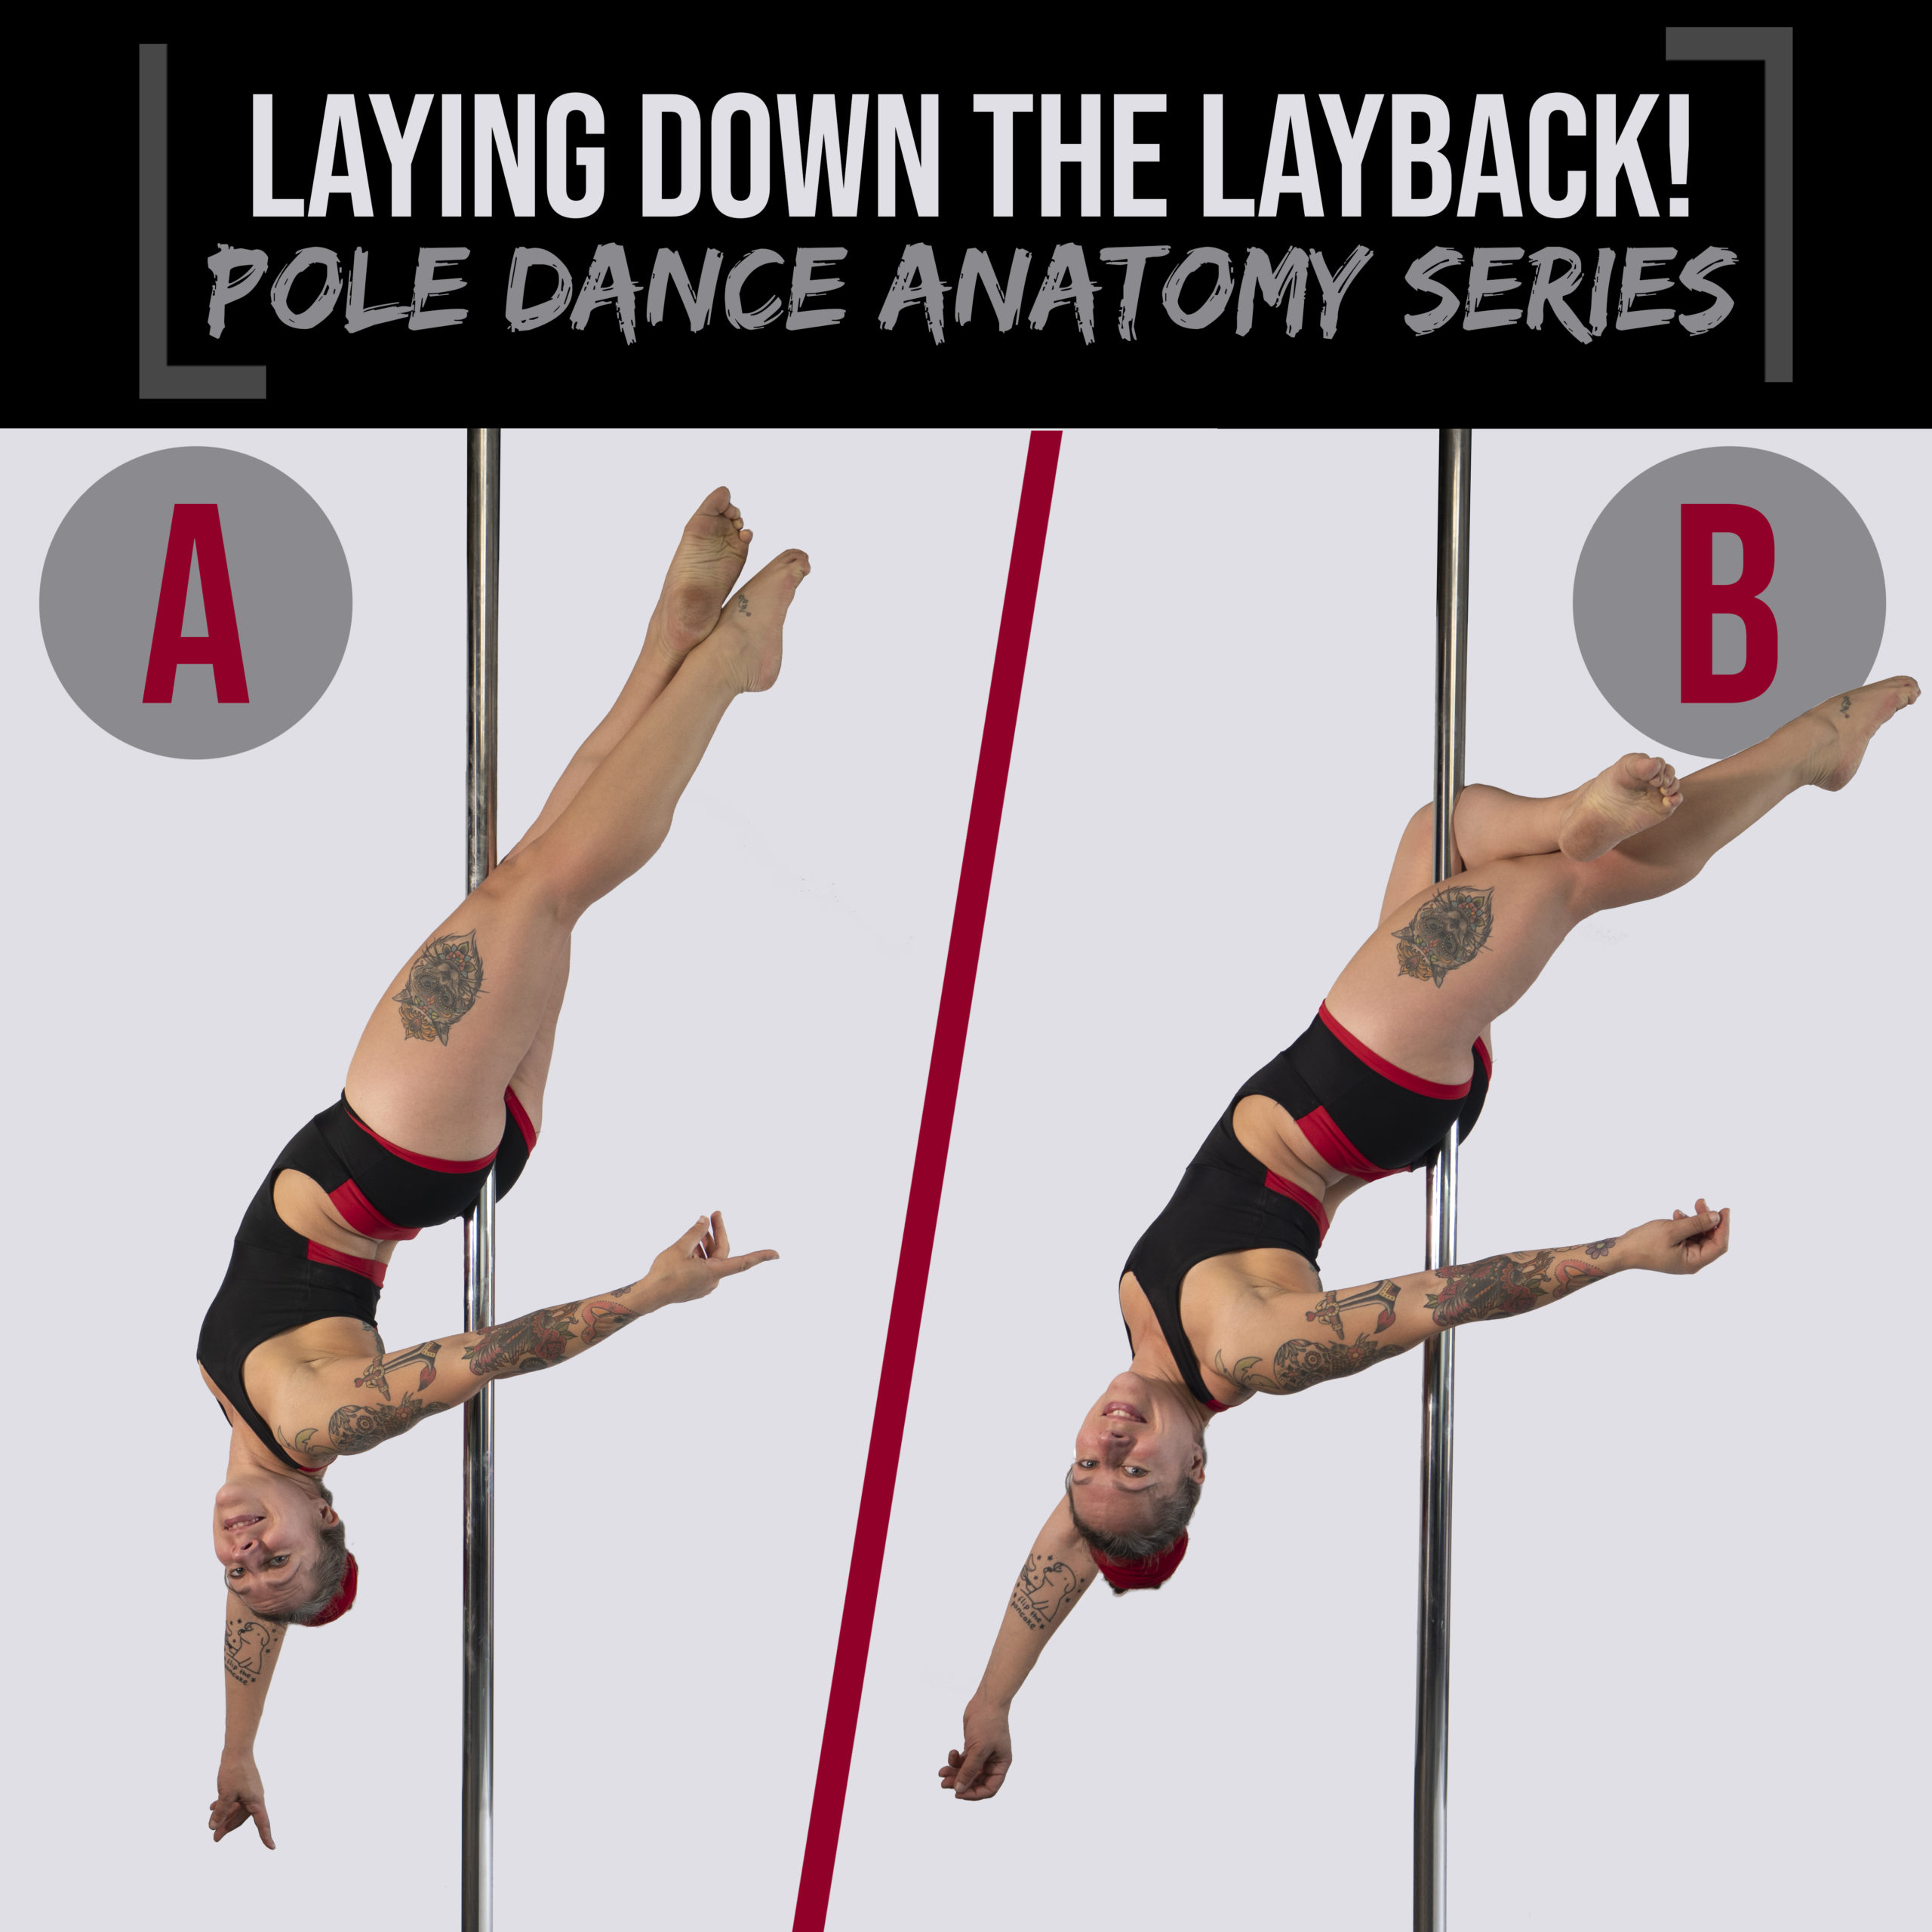
Ahhh, the layback (otherwise known as cross-knee release / cross-ankle release – and probably many, MANY other names around the world) has always fascinated me. Partly because when I first learnt it myself, it was THAT move – the one everyone else in class seemed to pick up on the first try while I stood ‘nope, nope, noping’ in the corner, legs covered in liquid chalk watching in frustration as everyone else fearlessly dangled back into this most elegant of pole moves. Hello nemesis, nice to meet you.
The layback – a beginner move?
It’s not just my own personal struggle bus with this move that makes it interesting. The layback is curious for other reasons, too. A quick Instagram poll tells me that while a lot of very sensible instructors classify laybacks as intermediate (due to the fact that if it goes wrong, it’s a difficult save), the cross-knee version is very often taught as a beginner move. Yet, I have had many advanced pole dancer clients who still really struggle with their laybacks.
Putting the obvious danger element of this move aside (good spotting, crash mats, exit strategies, core strength to lift back up out of the move… all very important considerations here!), there’s more to this simple looking move than you might think.
Of course, there is a BIG fear block to overcome with the layback. It takes a helluva lotta faith and commitment in your leg grip to tip gracefully backwards into the abyss. But, hey, that’s why it also looks so dramatic and badass – and there’s really nothing that we pole dancers love more than dramatic and badass!
So if you or your students are really struggling to nail your layback, or if you’ve ever wondered why you can do the straight leg version, but not the cross-knee version – read on! We’ll take a closer look at the anatomy of the layback, the mechanical differences between the cross-knee and the straight leg version, as well as some layback-specific exercises to help you understand and conquer this nemesis of many!
Thick thighs save lives
Chatting to people on social media, there is a recurring thigh gap debate when the topic of laybacks comes up. The general perception being that if you have chunky thighs (like me) laybacks may come easier to you than if you have a thigh gap. While there may be some truth in that – because thicker thighs = more contact with the pole, I actually think the importance of leg thickness here is a red herring.
Whether you have thick thighs or not, you’re still ultimately gonna need the same strength to grip the pole and, honestly, in my experience, I actually haven’t seen a correlation between those with thicker/thinner legs and layback success. Where I HAVE seen a correlation is in relation to hip rotation strength/mobility. Mmmmm – interesting!
I can tell you’re just itching to find out more, so let’s look at what’s actually going on with this move!
Anatomy of the layback
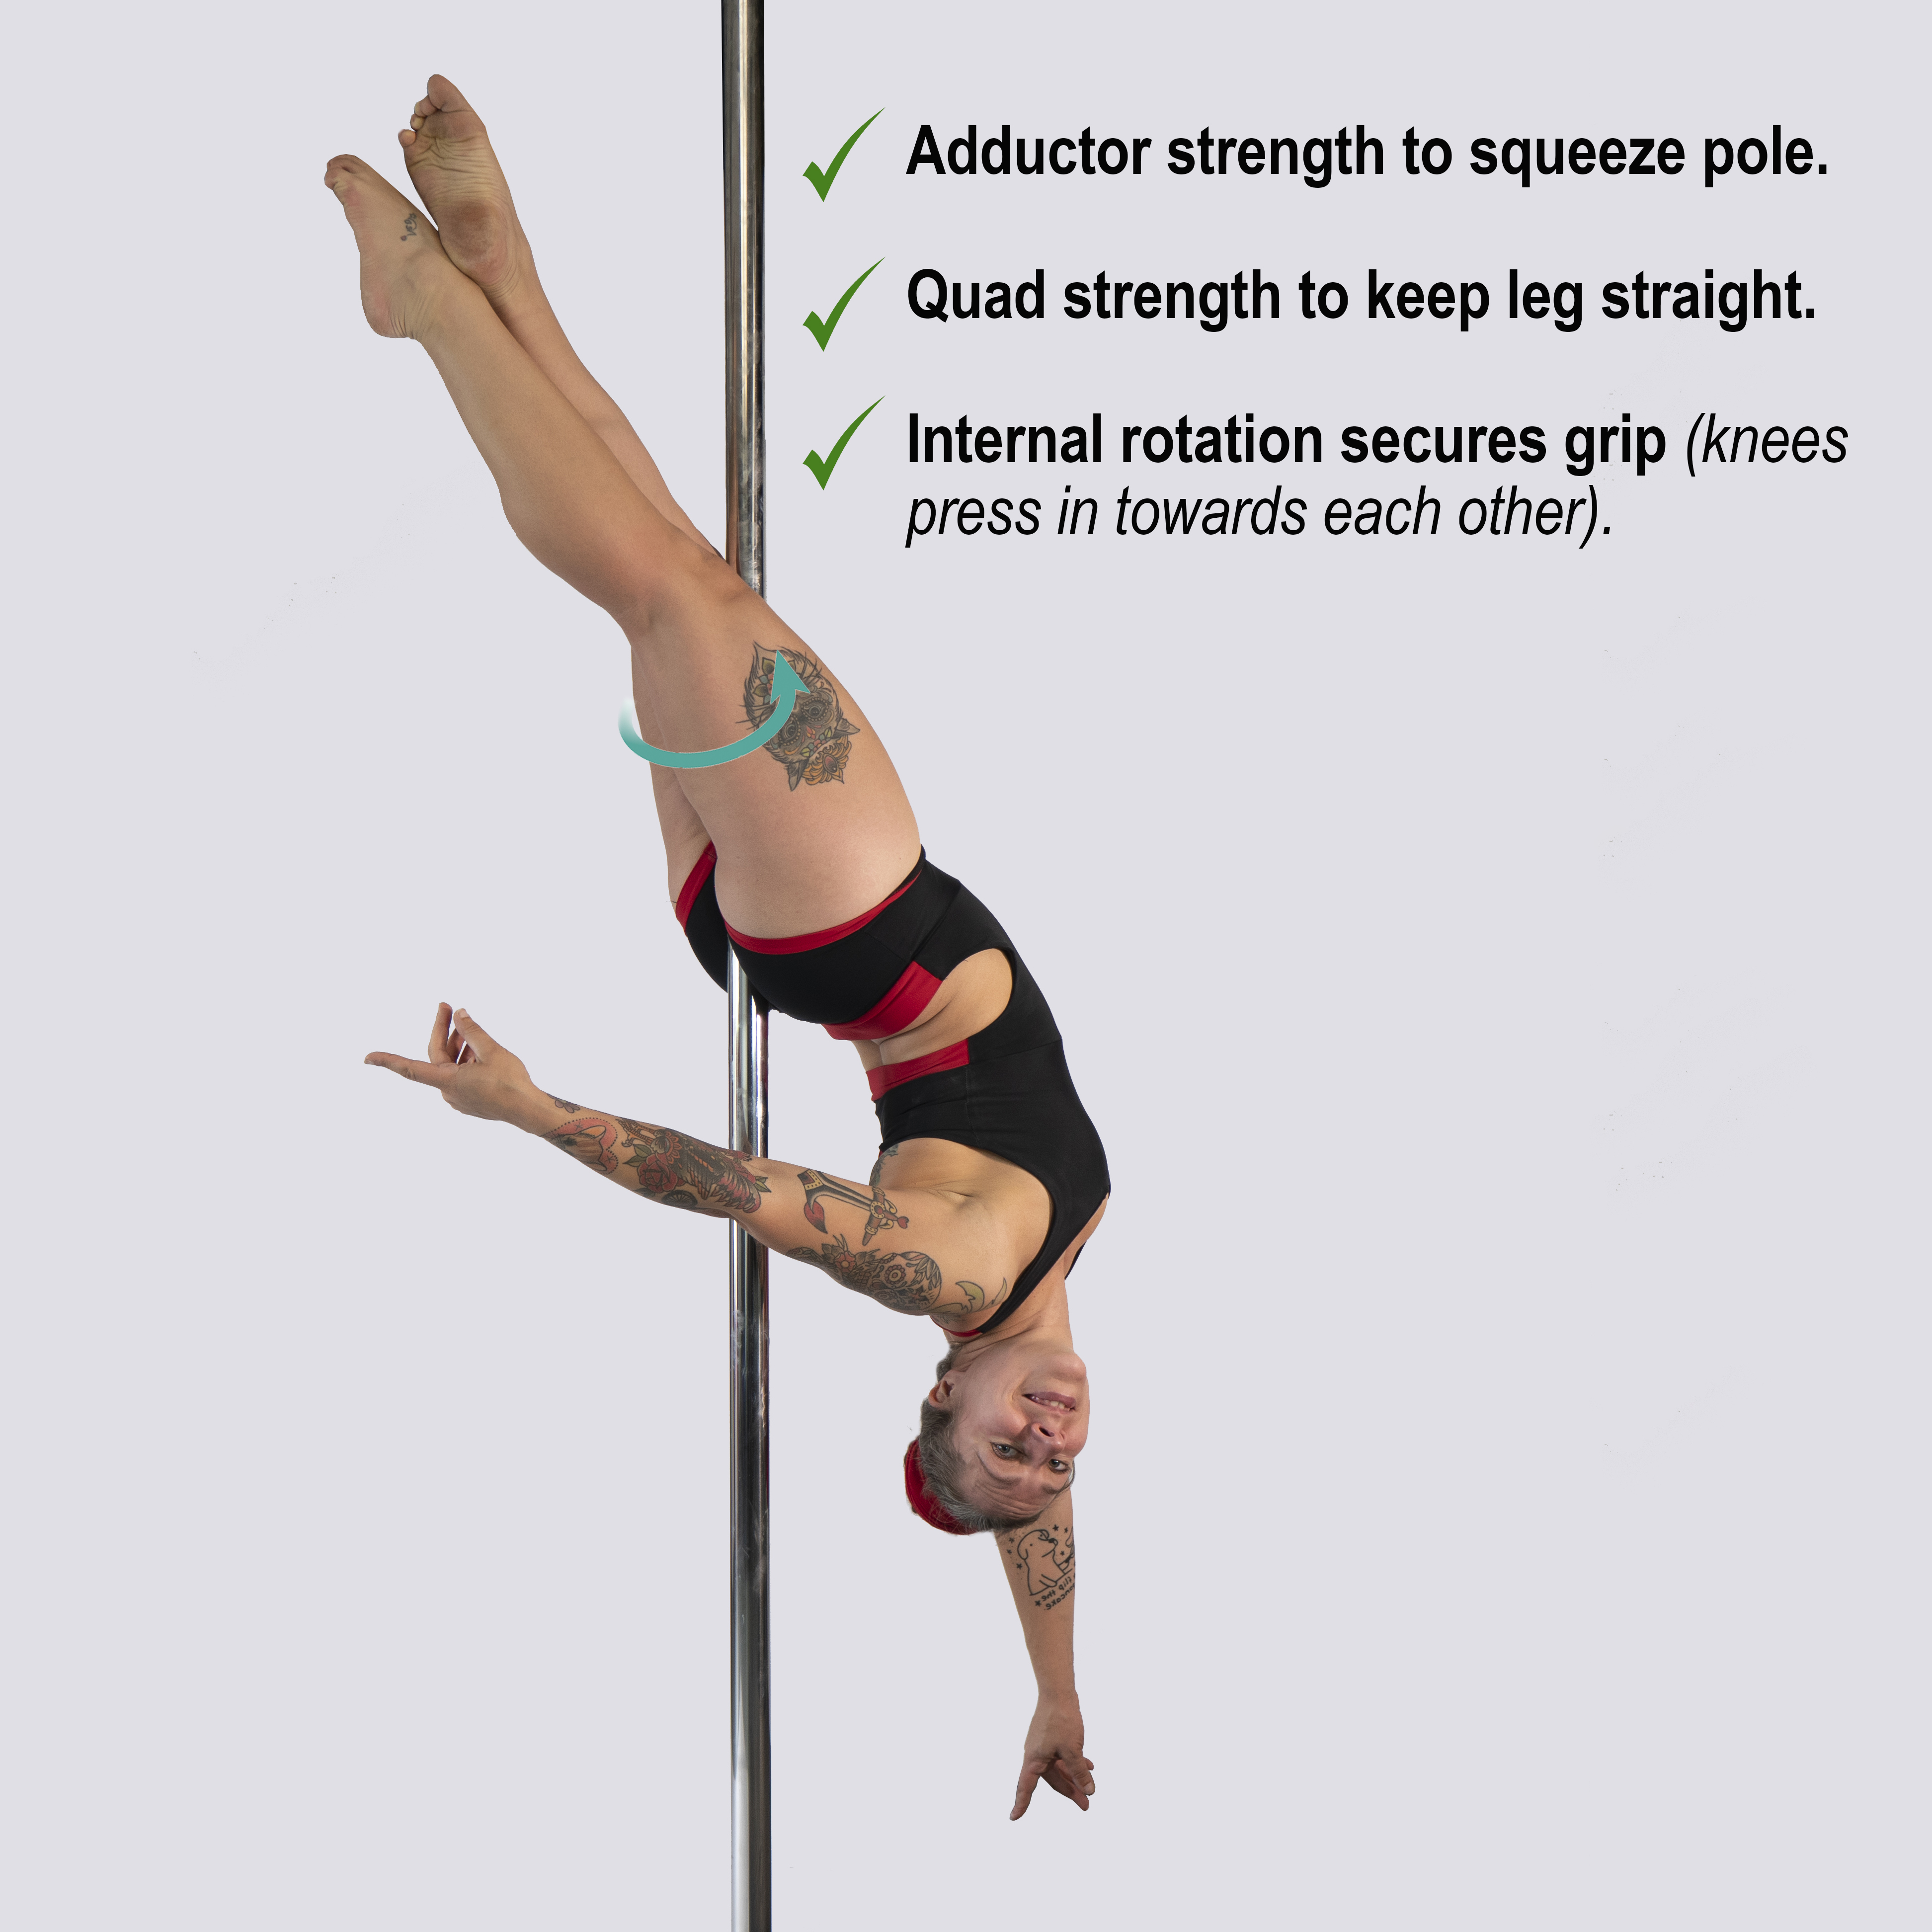
In the cross knee release, your straight leg is ‘internally rotated’ (imagine turning your knee in towards the pole) and squeezing IN to the pole using the adductor muscles of your inner thigh. Your bent leg is in an ‘externally rotated’ position (knee facing out to the side), but you are also actively, but isometrically, squeezing into internal rotation with that leg and, again, squeezing IN to the pole with your adductor muscles (pressing both legs in towards each other).
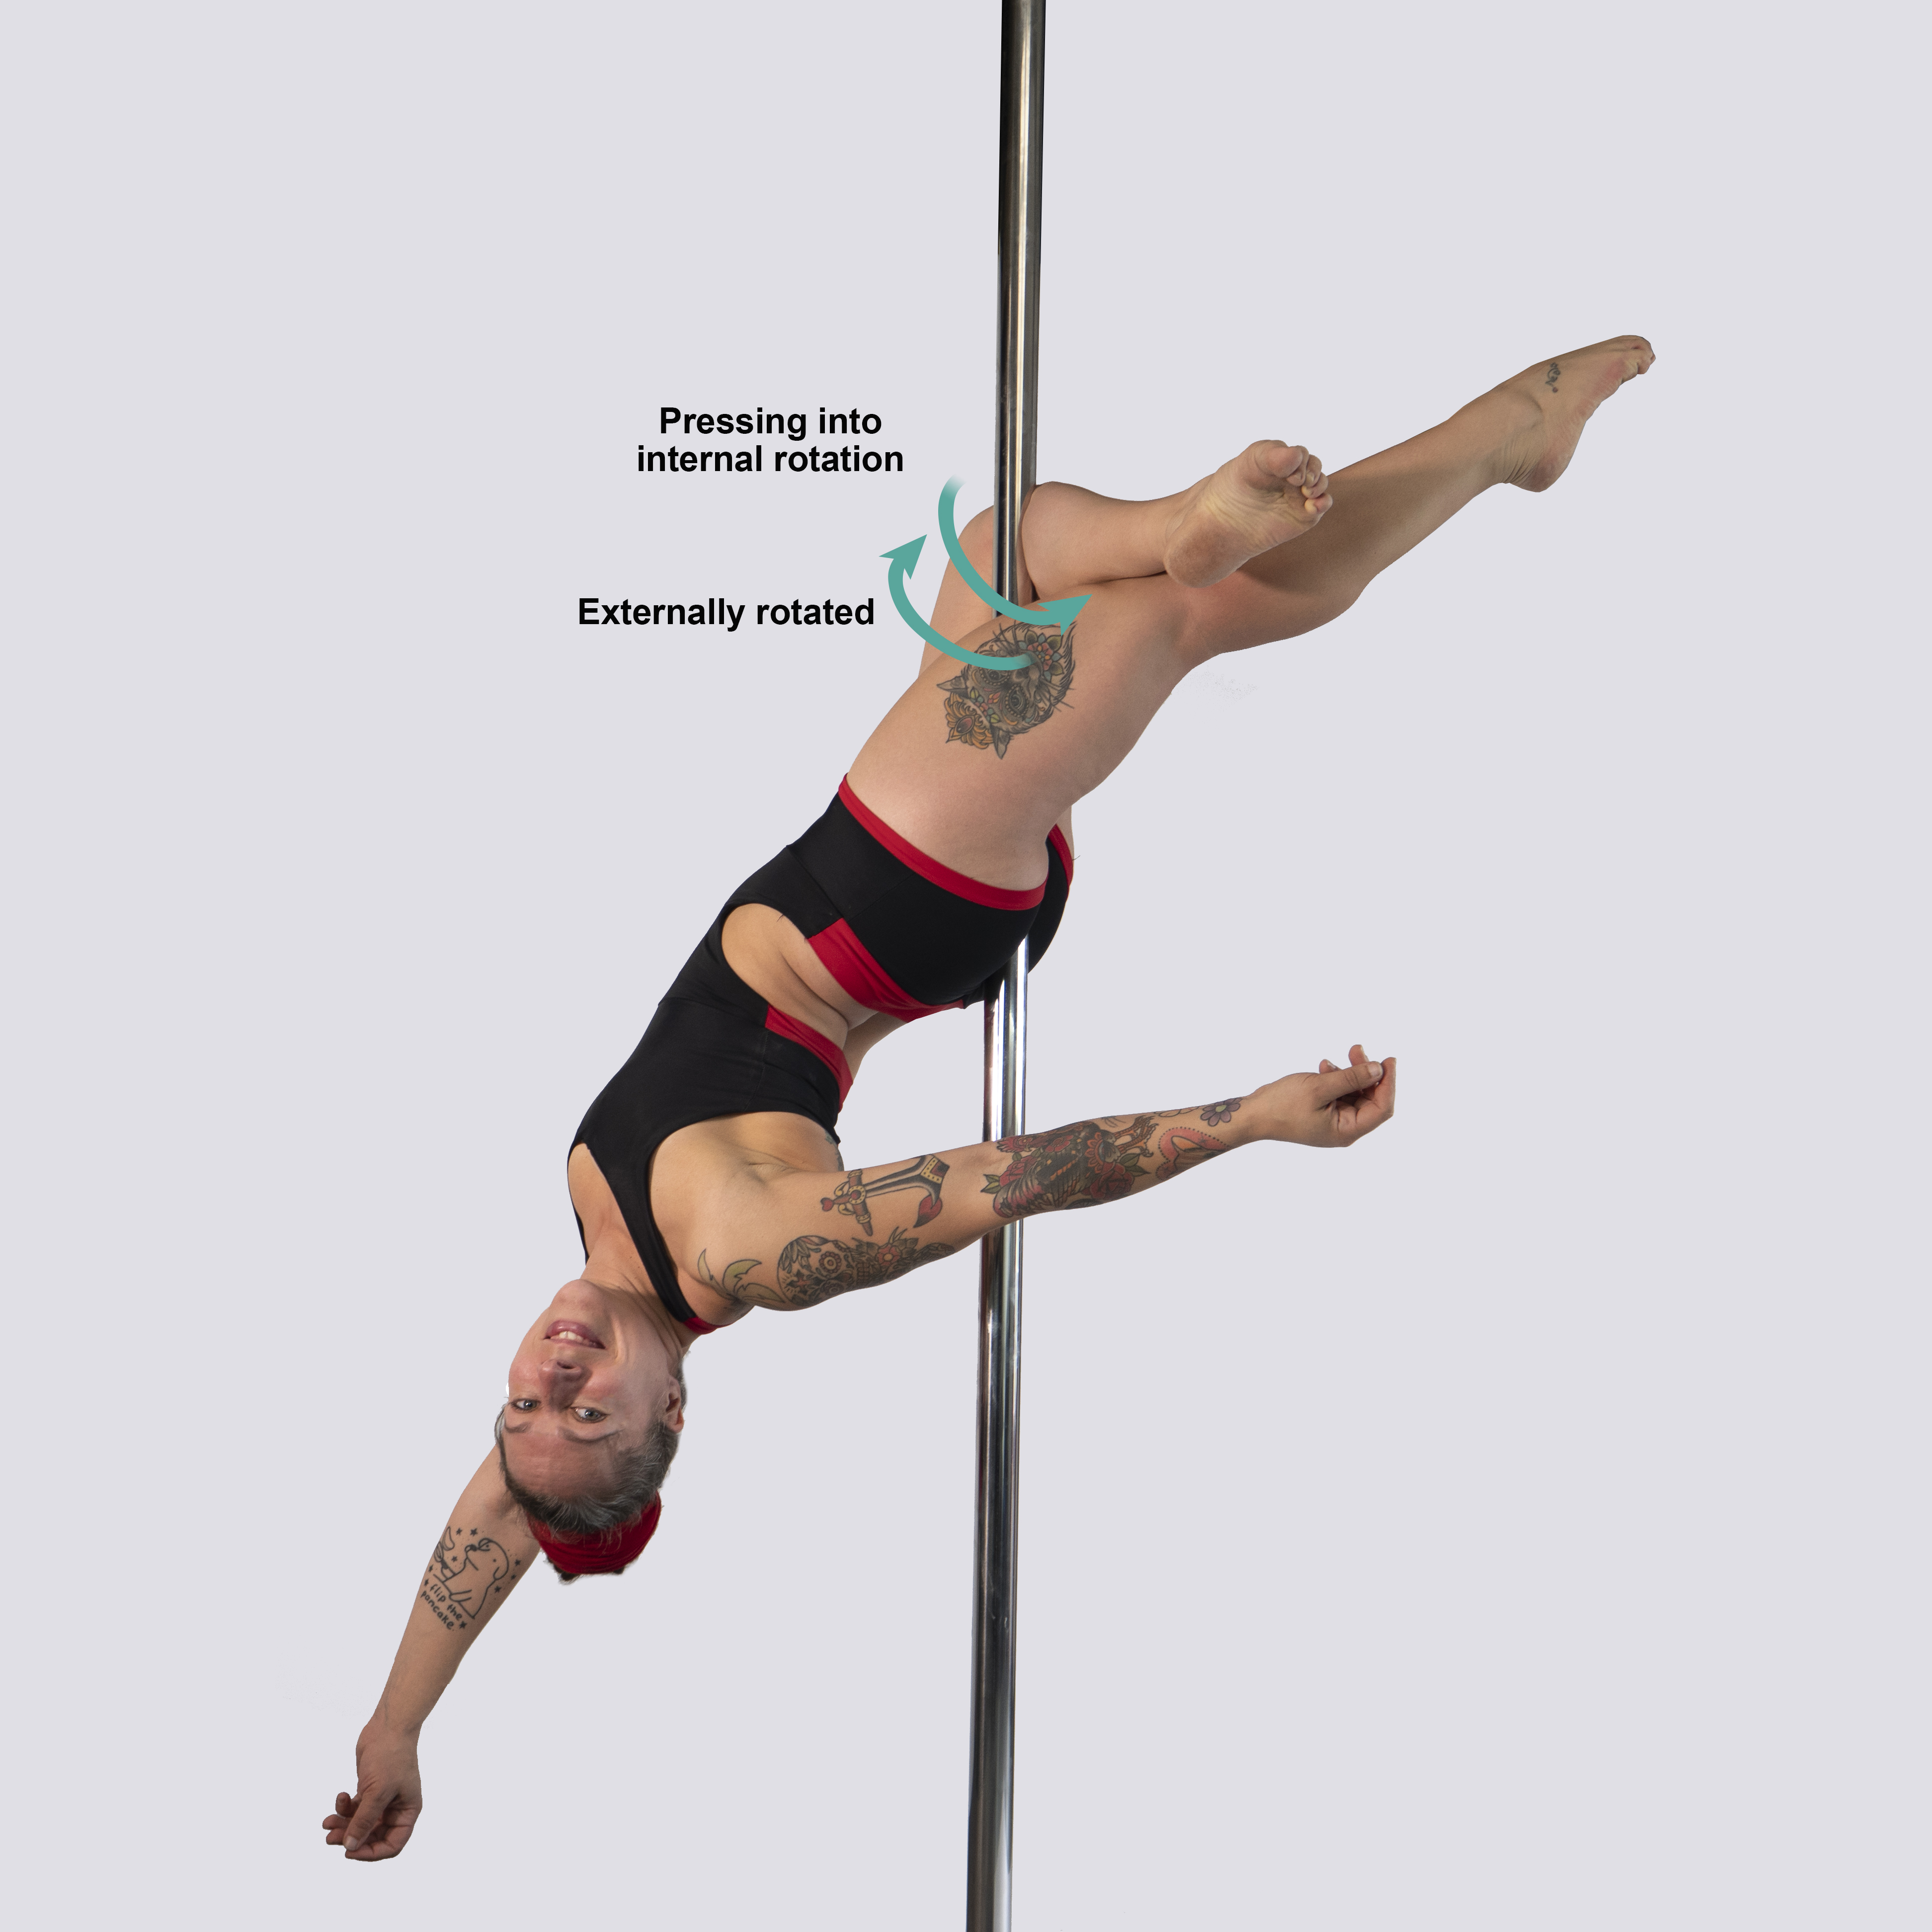
Clearly, internal rotation mobility/strength and adductor (inner thigh) strength are extremely important for the layback. But, because of the externally rotated position of the bent leg, if your external rotation mobility is limited, it can impact your ability to get into the right position and comfortably hold the pole there, too.
The straight leg version removes this external rotation element (EDIT: see my extra notes on this below!). Both my legs here are straight and pressing into internal rotation. So even though the straight leg version is usually seen as more advanced, it is slightly less complicated, anatomically speaking, because you can remove the external rotation part. With clients that find the straight leg version easier, I’ve found that their external hip rotation is usually a weak point and that working on improving that can really help them feel secure in the cross-knee version.
The ‘laying back’ part of the layback and the problem with internal rotation
We’ve established that internal rotation and adductor strength are the most important components of the layback. But, when it comes to rotation, because of the orientation of our hip rotator muscles, their primary purpose is to externally rotate – and they only really ASSIST with internal rotation.
This is important because when our legs are flexed at 90 degrees (like when we’re in a seated position on the pole), because of the direction of the muscle fibres, the ability of those hip rotator muscles to assist with internal rotation is increased. When we lay back, extend the hips and decrease that range of hip flexion, the ability of the rotator muscles to assist with internal rotation reduces.[i] One study suggests that internal rotation torque can increase by about 50% when the hip is flexed – that’s quite a decrease in rotation torque when we layback![ii]
Without going too far down the rabbit hole, what this all means is that when we are on the pole in a seated position, our internal rotation is much stronger. As we layback, the assistance from our hip rotator muscles reduces, so that in the layback position, we are relying mostly on the strength from our inner thigh adductor muscles to grip the pole.
We tend not to be FULLY extended at the hip in our laybacks – but, still – this loss of internal rotation strength might explain why we feel like we can grip perfectly fine in our pole sit, but then seem to lose our ‘lock’ on that grip as we lower ourselves down into our lay back.
[EDIT: I’m adding in an extra paragraph here to talk a little more about external rotation, because this has been brought up by some fellow pole nerds over on my Facebook page!] *Thank you fellow pole nerds!*
If (as we’ve established above) our internal rotators are not in their strongest position in the full layback and we don’t want to rely on our adductors, can engaging the legs in an EXTERNALLY rotated position, squeezing the glutes and ‘tucking’ the hips under assist with our layback grip?
I think the answer to this is ‘yes’, it totally can! It makes sense, biomechanically speaking!
We still need to squeeze the legs towards each other (adduction) to grip the pole, but if you’re going into full hip extension, increased glute activation will not only assist with that hip extension (and this is important if you are wanting to eventually take your layback into a fully extended move like a bridge), but because the grip point is now a lot closer to our crotch than our knees, externally rotating can help to ‘close’ that gap at the top of the legs and increase the muscular tension around the pole.
As I mentioned above, it’s common that we don’t move into full hip extension when performing the layback. And here’s my theory on this: if you’re keeping some amount of hip flexion and your pole grip point is therefore closer to your knees (closer to a pole sit type position), then squeezing in the direction of internal rotation is probably going to feel more secure.
But if you are moving into a fully extended hip position and the grip point is closer to your crotch (closer to a bridge layback type position) externally rotating and squeezing the glutes is probably going to feel more secure!
I’m not saying one way is right and one is wrong – I’m merely musing on the differences and why that might be! But either way, there is absolutely no doubting that hip rotation (in both internal and external directions) is a key player in this move and I absolutely encourage you to work on both aspects and explore how this feels for your unique body and your grip point preferences!
What’s important is the ability for you to engage in both internally and externally rotated positions; to be aware of and recognise the difference between how those two positions feel; and to be able to adjust between those two different grip ‘engagements’ as you adjust your body position on the pole.
Exercises for the layback
Working on hip rotation (particularly internal rotation) and adductor strength really helps to build the strength needed to feel secure in the layback position.
Exercises that combine both internal rotation and hip extension are particularly useful, however, I usually begin working on hip rotation with my clients in a hips-flexed position and then gradually progress to using that rotation in a more extended position. For example:
Internal hip rotation progression 1: Tabletop position (hips flexed)
Internal hip rotation progression 2: Side lying position (hips more extended)
Internal hip rotation progression 3: Bridge position (hips extended)
Working the adductors (the inner thigh muscles that squeeze the legs together) is also important. One my favourite exercises for this is the stability ball leg lowers below, which force you to maintain your active adductor squeeze while slowly extending the legs (not too dissimilar to the layback, hey?).
This doubles as a core exercise, too – also very important for the layback! But make sure you only go as low as you can while maintaining that core engagement and gradually increase the range of motion over time.
Last but far from least, my favourite ‘on the pole’ conditioning exercise is this layback on the stability ball. The ball should give you the support and comfort you need to condition your ‘between the thighs’ grip on the pole, without the fear of imminent death that comes from doing this move up the pole. If you feel confident in your grip here, you can start to add crunches to this too, which helps to strengthen and build confidence in your ability to lift yourself up out of the layback once you’re in it!
Happy laybacking!
As always, just ask if you have any questions at all. If you’d like to geek out more with me on the sports science of pole dance, check out my book – Strength and Conditioning for Pole – which is available now in hard copy or eBook.
Happy laybacking!
References
[i] Kinesiology of the Hip: A Focus on Muscular Actions, Donald A. Neumann, Journal of Orthopaedic & Sports Physical Therapy 2010 40:2, 82-94.
[ii] Comparison of isokinetic internal and external hip rotation torques using different testing positions, Lindsay DM, Maitland M, Lowe RC, Kane TJ, J Orthop Sports Phys Ther. 1992;16(1):43-50; The impact of sagittal plane hip position on isometric force of hip external rotator and internal rotator muscles in healthy young adults, Int J Sports Phys Ther, Hoglund LT, Wong AL, Rickards C, 2014 Feb;9(1):58-67.
Join my mailing list for free training advice direct to your inbox!
…including my FREE EBOOK “Grip Gainz – Grip Training for Pole Athletes” – with training drills and programming to help you achieve a vice-like pole grip.
I hate spam, too! When you join my mailing list, I’ll also notify you about new blogs and Pole PT updates that I think you might be interested in, but I’ll keep it to a minimum! You can unsubscribe at any time!

Thank you so, so much!! I read it and thought, its exactly me! And I am also practising since 10 years and the layback is still a mystery to me. And seemed, up to today ONLY fir me????. So thank you so much for the very interesting article! I love your work and workouts!
Thank you so much! I’m so happy you found it useful. ❤❤❤
This was a really interesting read!! My pole studio teaches laybacks pretty early in the curriculum, but they teach it with your foot hooking the pole rather than off the pole like you do it. That foot hook helps make the move more secure, but now I’m wondering if that’s not the “right” way??
Thank you! ???? Ooo that’s an interesting one, I’ve never come across it taught that way before, but hey – it’s pole, we’re always creating new shapes and variations of shapes, so I don’t think there is ever really a strict ‘right’ and ‘wrong’ at all. Actually, from your description, I wonder if what you’re describing is what I’d call a Stargazer. ???? In which case, I’d consider that an entirely different move altogether. ????