Handstand training is AWESOME for pole dancers.
Firstly, handstands help to develop body awareness, core strength, balance and control—some of the main attributes of a sh*t-hot pole dancer.
Secondly, because handstands are essentially an overhead pushing exercise, they are a great counter-movement for balancing out the amount of overhead pulling we do in all those pole spins.
Buuuut whenever I mention handstands, the same thing always comes up – wrist pain!
Why you gotta hurt, wrists?
Unfortunately, wrist pain is really common, especially for those just starting to work on their handstands.
It’s not surprising, really. We’ve been living our entire lives with our ‘head up top’ and ‘feet down bottom’ since we took those first tentative steps towards the encouraging open arms and excited gestures of our mum/dad/nanny/other care-givers are available at about 12 months old. When we suddenly decide (at age 35, in my case) that #lifeisbetterupsidedown and flip that—literally—on its head, putting our entire bodyweight on our poor unsuspecting hands, it can be a bit of a shocker for our wrists, which are nowhere near as sturdy and robust as our ankles.
While it’s normal to feel achy and maybe even a slight discomfort when first training handstands, pain is your body’s way of warning you that something isn’t right. So don’t just ‘work through it’!
Wrist injuries are particularly pesky for pole dancers; not only will an injury mess up your handstand practice, but it will put a major spanner in your pole progress too. <<< AND THAT will be a major bummer!
So here are 3 of the main reasons you might be experiencing handstand wrist pain, along with some tips for avoiding injury.
Before we get started, it goes without saying (but I’ll say it anyway), that if have a wrist injury already, or if you are having acute or nagging pain or numbness in the wrists which might indicate an injury—orrr if you have any wrist injuries from the past—you should seek proper medical advice from a doctor or physio!
Wrist pain reason #1 – Your wrist mobility sucks
In a handstand, your wrist will be loaded at around a 90 degree angle.
If you cannot flex and extend your wrist through a decent range of motion without excess force then it’s probably not a good idea to start weight bearing on it.
If you attempt to hold your entire body weight at that 90 degree angle when your wrist joint cannot naturally reach that position, you are basically forcing the joint into a position it probably isn’t ready for.
To test your own wrist mobility, just see if you can flex and extend your wrist into the positions I am holding in this picture.
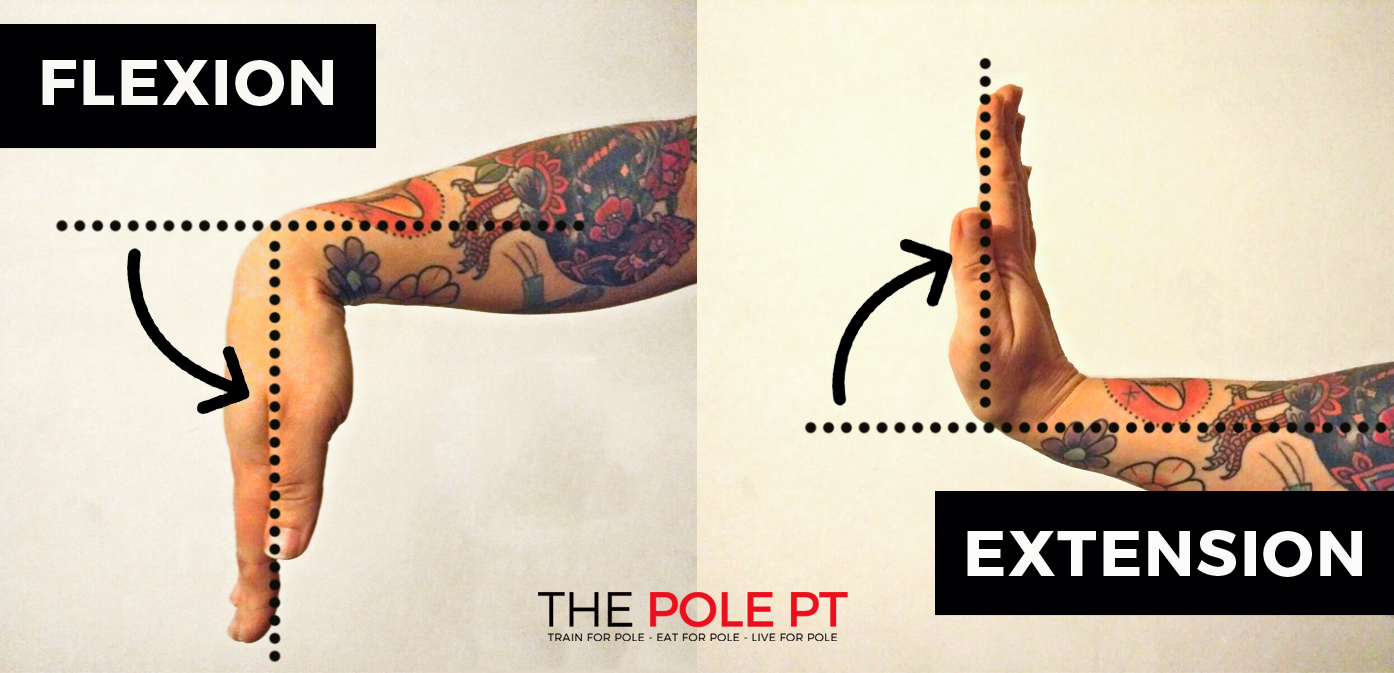
If you can’t, then spend some time working on your wrist mobility. You can use the exercises listed in the ‘warm up’ section below. Done consistently over time, they can help to improve your wrist mobility and reduce the risk of injury when you are ready to weight-bear on your hands.
Wrist pain reason #2 – You aren’t warming up properly
We all know that warming up before exercise is crucial to avoid injury, right? But so many people don’t pay enough attention to warming up their wrists properly before jumping into their handstand training.
Below are 5 of my favourite wrist warm up drills. You’ll find tonnes more wrist prep exercises online, too.
I do these after a general warm up as part of my workout-specific mobilisation drills… 10 repetitions of each one a couple of times through…
Wrist pain reason #3 – You’re doing too much, too soon
It’s true that if you want to get better at handstands, you have to spend more time on your hands, but there is a right and a wrong way to go about this.
Unless you already spend a lot of time with your hands on the floor, your wrists are simply not used to weight bearing. The muscles, ligaments and tendons of the wrists need to gradually get used to that extra load through incremental strength training.
Connective tissues (the ligaments and tendons) take much longer to adapt to training demands than muscles, so you will need to be patient.
Progression, not perfection
Build up the strength in your wrists slowly by following a series of gradual progressions – this might even mean starting with simple plank holds and press ups, if you’re not used to having your hands on the floor in this position.
There are a million different handstand progressions out there and everyone has a different starting point, but, if your wrists are happy with simple plank holds and press ups, here are some of my favourite exercises to help you gradually get used to taking more of your body weight onto your hands, but without committing to a full handstand.
Crow pose progressions
L-handstand against wall or pole
Start with 3 x 5-10 second holds and build up the time gradually, week by week. If you don’t have a pole, you can do this with your feet on the wall instead.
Swiss ball pike lifts
This exercise is great preparation for handstand deadlifts, too. You don’t need to bring the hips as high as I am doing in this video at first – you can incrementally increase the amount of weight you are putting into your hands by lifting the hips higher and higher each week. Try 3 sets of 5 reps.
Build up ‘time spent on hands’
Don’t rush. If you go from zero time on your hands to trying to hold your bodyweight for 60 second intervals, for example, you’re more likely to run into problems.
Take your time to condition and strengthen the wrists and hands first, starting with a very low training volume – maybe just 3 x 10 second holds to start with – and gradually increase the amount of time you spend on your hands over weeks and months.
Whilst you are building up that endurance, there are plenty of other exercises to progress your handstands and mix up your handstand training so that you aren’t spending TOO much time on your hands – including hollowbody hold progressions and shoulder mobility drills.
Parallettes
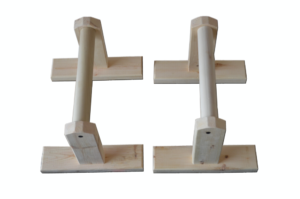 Finally, a pair of low parallettes are a great tool if you struggle with wrist issues in your handstands. They basically put the wrists in a more neutral position by taking away that 90 degree angle.
Including parallette handstands in your handstand training programme will allow you to spend more time upside down so you can practice the other elements of your handstand without overtraining the wrists.
Like anything worth doing properly, handstands take time to master. HAVE PATIENCE and give your body the time it needs to get with the programme!
Happy handstanding! 🙂 And please, please look after your wrists!
Remember, I am a strength coach, not a physio! If you have a wrist injury or even an old injury from the past, orrrr if you are having acute or nagging pain or numbness in the wrists —you should seek proper medical advice from a doctor or physio before trying any of the recommendations in this blog!
Wanna nerd a bit more about strength and conditioning for pole dance? Hell yeah you do! Check out my book Strength and Conditioning for Pole – available now in ebook or paperback!
Join my mailing list for free training advice direct to your inbox!
…including my FREE EBOOK “Grip Gainz – Grip Training for Pole Athletes” – with training drills and programming to help you achieve a vice-like pole grip.
I hate spam, too! When you join my mailing list, I’ll also notify you about new blogs and Pole PT updates that I think you might be interested in, but I’ll keep it to a minimum! You can unsubscribe at any time!
Love this very helpfull Neo x
Ah, thank you Jayne 🙂 Glad it was useful! x
Loads of information for building strength for handstands, thank you????????????????
Thanks Diane, glad it was useful! 🙂
I’m so happy I found this post! Huge help for helping me get inverted. I find that when I try to get into the L shape while using the wall, my hips are nowhere near being over my shoulders. As soon as I bring my hips forward to be over my shoulders, my wrists start to get more into a 90 degree angle and hurt like hell. I’ll start using your wrist exercises and see where this takes me before I cause injury. Thank you so much!
Thank you so much, I’m so happy it helped! ❤