This beast of a topic has been brewing in my dreams for a while now. My research for this post kinda spiralled outta control, ending with me consulting physios, and creating slo-mo biomechanical analysis of all the different handspring grip positions… So… yeah… I kinda geeked out a bit back there.
But here it is! Everything you wanted to know – and even more you probably didn’t – about the difference between cup, twisted and split/true grip – which one is ‘best’/safest/easiest and how you can give your shoulders and upper body strength a head-start in all of them!
Very quickly, before we get into the good stuff…
We pole dancers just LOVE to over-complicate the names of moves (seriously, don’t even get me started on the inside/outside leg, Scorpio vs Gemini debate), so just so we’re clear about this…
For the purposes of this post, when I say ‘Ayesha’, I mean the end position (inverted straddle), and by ‘handspring’ I’m talking about the dynamic movement to get up into the Ayesha position straight from the floor.
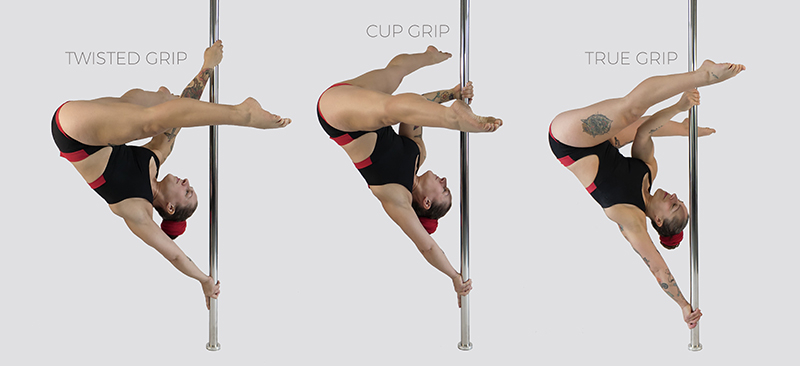
Here are the grips I’m referring to throughout this post:
We good? Good!
Now, onto the fun stuff!
Ayeshas, handsprings, Iron X and handspring deadlifts… these are the kind of pole goals that every pole dancer dreams of.
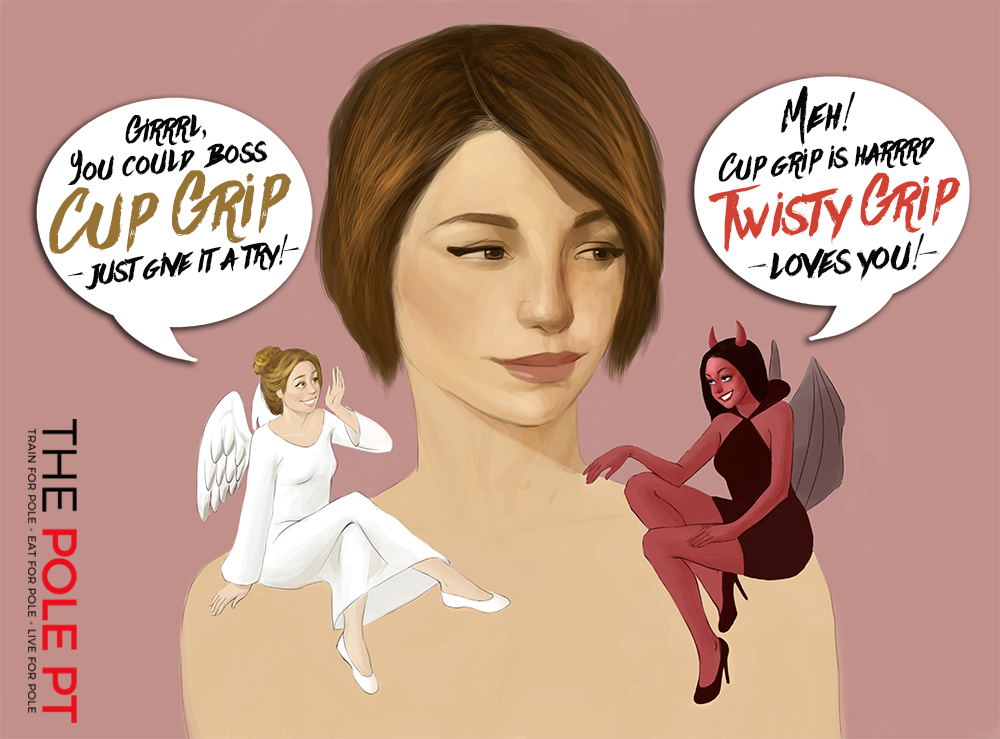
I’ve worked with loads of pole dancers on these exact goals in my personalised programmes with great success, but one thing has held me back from launching ‘pre-set’ programmes for these kind of moves: the bad rep of twisted grip!
Research into the biomechanics and injury risks of pole dance is still only just starting to emerge from the scientific community, but after Sarah Scott’s awesome analogy (pitting Twisted Grip as the chocolate cake of pole dance) went ‘pole community viral’, there definitely seems to be a wider awareness now within the pole world that ‘twisted grip is baaad mkay’.
TWISTED GRIP: THE ELEPHANT IN THE ROOM
When I started teaching pole, I chose not to teach twisted grip to my in-person pole students and even though most of my online clients favour twisted grip, I strongly encourage them to learn true and cup grip and support them through the process of starting to incorporate more of these grip variations in their training, too.
The problem is, I’ve always felt a little uncomfortable about my unease with twisted grip. As a strength coach, my aim in life is make my clients stronger; to ‘do no harm’ and to make them as robust and injury proof as possible – hence my approaching twisted grip with caution.
BUT, ultimately, my main goal must always be to prepare my clients for the demands of their sport. If that sport includes twisted grip, am I really doing them more of a disservice by avoiding it?
As a strength coach, it isn’t my job to dictate the demands of the sport that my clients choose to do. If I were coaching a tennis player, I wouldn’t be forcing them to use their non-dominant hand for serving. I wouldn’t be telling them that diving for a ball that’s heading for the baseline should be avoided because it’s risky for their shoulders.
Instead, I would be helping them to balance out that unilateral movement they do with off-the-court conditioning. I would be helping them to build the strength and stability in their shoulders that will enable them to perform the extreme movement patterns they need to excel at their sport. To me, pole is no different.
As long as pole remains a performance sport and an art – by which I essentially mean it is visually ‘entertaining’ in the same way as ice skating, dance and circus – whether you are performing on stage, competing, or just plain filming tricks and combos for your Insta account – pole dancers will always look for moves that give the illusion of floating and make an audience WOW. Part of the magic of that is making difficult moves look effortless. If that means utilising a physically less tiring grip position, you can betcha that people will do it, especially if they can’t manage the alternative.
Twisted grip is the elephant in the room. Even if we keep looking away, unfortunately that big ol’ efalump ain’t going anywhere.
My duty as a strength coach is to ensure my clients are building strength in the positions they need to be strong in to do the activity that they love. Right now, that activity includes twisted grip.
So you see my dilemma, right?
Any hoo, this train of thought led me down the rabbit hole that is this blog post. I decided to finally grab that elephant by his unwieldy trunk and look him square in the eye.
And here it is – my one-woman mission to explain exactly why twisted grip has such a bad rep, to debunk some twisted grip myths, and to compare the biomechanics of the handspring/Ayesha in all three grips, so pole dancers can understand exactly what they are getting themselves into.
I’m going to show you why cup grip is a harder, but more shoulder-friendly grip choice. Then we’ll look a little closer at how we can properly prepare our shoulders for handsprings and how we can approach our training to reduce risk to our shoulders (whichever grip you choose to use).
PART 1: THE BIOMECHANICS OF TWISTED GRIP
Let’s geek out a little bit (just a little) on the biomechanics involved in a twisted grip handspring.
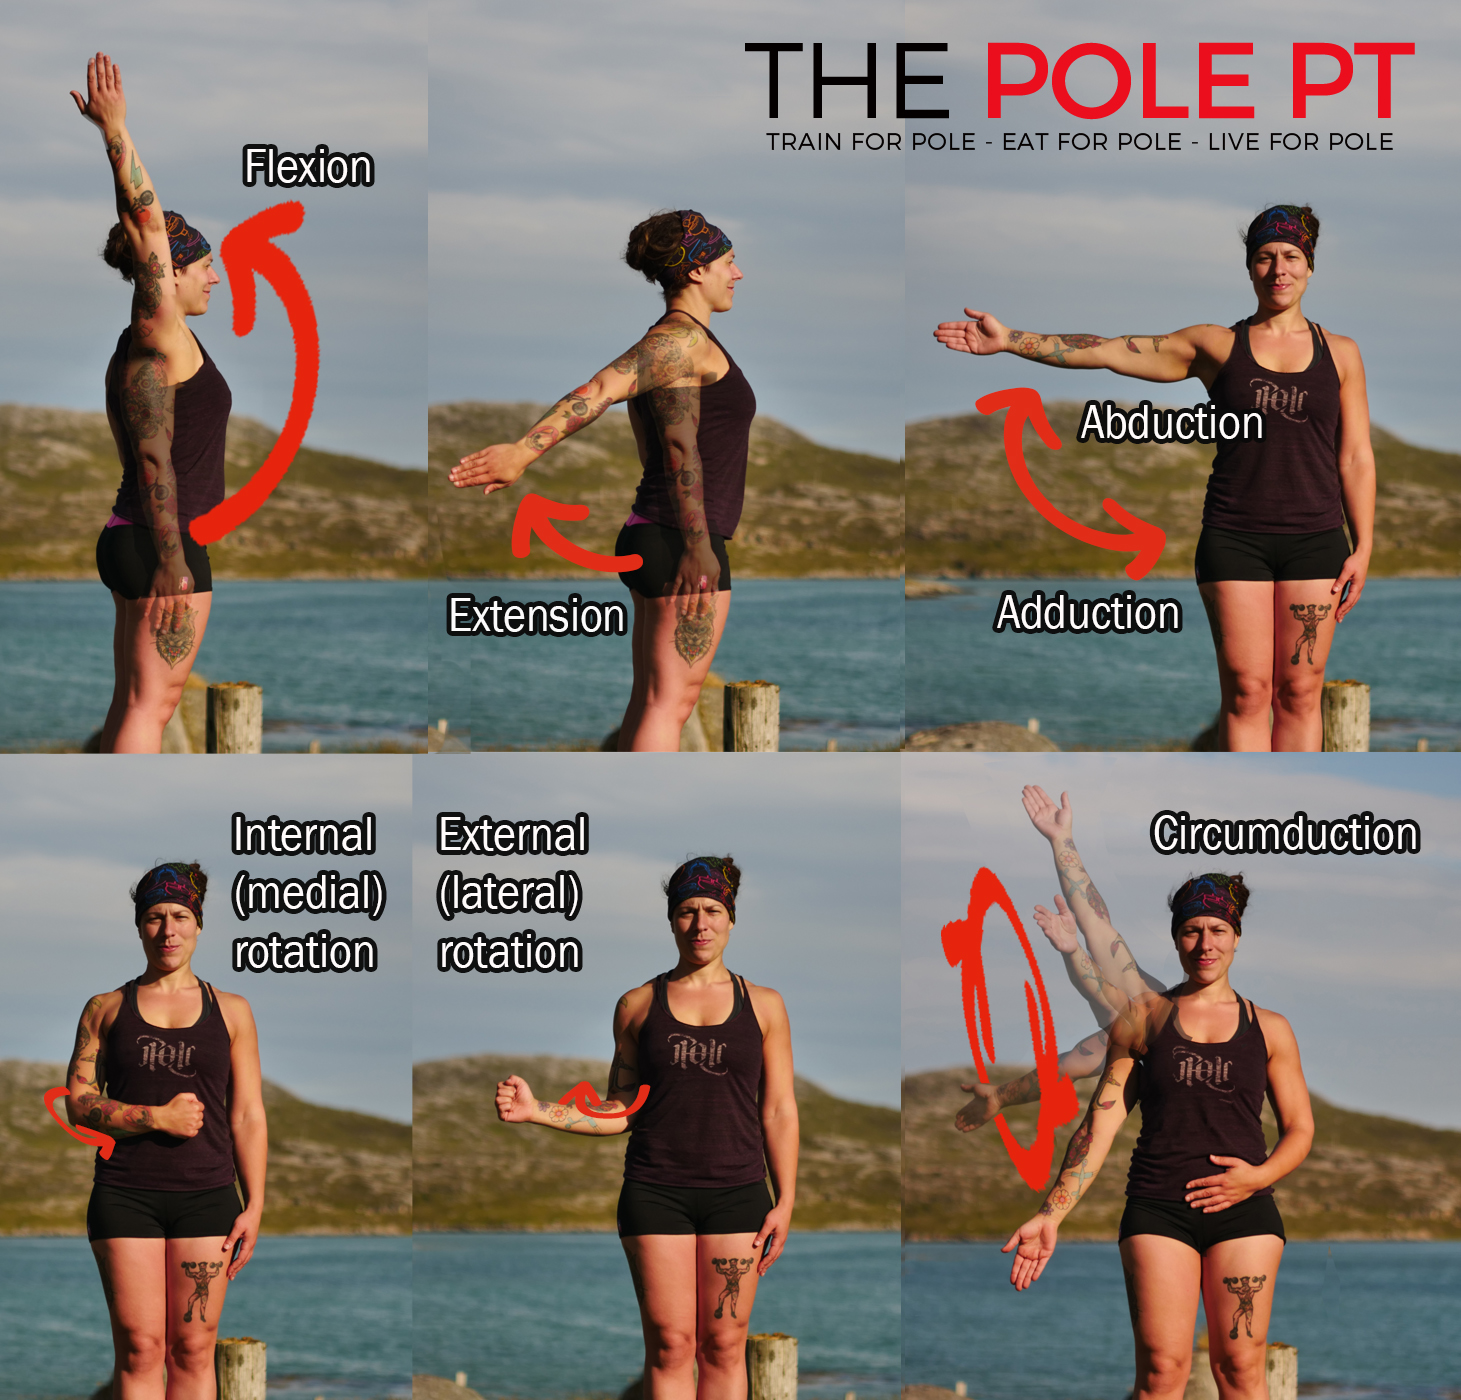
Remember that our shoulders are freakin’ AMAZING! They are the most mobile joints in the human body. We can move our arms in pretty much any crazy direction we choose…
There are two main reasons why twisty grip handsprings are considered ‘risky’ for the shoulders.
-
THE TOP ARM AND ALL THAT INTERNAL ROTATION
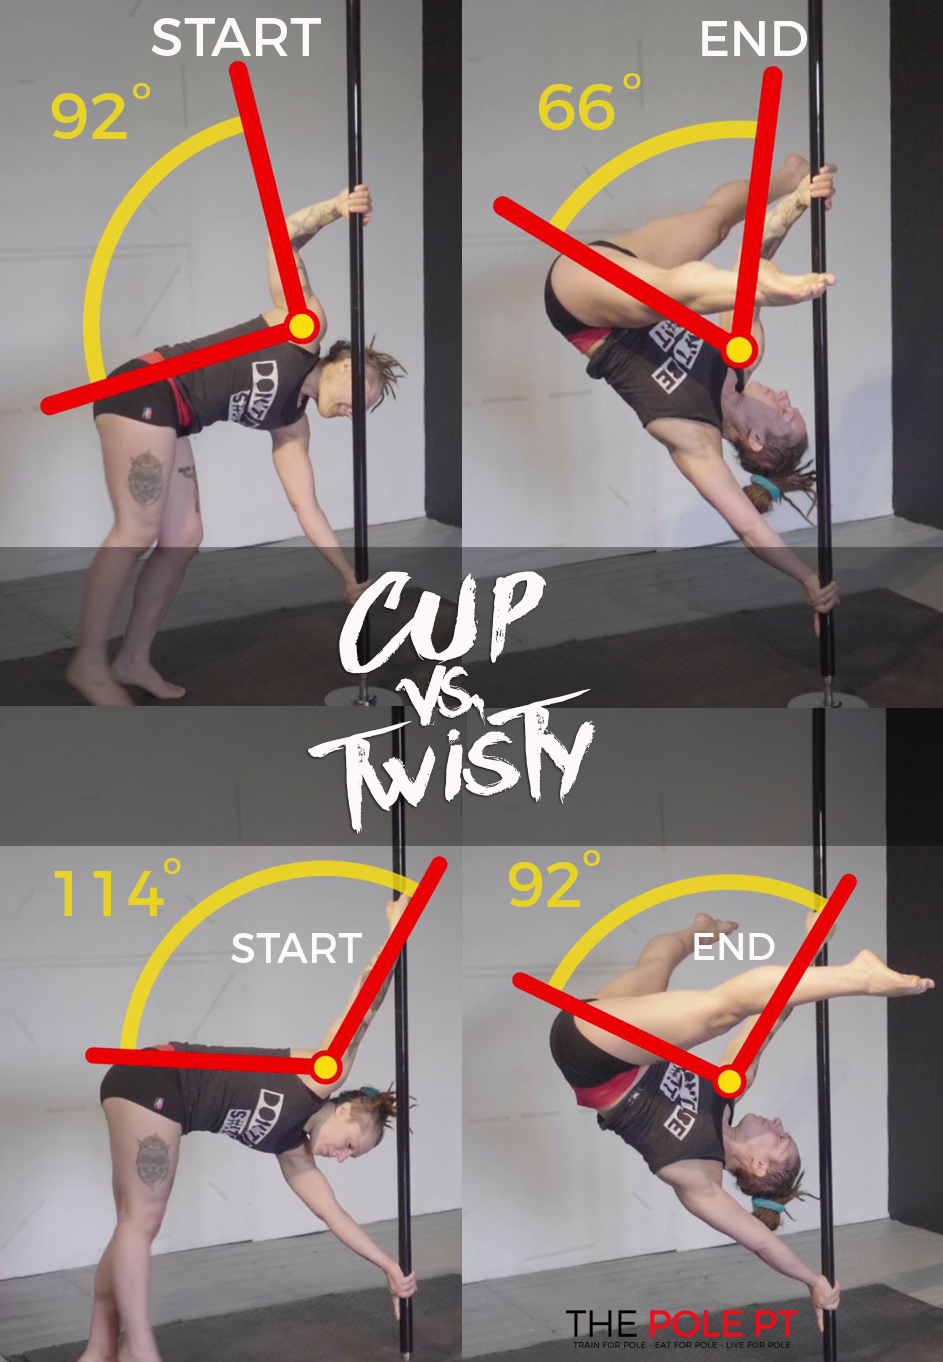
Take a look at the slow mo handspring below – I’ve highlighted the top arm movement so we can focus on what is actually happening with that arm throughout the movement. We’ll come back to the bottom arm shortly!
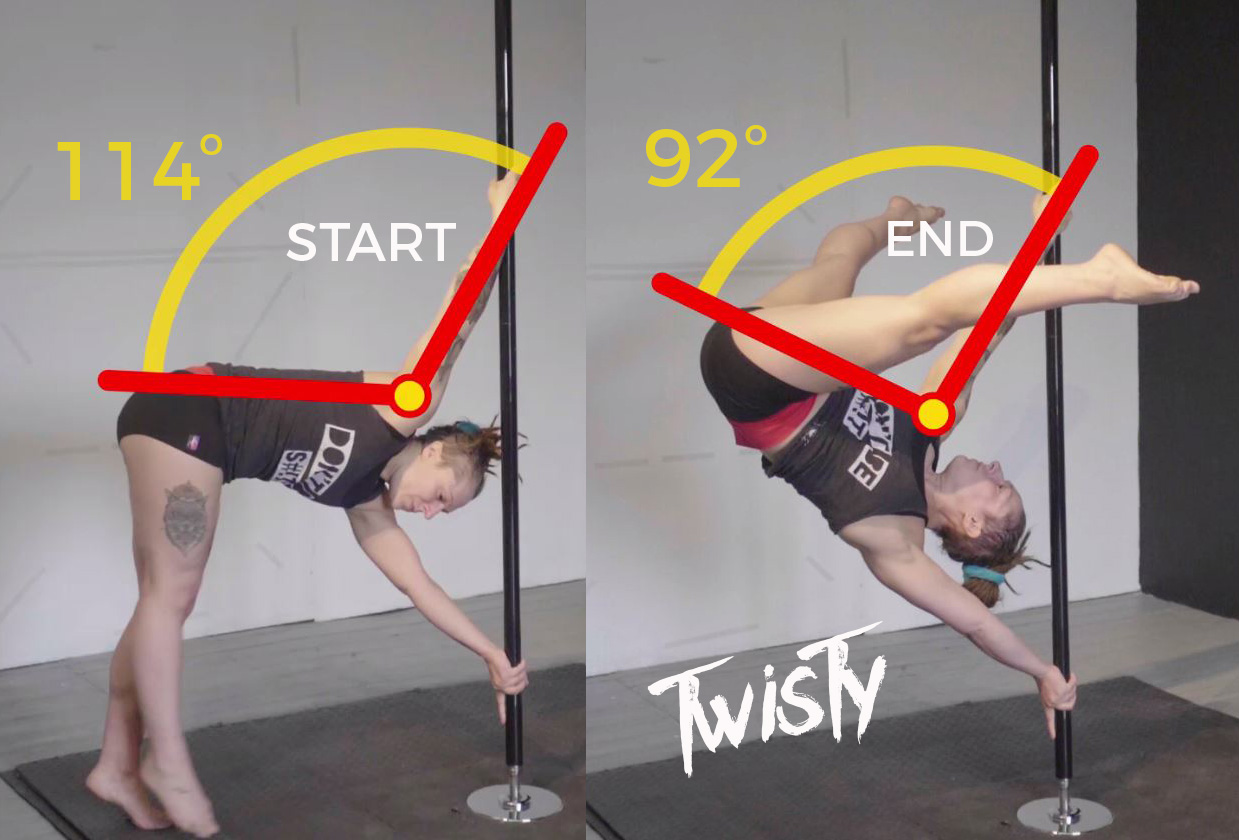
Notice a few things that are going on with my top arm in that video:
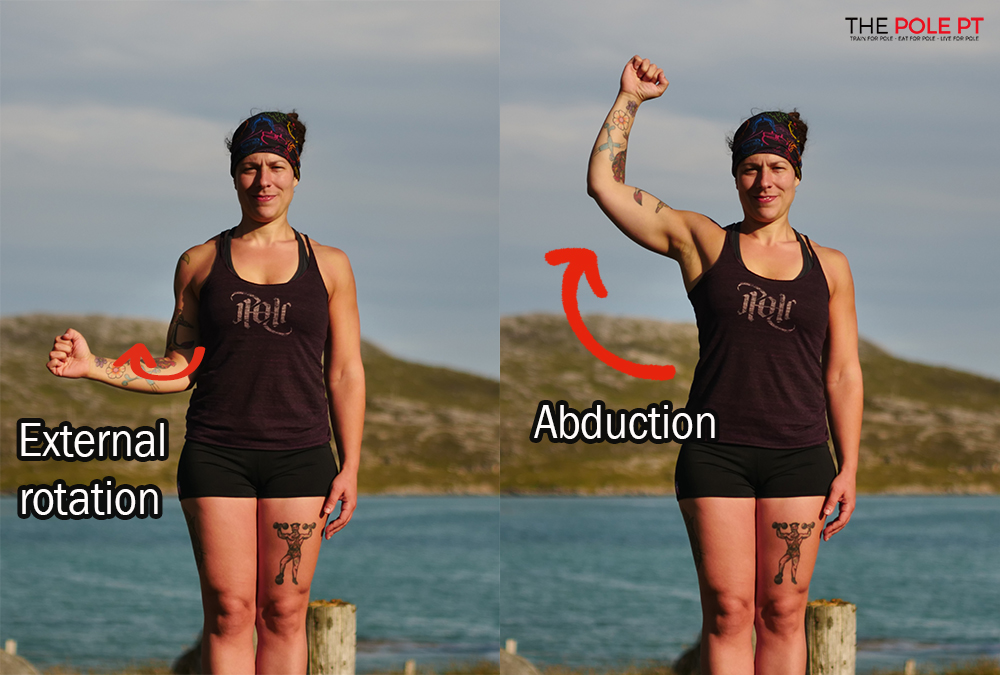
- It starts in a slightly extended (i.e. arm slightly behind me) adbucted (i.e. arm out to the side) position at about a 114 degree angle from my torso and internally rotated (more on that in a sec).
- It ends roughly in front of my body, at about a 92 degree angle to my torso, still in that internally rotated position.
- It remains straight and internally rotated throughout the whole movement.
Essentially, from a biomechanical point of view, we are taking the top shoulder through circumduction (a combination of flexion, extension, abduction and adduction), all in an internally rotated position.
It is this internal rotation that puts the ‘twisty’ in ‘twisted grip. But what does ‘internal rotation’ actually mean and why is it such a bad thing?
First, let’s do a little experiment so that you can feel and understand the difference between internal v external rotation…
Bring your arm into the externally rotated position I’m demonstrating in the first image below – so your elbow is tucked into the side of your body and your hand is rotated out to the side. Now, maintaining that position with the elbow and shoulder, bring the arm out to the side and start to raise it over head towards your ear like I’m doing in the second image…
Now do the same thing again, but this time, bring the arm into the internally rotation – so your hand is rotated inwards, towards your tummy, as per my demo in the first image below. Again, maintaining that elbow and shoulder position, try to do the same movement you just did – bring the arm out to the side and towards your ear.
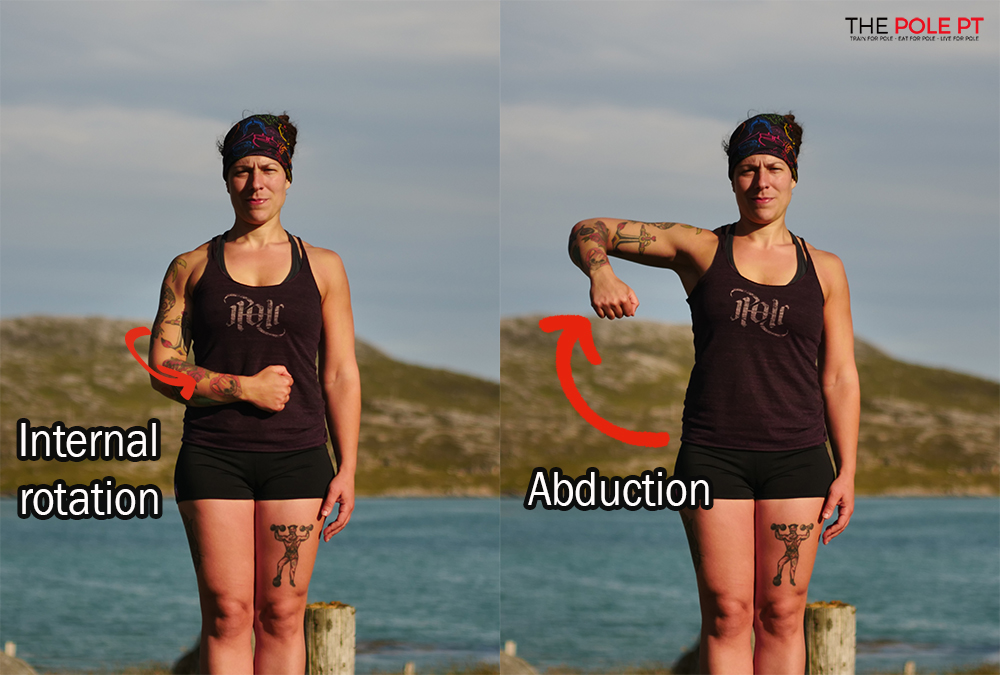
Couldn’t get as far on that second one, huh? Feel kinda jammy in the shoulder when you got to a certain point? This is because, when the arm abducts (moves out to the side to overhead), we naturally externally rotate the humerus.
Without this external rotation, the tendons have difficulty gliding through this space and movement becomes restricted and difficult to achieve.
Here’s what’s going on in there:
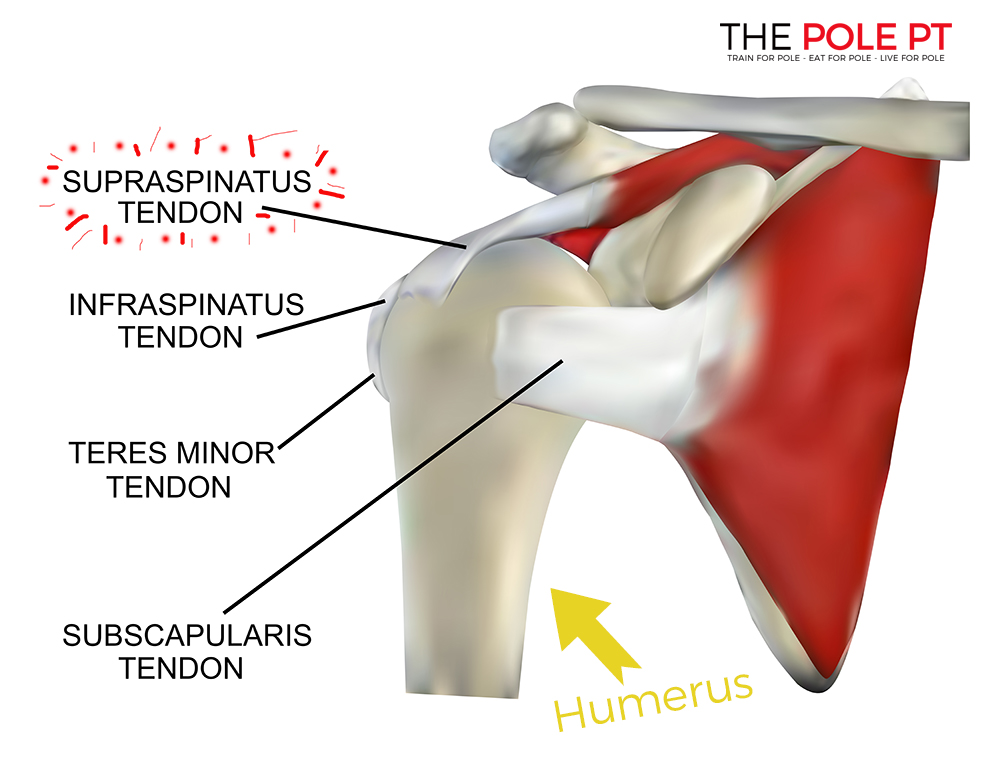
The 4 rotator cuff tendons are shown on the pic above. When we internally rotate our arm, we decrease the space available in that joint (the ‘subacromial’ space). Here’s an xray showing both internal and external rotation…
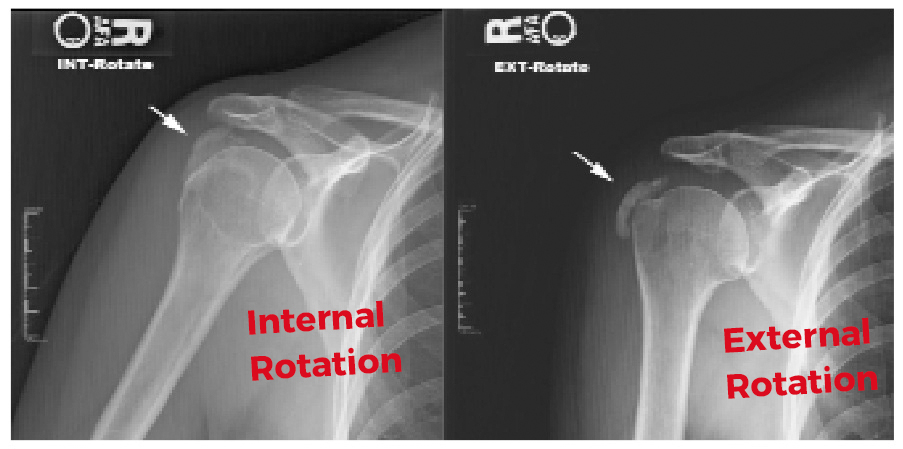
I may have taken this image completely out of context, but for the purposes of the point I am making, can you see how in the internally rotated position on the first xray, that gap between the bones is slightly reduced when compared to the externally rotated position?
That’s the gap where our rotator cuff tendons live.
This is why, in the fitness industry, we love EXTERNAL rotation.
The externally rotated position is favoured in most movements and considered a more optimal position for the shoulders.
If you’ve heard cues like ‘break the bar’ while using a barbell, ‘show your armpits’ / ‘screw the hands into the floor’ / ‘spread the floor with your hands’ while doing press ups, or heard the concept of ‘creating torque’ through the shoulders, these are all common cues for external rotation.
Thanks to computers, desk jobs, smartphones and tight pecs, we have a tendency to internally rotate (coupled with rounding our shoulders forwards). The ‘external rotation’ cues all help to reset the humerus back to its most optimal position – its rightful home and where it should be – in the centre of that joint with maximum space around it for movement.
Twisted grip puts our arm into the less optimal internally rotated position, which really is the main reason why it has such a bad rep.
I’ll save detailed analysis of the Iron X position for another day, but in the image below (twisted grip Iron X), can you see how my top arm ends up abducted overhead at around 130 degrees AND internally rotated?
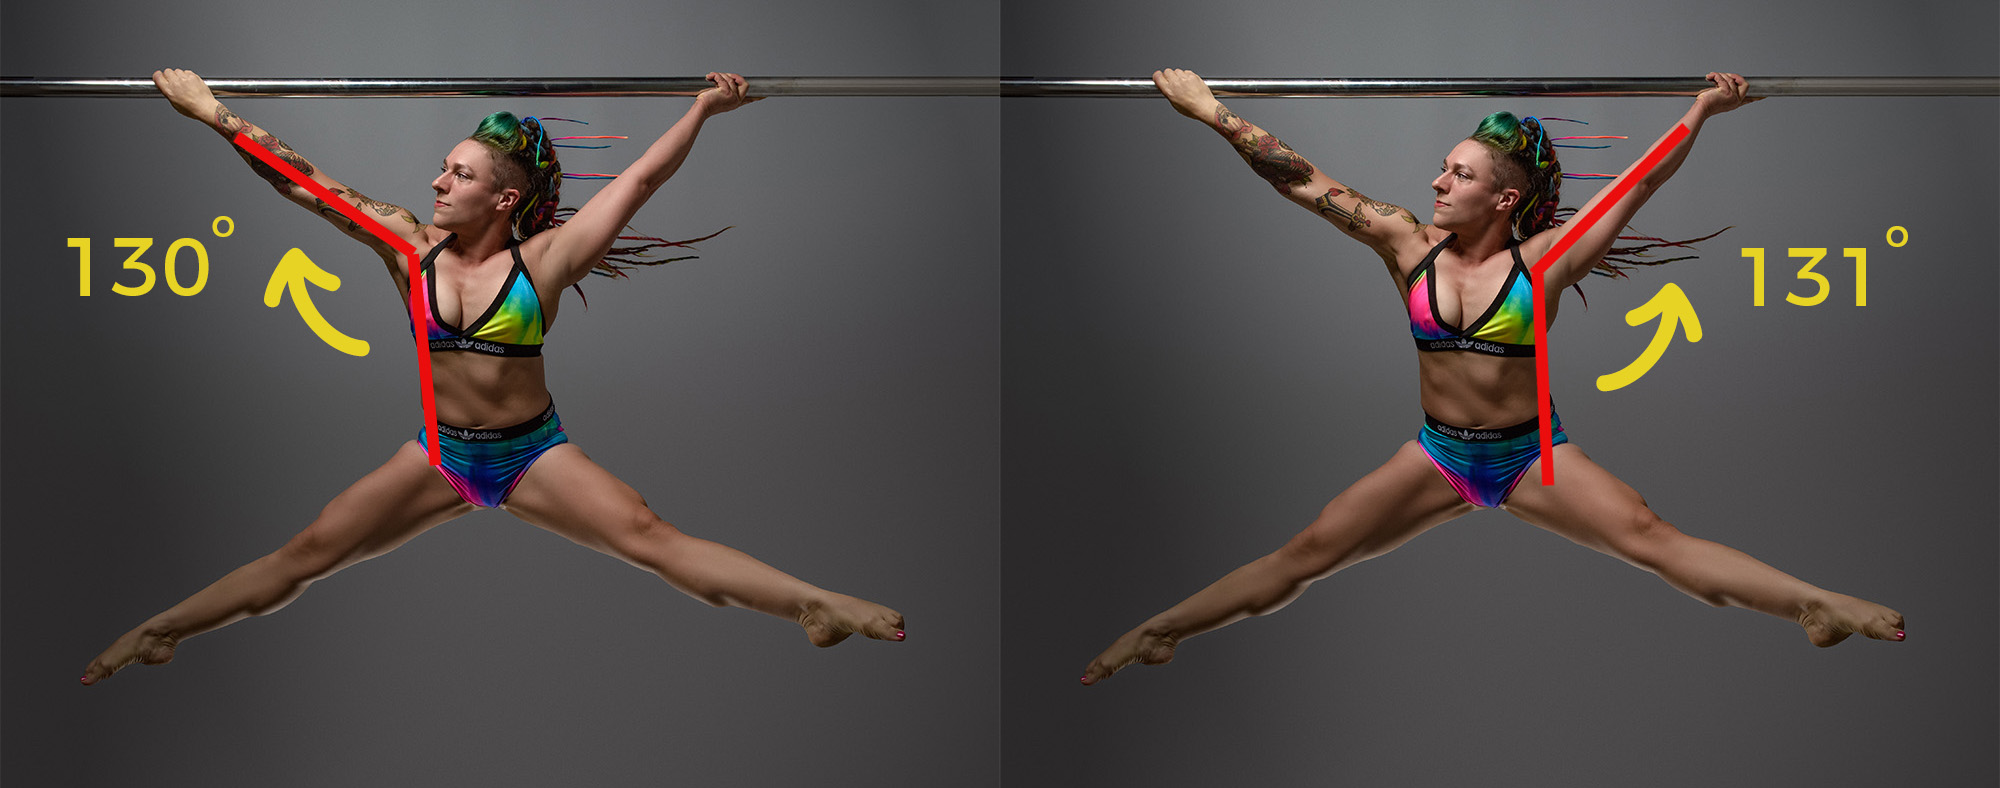
After our little experiment back there, can you see why my top shoulder might be a bit cranky with me rotating the entire weight of my body into that position?
This is because, when we lift our arms towards shoulder height or above, that space in the shoulder joint is decreased even more – so overhead movement combined with internal rotation is a trickier position for our rotator cuff.
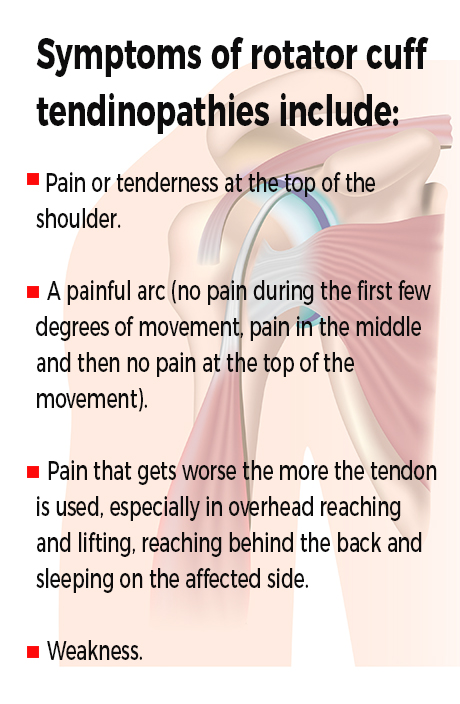
If our shoulders are properly conditioned to handle this position, there is no reason why we can’t perform this movement safely. The problem really comes from repeated overuse without the appropriate strength and conditioning in the right muscle groups, as this can result in ‘tendinopathies’.
Tendinopathies occur when our tendons are unable to adapt quickly enough to cope with the demand being placed upon them, causing them to weaken.
As a result of the increasing forces being put through them, the tendons can become irritated and inflamed, making it very difficult for them to glide smoothly through that subacromial space, especially if that space is decreased due to internal rotation and/or overhead positioning.
This puts additional stress on the rotator cuff, which can cause pain and tenderness in the shoulder joint and reduced strength.
It’s worth noting, though, that in the Ayesha position, although the top arm is internally rotated, it isn’t actually overhead, but in front of the body (in flexion) at about 92 degrees. In the handspring movement, the only time we actually have that internally rotated arm overhead is in the start position. And, even then, it is not fully overhead – only about 114 degrees.
Why do all these angles matter?
Let’s have a quick look at shoulder mechanics in overhead movements…
Whether we are internally or externally rotated, there is something interesting that we need to talk about when it comes to overhead movement patterns. As our arm lifts overhead, in order to create optimal space for those rotator cuff tendons, the scapula (shoulder blade) rotates upwards.
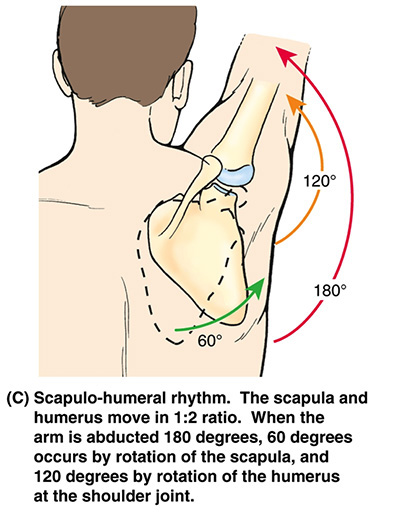
If our arm is overhead and we are squeezing the shoulder blade ‘back and down’, we are essentially fighting against this upward rotation of the shoulder blade and therefore restricting movement of our shoulder joint as a whole.
If you train handstands, you’ll often hear the cue of shrugging at the shoulders / pushing the ground away. This is to help support that scapula upward rotation, and to allow the rotator cuff tendons space to glide freely.
In pole, when we are taught to ‘engage’ the shoulders, we often think of the ‘down and back’ action of squeezing our shoulder blades together, but when our arms are overhead, that’s not actually a great place for our shoulders to be.
Engaging the shoulders whilst also having the scapula in that upwardly rotated position is a lot more difficult to achieve and often requires lots of coaching and drilling of movement patterns so that our bodies understand that position – and it’s best to do this on the ground, before we try to do it upside down and hanging off a pole!
Putting our arm into an overhead AND internally rotated position and then flinging our body about, without the appropriate kinaesthetic awareness, shoulder strength and stability, is probably not going to end well. BUT remember, as I already mentioned, the twisted grip Ayesha itself does not put that internally rotated top arm into this more risky overhead position.
In my opinion, the most vulnerable part of the movement for the top arm really comes from the start position of the handspring and the initial lift from the floor – but even then, your arm is not fully extended overhead, it is elevated at less than 120 degrees, so although it may be in the less optimal position of being internally rotated, we don’t have to be too concerned about the scapula upwardly rotating.
It is this observation that makes me wonder whether the twisted grip handspring really deserves its bad rep.
The problem really comes from how we approach learning and conditioning for handsprings, which usually goes something like this:
We learn to Ayesha, then we start to work on handspring technique, at which point we repeat that movement pattern over and over again until we eventually ‘nail’ it. Then we continue to repeat that movement in even more demanding ways – incorporating it into different combos and building on it by starting to work on more advanced moves like Iron X and deadlifts. Sound familiar?
The problem is that without progressively developing the appropriate strength and conditioning first, our tendons basically cannot keep up with the increasing demand we place on them. It is this overuse combined with a lack of appropriate strength and conditioning (IMO) that leads to rotator cuff tendinopathies, not the internally rotated position itself.
-
THE BOTTOM ARM AND THE ‘PUSH’
Personally, I am much more interested in the bottom arm!
Our bottom arm is NOT internally rotated – it can be engaged towards external rotation (yey!) BUT it DOES end up overhead!
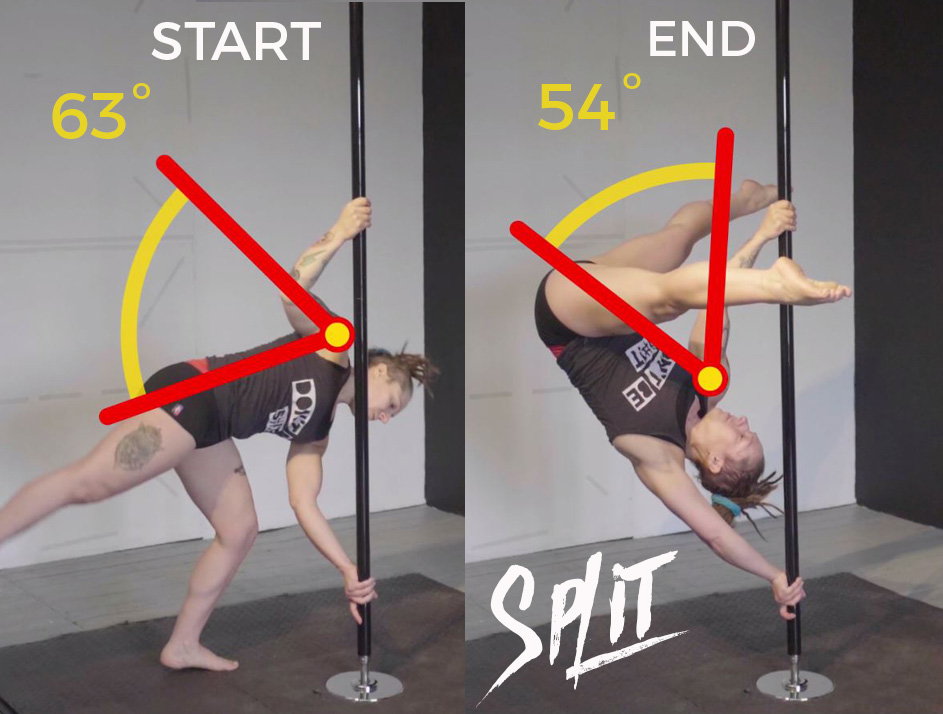
If you look at the bottom arm in the video below, you’ll see that it actually moves from a place of flexion (in front of the body) and kinda abducted (slightly out to the side and overhead) at around 133 degrees to my torso, but it ends fully overhead at about 180 degrees.
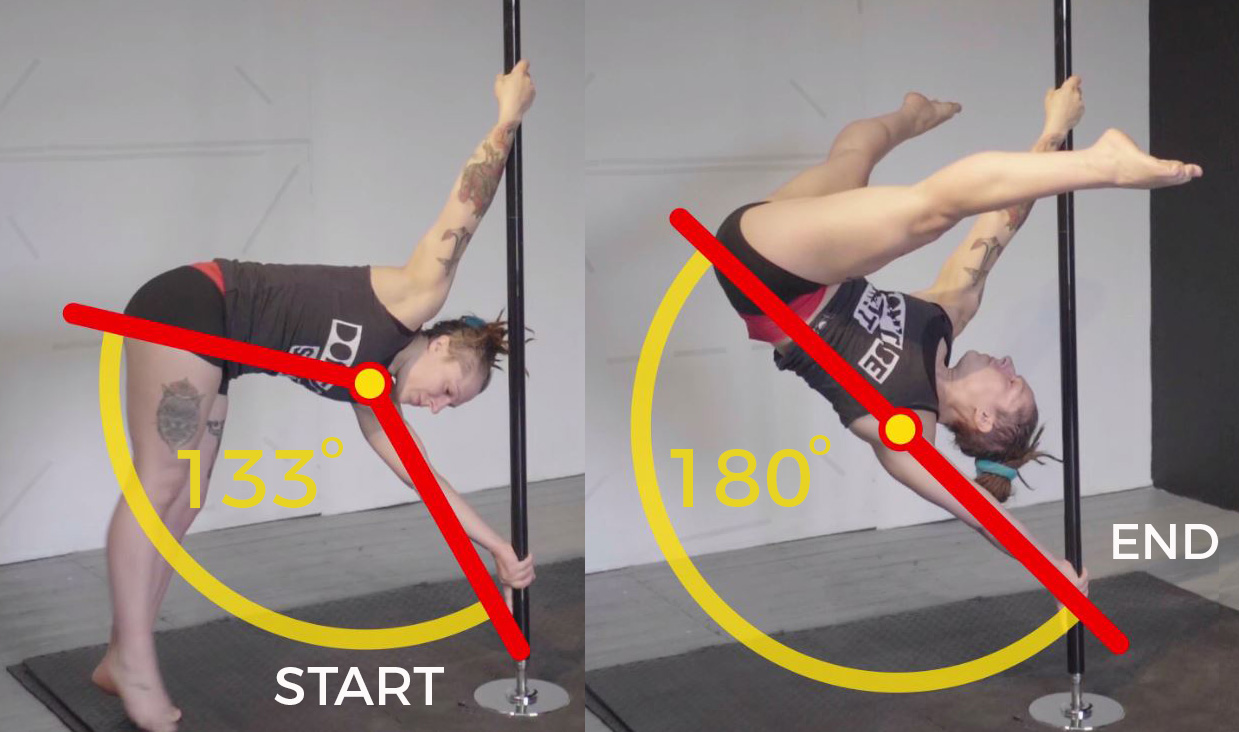
As we talked about above, when your arm is overhead, your scapula will upwardly rotate to create the most optimal position for the shoulder joint.
This is why the ‘down and back’ cue is not appropriate when our arms are overhead. So in the same way that we exaggerate the shoulder shrug in a handstand by pushing the floor away, we need to push the pole away with the bottom arm, with the push coming from the shoulder, not from the elbow/wrist, so that we are actively engaging the correct muscles around the shoulder joint to support that position.
Interestingly, the bottom arm position doesn’t change much whichever grip you use – whether you are in twisty, cup, or true grip, the arm always ends up fully extended overhead. So this applies whichever grip you use.
The problem I see with twisty grip is that because your top arm is straight, you can essentially ‘cheat’ and just hang from the top arm/shoulder, without any engagement there whatsoever. Even if you ARE actively engaging and pulling with that top arm, because it is straight and internally rotated, it can be difficult to get the balance between the push with the bottom arm and the pull of the top arm.
We tend to be much stronger / more controlled at pulling with the arm bent. Pulling with the arm straight is trickier, because it’s harder to use the muscles in our arm to assist. But that’s okay, because in twisty, we can cheat. 😉
My point is, if you aren’t pulling with your top arm, or are unable to pull enough to balance out the push/pull of the movement, then your bottom arm will end up taking the brunt of the effort.
If our ‘pulling’ arm isn’t pulling its weight (see what I did there?), then we’re essentially dumping all our bodyweight into the bottom arm while it is 180 degrees overhead. And if our bottom shoulder is not set up to handle overhead movements properly, it’s not good news for the rotator cuff tendons on that bottom arm!
TWISTED GRIP V CUP GRIP – WHO WOULD WIN IN A FIGHT?
Cup grip is considered to be the broccoli to the chocolate cake of twisty, because it essentially overcomes most of these issues.
- The top arm is in a neutral position throughout the movement = no internal rotation issues!
- The top arm doesn’t start in an overhead position. Obviously, this depends on how you set up for your cup grip handspring, but in my experience twisted grip is usually taught with your body positioned directly in line with the pole (so your top arm is slightly overhead) and cup grip is taught with your body slightly to the side of the pole (so your top arm is about 90 degrees from the body at the start point). This removes the potentially risky overhead AND internally rotated part of the movement.
- The top arm is bent, which allows much better engagement and control of the top arm and shoulder, prevents you ‘hanging’ on that top shoulder and creates more balance between the ‘push/pull’, taking some of the strain off your bottom arm!
Yey cup grip!
What about true grip? I hear you ask
True grip similarly doesn’t have the internal rotation of twisted grip and still allows you to bend that top arm in an externally rotated position.
But one of the main reasons I prefer cup grip over true grip is the wrist positioning.
Can you see in the image below how my wrist is in a neutral position in cup grip and looks kinda awkward in true?
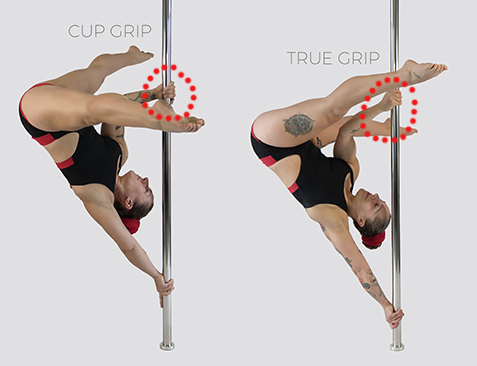
The true grip ayesha places a higher demand on your wrist mobility and the pull position of cup feels much more ‘natural’ because it puts less rotational force on the wrist and forearm.
SO, CAN TWISTED GRIP BE DONE SAFELY?
Throwing your body through positions where it has no active strength, stability and awareness is a recipe for injury, especially if you have a pre-existing shoulder condition, but the truth is that we have the capacity to be strong in all of the positions throughout the handspring movement – in all three grips!
Studies have been completed on athletes who regularly perform overhead activities such as tennis, baseball, swimming and volleyball and have found 3 factors that contribute to rotator cuff tendinopathies:
- Excessive humeral head translation caused by repetitive stretching of the anterior glenohumeral capsule (in other words: excessive shoulder movement/lack of stability caused by repetitive stretching of the front of the shoulder);
- Tightness of the posterior glenohumeral joint capsule (tightness at the back of the shoulder); and
- Muscle imbalances.
If you are suffering with these symptoms already, find a good physio – ideally one that specialises in aerial athletes, like our in-house physio Georgina, who you can find at www.fizzylemonphysiotherapy.co.uk
Pole is an overhead sport, too, and knowing these contributing factors to tendinopathy means we can try to address these issues before they become a problem.
Twisted grip can be just as ‘safe’ as any other grip provided we have the necessary strength and stability and have properly primed our rotator cuff to cope with that internally rotated movement.
If you are going to do any kind of handspring, you need your shoulders to be strong and stable enough to reach the positions of the movement actively and with the most optimal shoulder positioning possible. This applies just as equally to the bottom arm as it does to the top one.
That’s why in PART 2, we’re going to look a little closer at how we can properly prepare our shoulders for handsprings and how we can approach our training to reduce risk to our shoulders.
If you feel like cup grip is out of your reach then keep an eye out for PART 3, where I’ll share my favourite cup grip strengthening exercises.
As always, I’d love your comments and questions on this topic!
If you love to nerd about pole, I think you’ll love my books…
‘Strength and Conditioning for Pole‘ – create your own strength training programme for pole dance!
‘Pole Anatomy’– geek out on the anatomy of over 60 individual pole tricks!
Both nerdy pole books are available now in hard copy or downloadable ebook!
Join my mailing list for free training advice direct to your inbox!
…including my FREE EBOOK “Grip Gainz – Grip Training for Pole Athletes” – with training drills and programming to help you achieve a vice-like pole grip.
I hate spam, too! When you join my mailing list, I’ll also notify you about new blogs and Pole PT updates that I think you might be interested in, but I’ll keep it to a minimum! You can unsubscribe at any time!
Fascinating bit of science! Twisted grip has always been a problem for me, so good to see why and how we can improve and condition the shoulders for all the grips!
Thanks, Peta. The shoulder mobility and strength work we are doing will defo help with this. ❤ ????
AMAZING ARTICLE! Thank you !
Thank you, Kasey! ????
Great article! Thank you for being so detailed in your explanation! The more we know, the more we can improve safely! =)
Thank you, Colleen. ???? That’s exactly why I wanted to do this study. Knowledge is power! ????
AWESOME!! So enlightening! Made my day, definitely helped my technique! Can’t wait for part 2 and 3. Thank you
Ah, thank you, Rach. Glad it helped. 🙂
I would love to see a tutorial on a safe way for doing the one-handed airwalk and the correct shoulder bio-mechanics involved. In that case, one should engage the scapula, but how to do that without decreasing the subacromial space and causing fraying of the tendon structures on the long term.
Moreover, how do I know if my shoulder is prepared for an elbow hold. I used to do these holds so often on the pole and so easily before but after suffering from shoulder impingement for 8 months, I am quite reluctant to try these out again. In fact, I cringe when I think of the internally rotated position I’m putting my shoulder in and all the body weight invloved! Poor shoulders.
Hi Lea, thanks for your message! 🙂 Overhead shoulder engagement while ‘hanging’ is such an interesting topic. I agree that the muscles surrounding the shoulder should be engaged and supporting the shoulder joint, but that compressing the shoulder blade aggressively ‘down and back’ is not necessarily the best way to achieve that – and may not be the greatest position for our rotator cuff with the arm overhead. Ultimately, I think it’s a case of ensuring that we have proper shoulder mechanics and understand what ‘engaged’ feels like. The same applies to any spins and ‘hangs’ on the pole – but especially one handed moves! I will defo add this to my list of topics to cover on the blog! 🙂
I’d like to investigate elbow holds a little more, too. Due to the shorter lever length, they can be “easier” from a strength point of view and I know some studios teach elbow hold Ayesha before the others I’ve covered in this blog, but you are right, they do involve some internal rotation of the shoulder. The screening tests I’ve covered for twisted grip in Part 2 of the blog might be a good place to start for that – and if you have shoulder impingement then definitely take a video or pic of an elbow hold to your physio and get clearance from them to start training it before you jump back in. ????
This is a really great post. Informative but not overdone.
Just a quick question, regarding the cup grip. In your example pictures, the degree of flexion in your elbow has lessoned during the motion of the handspring, which surely would affect the overall finishing degree. If you take your example and have it done by someone without the same degree of bicep control, meaning it fatigues and lengthens during the motion, would that not end up shockloading the shoulder into a hang whilst it scrambles to pick up the slack. I would say that is an argument for the cup grip and true grip variations to be done in a long arm extension.
Thanks, Sam. That’s a really interesting point. I agree, if that top arm begins the movement bent and then drops into full extension due to lack of strength in that bent arm position, then it would end up dropping into a hang position (and probably dumping more weight into the bottom shoulder, too, in the process). ????
You’re saying that if this is the case, it’s probably preferable to start the movement with the top arm fully extended, right? To remove the ‘dropping into it’ part – so it’s extended throughout the whole movement? I think I’d agree with this.
Having said that, I’m sure it’s possible to move between the bent and extended arm position in cup grip with full control without ever ‘dropping’ into the hang (although I suspect it does happen mostly because of a lack of strength/engagement somewhere).
I suppose they could be thought of as two completely different movements really – the ‘bent arm cup grip handspring’ and the ‘straight arm cup grip handspring’, as the small change in position really changes the movement quite a lot. When learning cup grip, I see a lot of people struggling to keep that top arm bent and extending the arm, as you say. That’s one of the reasons I focused on bent arm pulling strength exercises in Part 3.
Aiming for the bent arm version and ending up in the straight arm version because you can’t hold the elbow flexion is probably not a good place to be, so I definitely think there is an argument for approaching them as two completely separate movements with their own entry points and progressions. What do you think?
Hmmmm, imma be thinking about cup grip handsprings all day now! ????
I have never liked the twisted grip shoulder mount (I think sometimes it’s called the Princess grip) When it came time to sign off on this move in my classes, my shoulders were sore for weeks (in a nerve pinchy, into the neck type way) So I haven’t really worked on them since I’ve been signed off and my shoulder pain went away. I am so glad I found your article because I’m in extreme now and I know it won’t be too long before I start learning the handspring and I know a lot of girls at the in the studio used twisted grip. I heard in a pole thread that it was bad which lead me to google it which lead me here. I’ve already started implementing your movements, I really like the side plank to downward dog motion! Will these same moves also help me in the twisted grip shoulder mount? Or would you have a recommendation for protecting the shoulder while doing it? Really love your website. Thank you so much for sharing your knowledge with the world <3
Thanks for your kind comments Reanna, I’m glad you found it useful!
The twisted grip shoulder mount is even more tricky than the handspring because your twisted (internally rotated) arm starts directly above you, so it’s not an optimal place for your shoulder to be, especially when you are lifting all your body weight on it.
If you know it causes pain then you might prefer to avoid that position. It just might not be right for you and there are other, much better, shoulder mount grips anyway. 🙂 But if you need to use it for a routine or performance and can’t avoid it then making sure your shoulders are mobile enough to be able to reach that twisty position without using the pole to force your shoulder into it, and also that you are strong and engaged to support the joint in that position should help to reduce risk of injury. The problem is also that it’s a pretty weird position that you wouldn’t ever use otherwise, so you probably never gave your shoulders time to adapt to it before adding load to the new position.
The exercises in this blog are really focused on the twisted grip for handspring, which is a bit different as your twisty arm isn’t really overhead in the same way as it is in the shouldermount, but the tests and exercises in Part 2 are still relevant to some extent.
If in doubt, get in to see a physio as they will be able to do a hands-on assessment for you and identify any weak points – they should be able to help you figure out exactly what was causing the pain and give you individualised exercises to help, too. 🙂
And what about the bottom arm? In the end of flag it must be better slightly bent or stright? And then at the start bent? I see different kind of tehniques and some say bent some stright..????
It should be easier with your bottom arm straight as your bone structure is then helping to support the weight. I think some people keep a slight bend to avoid elbow hyperextension.