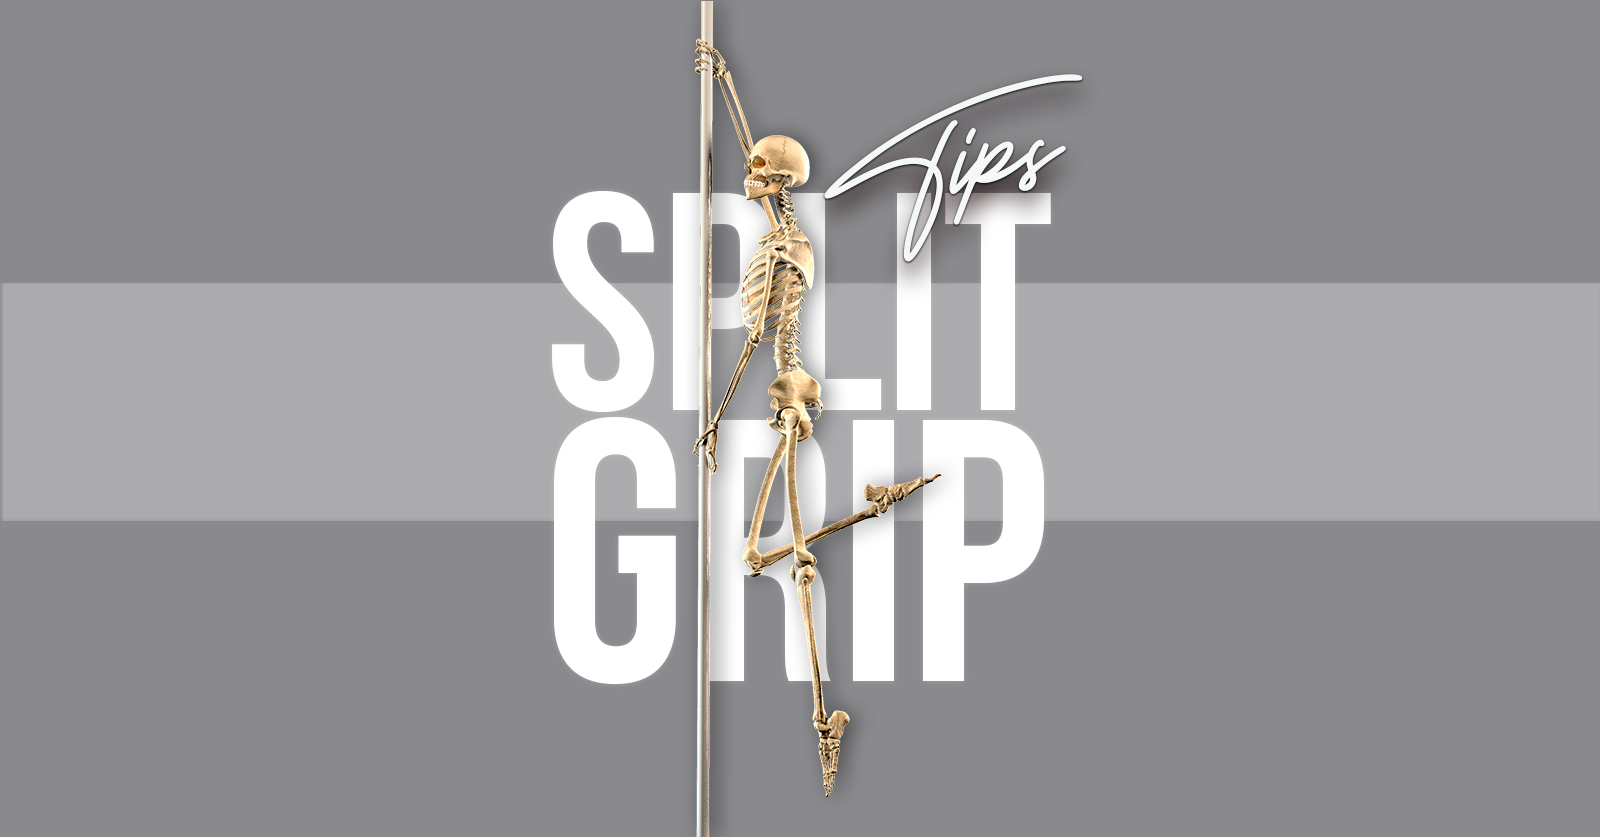
After my last post about the Boomerang, I got a few comments and messages that went something like this…
“I got injured doing split grip in class. :(“
“How can I build strength for split grip?”
“It’s well ‘ard!”
“I get pain in the bottom wrist/forearm/elbow whenever I do split grip, plz help.”
I paraphrase, but you get the general idea!
Unfortunately, I’ve heard these kinds of split grip woes many times over the years and IMO the upshot is pretty simple: split grip requires a high level of upper body strength and shoulder stability.
Although it’s quite often taught early-on (sometimes in advanced beginner levels), I think people tend to underestimate the strength demand of split grip and end up either not doing enough to prep for it, or they just seem to rush through that process and do too much volume, too soon.
So, is there a better way we can approach split grip? And how can we make sure our split grip is strong and pain-free?
I made a little video summarising some of the key points in this post, which you might enjoy if you’re a visual learner – but after you’ve watched it, please keep reading below because I put waaaay more detail into this blog post than I could fit in the little video for social media!
Before we continue, I should point out that the exercises and recommendations in this post are meant for general educational purposes and may not be suitable for you, especially if you are already experiencing pain in your split grip. I hope this little nerding session gives you some ideas to explore, but if you experience pain with split grip, please go see a physio to get personalised advice for your body!
First, indulge me in a little anatomy nerding about split grip!
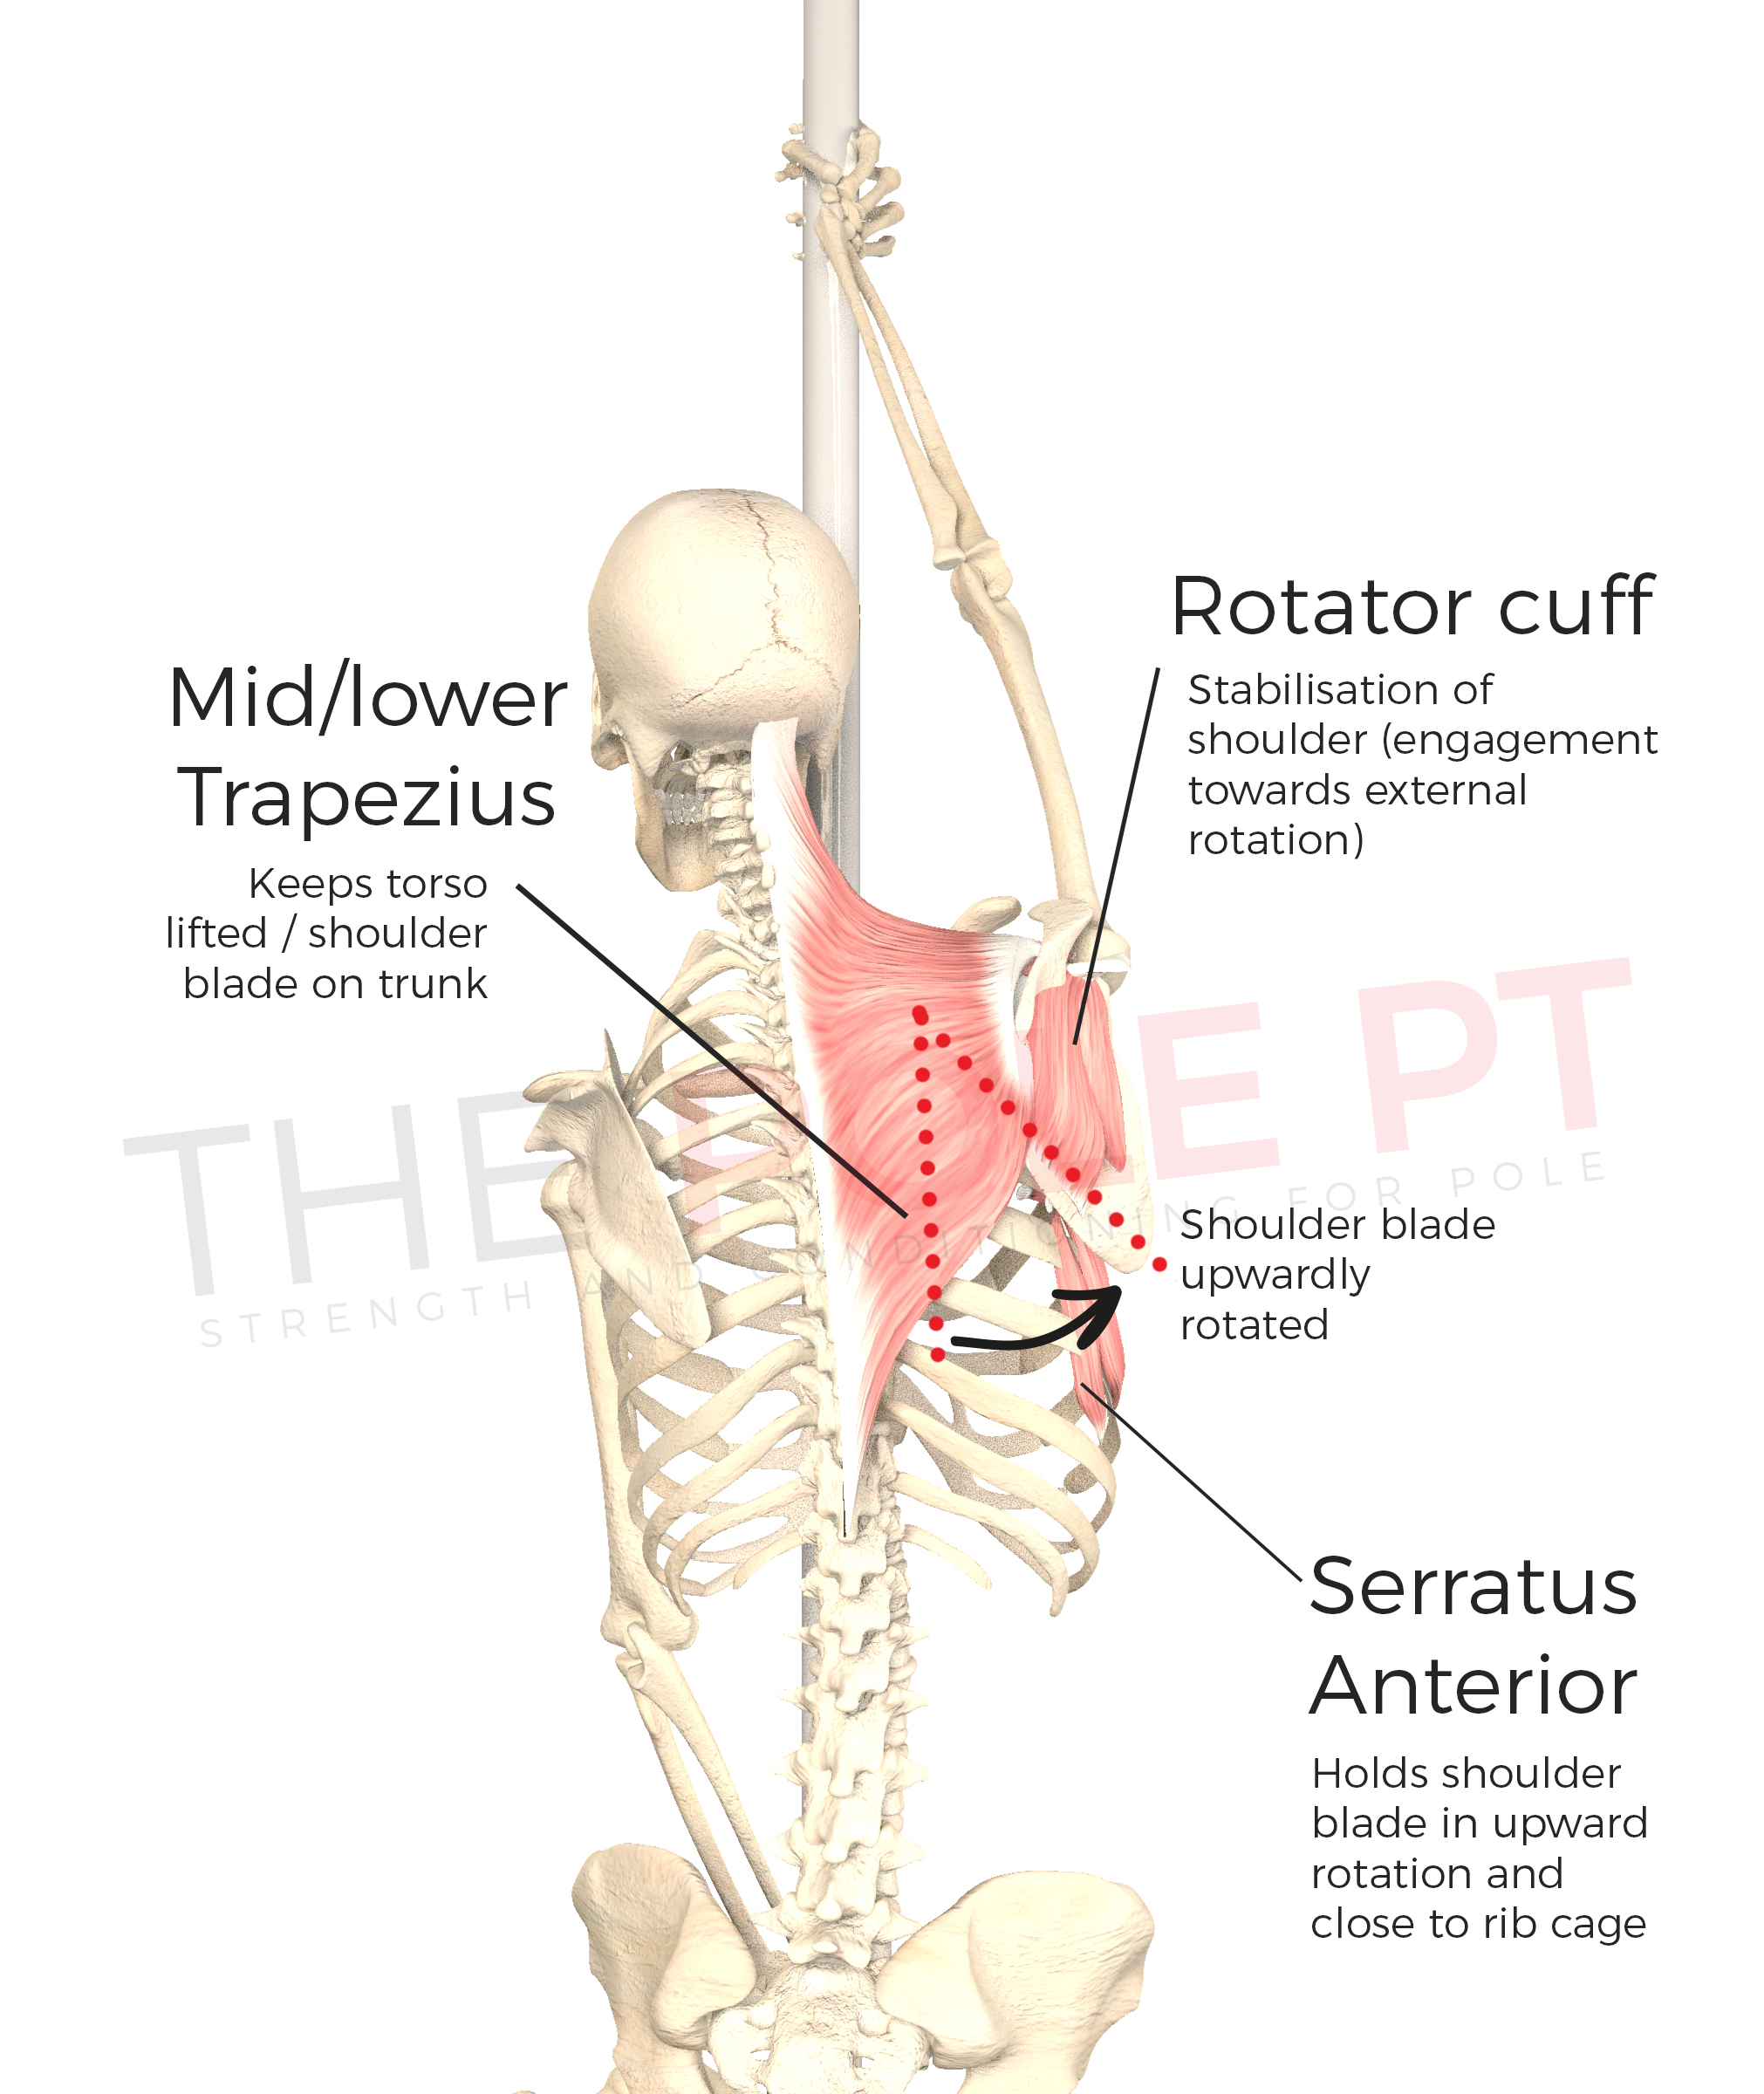
The top arm in split grip is up overhead, so our shoulder blade is upwardly rotated, but we’re not just hanging from that arm without engagement, we’re actively working to resist gravity, so just like we do in all of our spins, we’re engaging in an isometric pull to hold the position.
Our rotator cuff muscles are keeping our shoulder joint stable, with engagement towards external rotation (that external rotation engagement = usually a more ‘shoulder friendly’ engagement when our arm is overhead like this).
Our mid/lower traps are working to keep our torso lifted/keep our shoulder blade on our trunk and upwardly rotated.
Our arm isn’t *fully* overhead in split grip; our hand is just ahead of our torso, holding the pole in front of us. Our latissimus dorsi will also be working in an isometric contraction to help hold this position, but note that engaging our super strong lat muscle also:
- internally rotates the shoulder (working against that external rotation engagement we’re shooting for);
- encourages ‘closing’ of the shoulder angle (which can lead to rib flare and make it more challenging to stabilise our lower body position – depending what shape we’re trying to make on the pole); and
- can also encourage us to pack that shoulder blade ‘down and back’ a little *too* much (which goes against that more natural upward rotation of the shoulder blade we want when our arm is overhead).
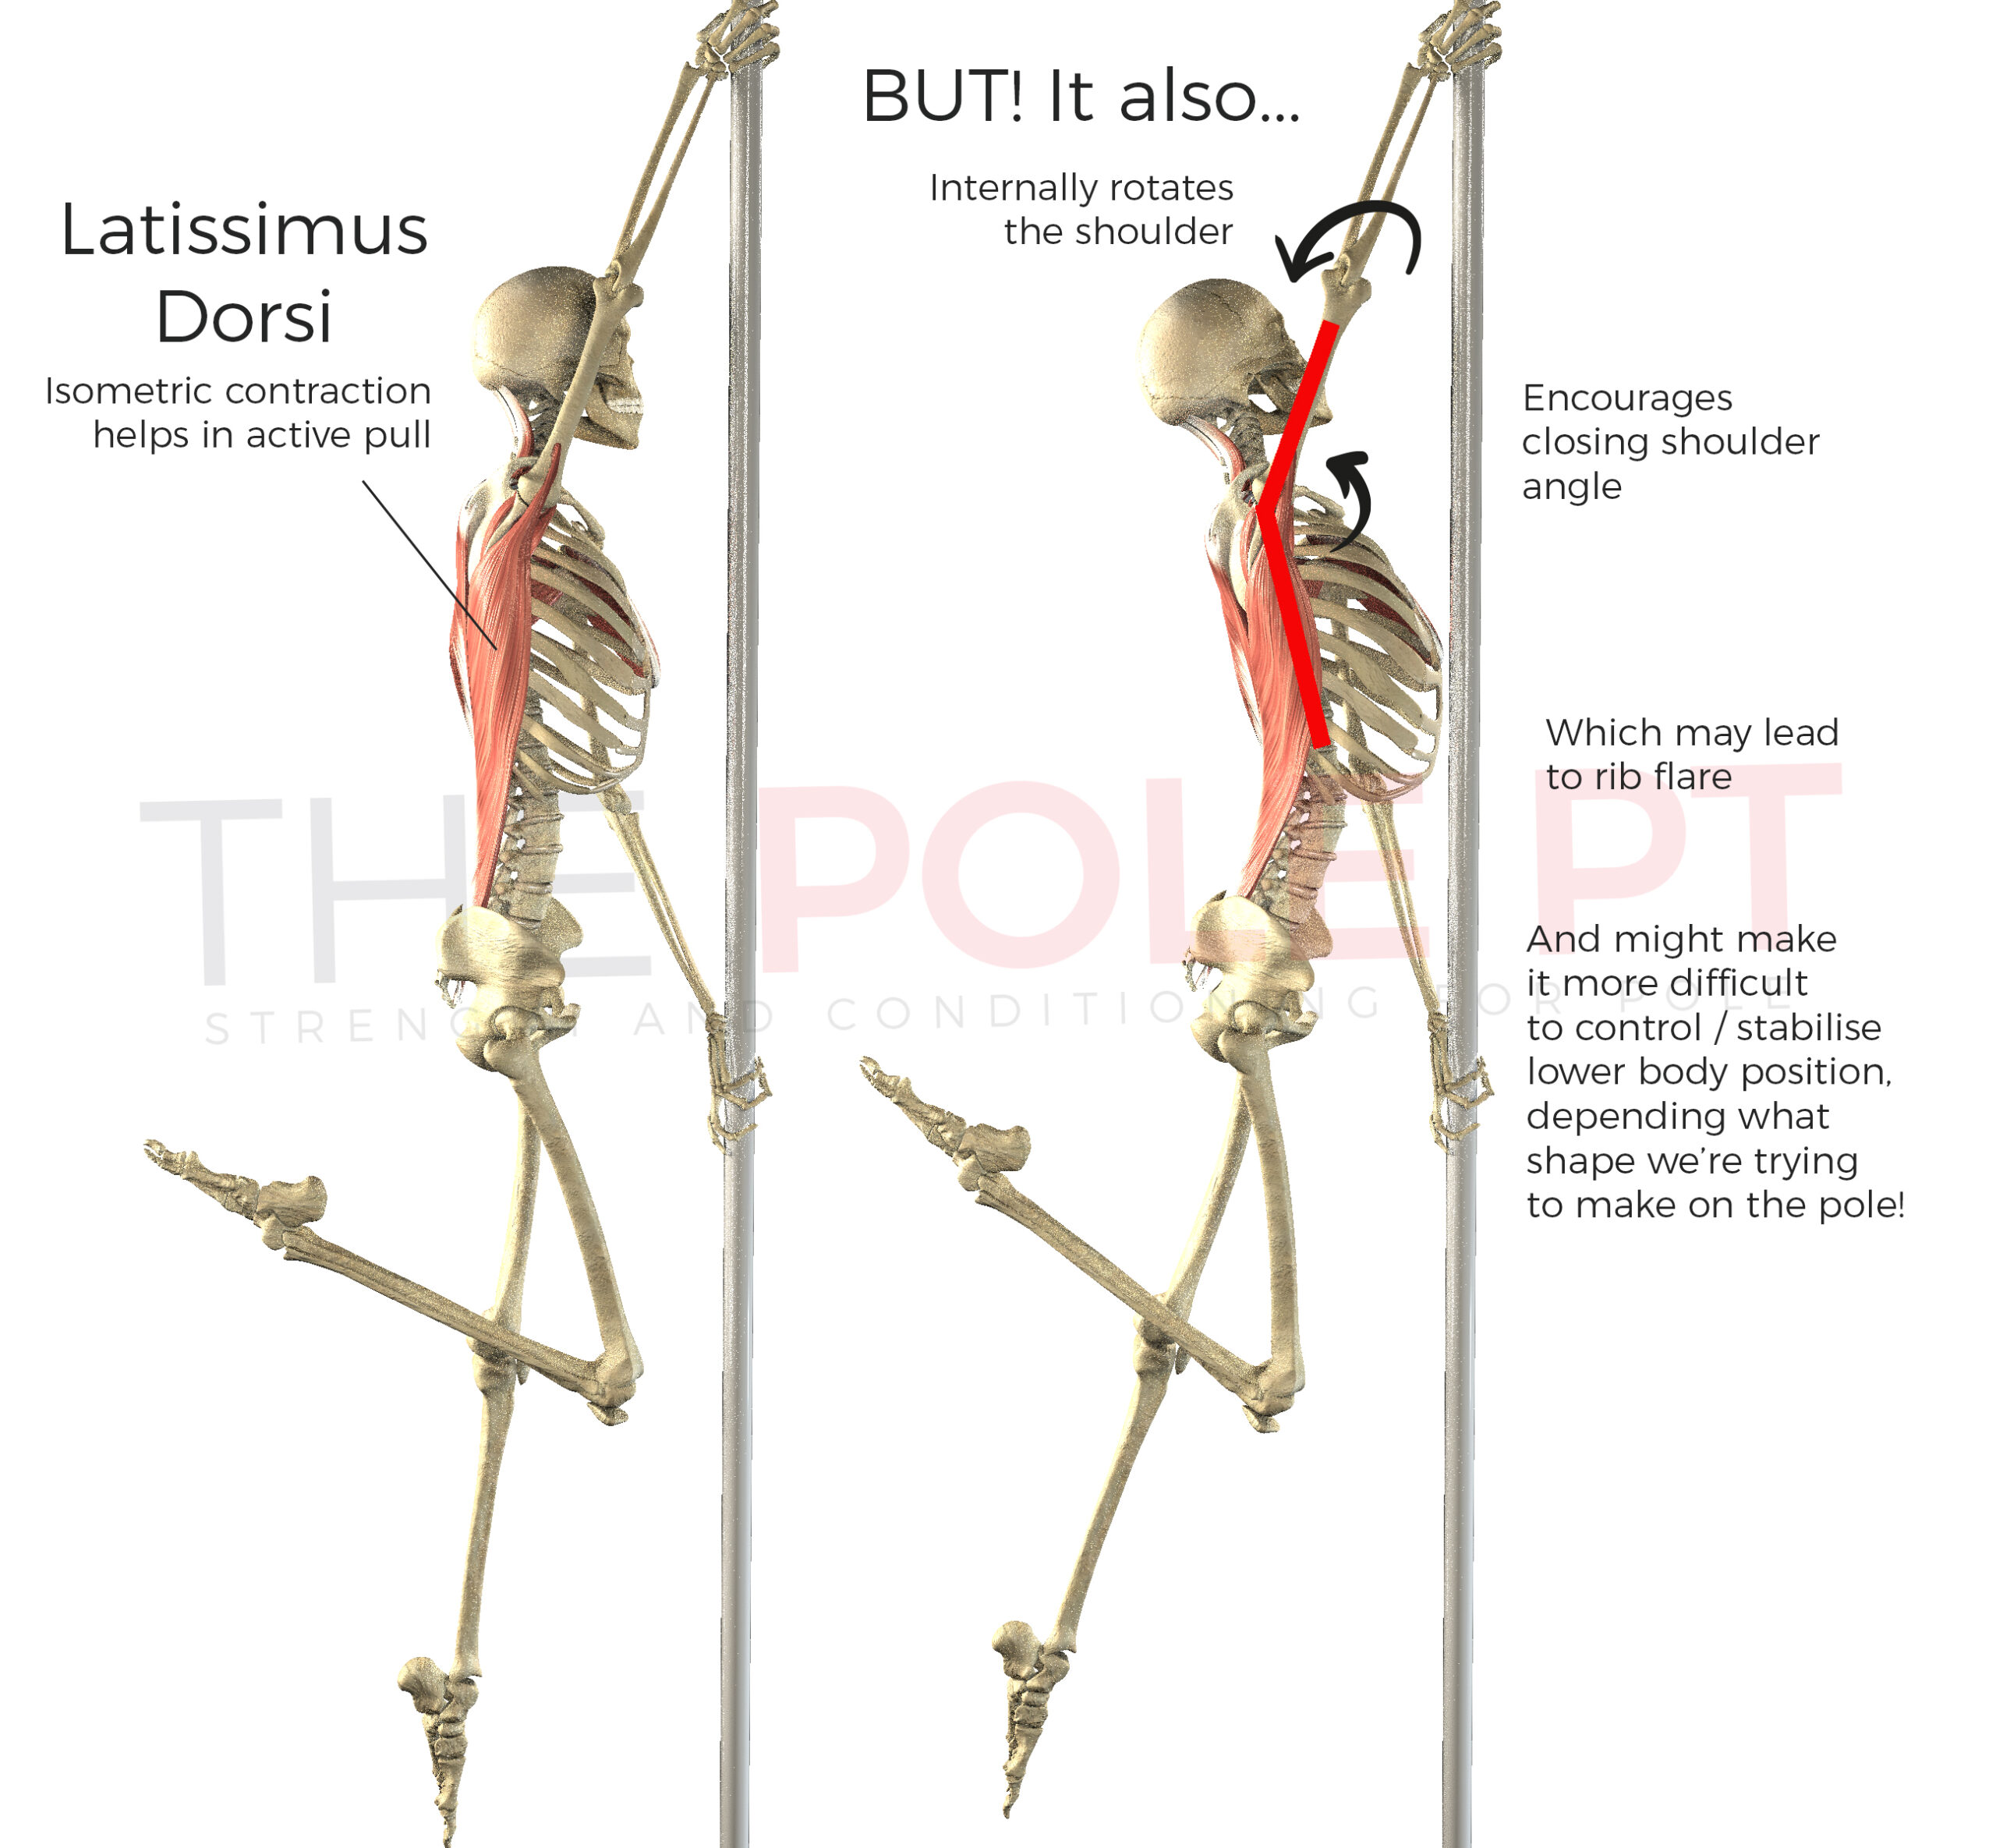
Because of all that (and because we pole dancers already LOVE using our lats – they’re our pole wings, right?), I prefer to use cues for the top arm pull which encourage more engagement of the trapezius than the lat. But anyway, details! The main point is: we’re actively engaging to support the position!
The bottom arm is low on the pole and similarly, we’re not just letting gravity win and dumping all our bodyweight into that arm, the push is active and coming all the way from the shoulder.

Our triceps are working to keep our arm bottom straight and we’re using our lower traps to push down and keep the shoulder down / push our body up to resist sinking into that bottom shoulder. Our anterior deltoid works to push forwards into the pole with the pecs and serratus anterior engaging towards protraction of the shoulder blade.
Of course there’s a big demand on our elbow and wrist stabilisers, too. That demand is increased if we’re not actively engaging to fully support the position through our shoulders and our core. So while people often look for wrist strengthening work for split grip (because that’s where people tend to feel it the most) the strength and stability comes primarily from our core and the muscles around our shoulders that create this balance of both pull and push engagement. If we nail those fundamentals, then we’ll be able to spread the load across our joints more efficiently and reduce the risk of overloading our wrist or elbow.
Don’t get me wrong, when we’re preparing to work on hands-only tricks like split grip, wrist mobility and grip strength prep is important, too (you’ll see some example exercises for that below), but it is just a small part of the bigger picture.
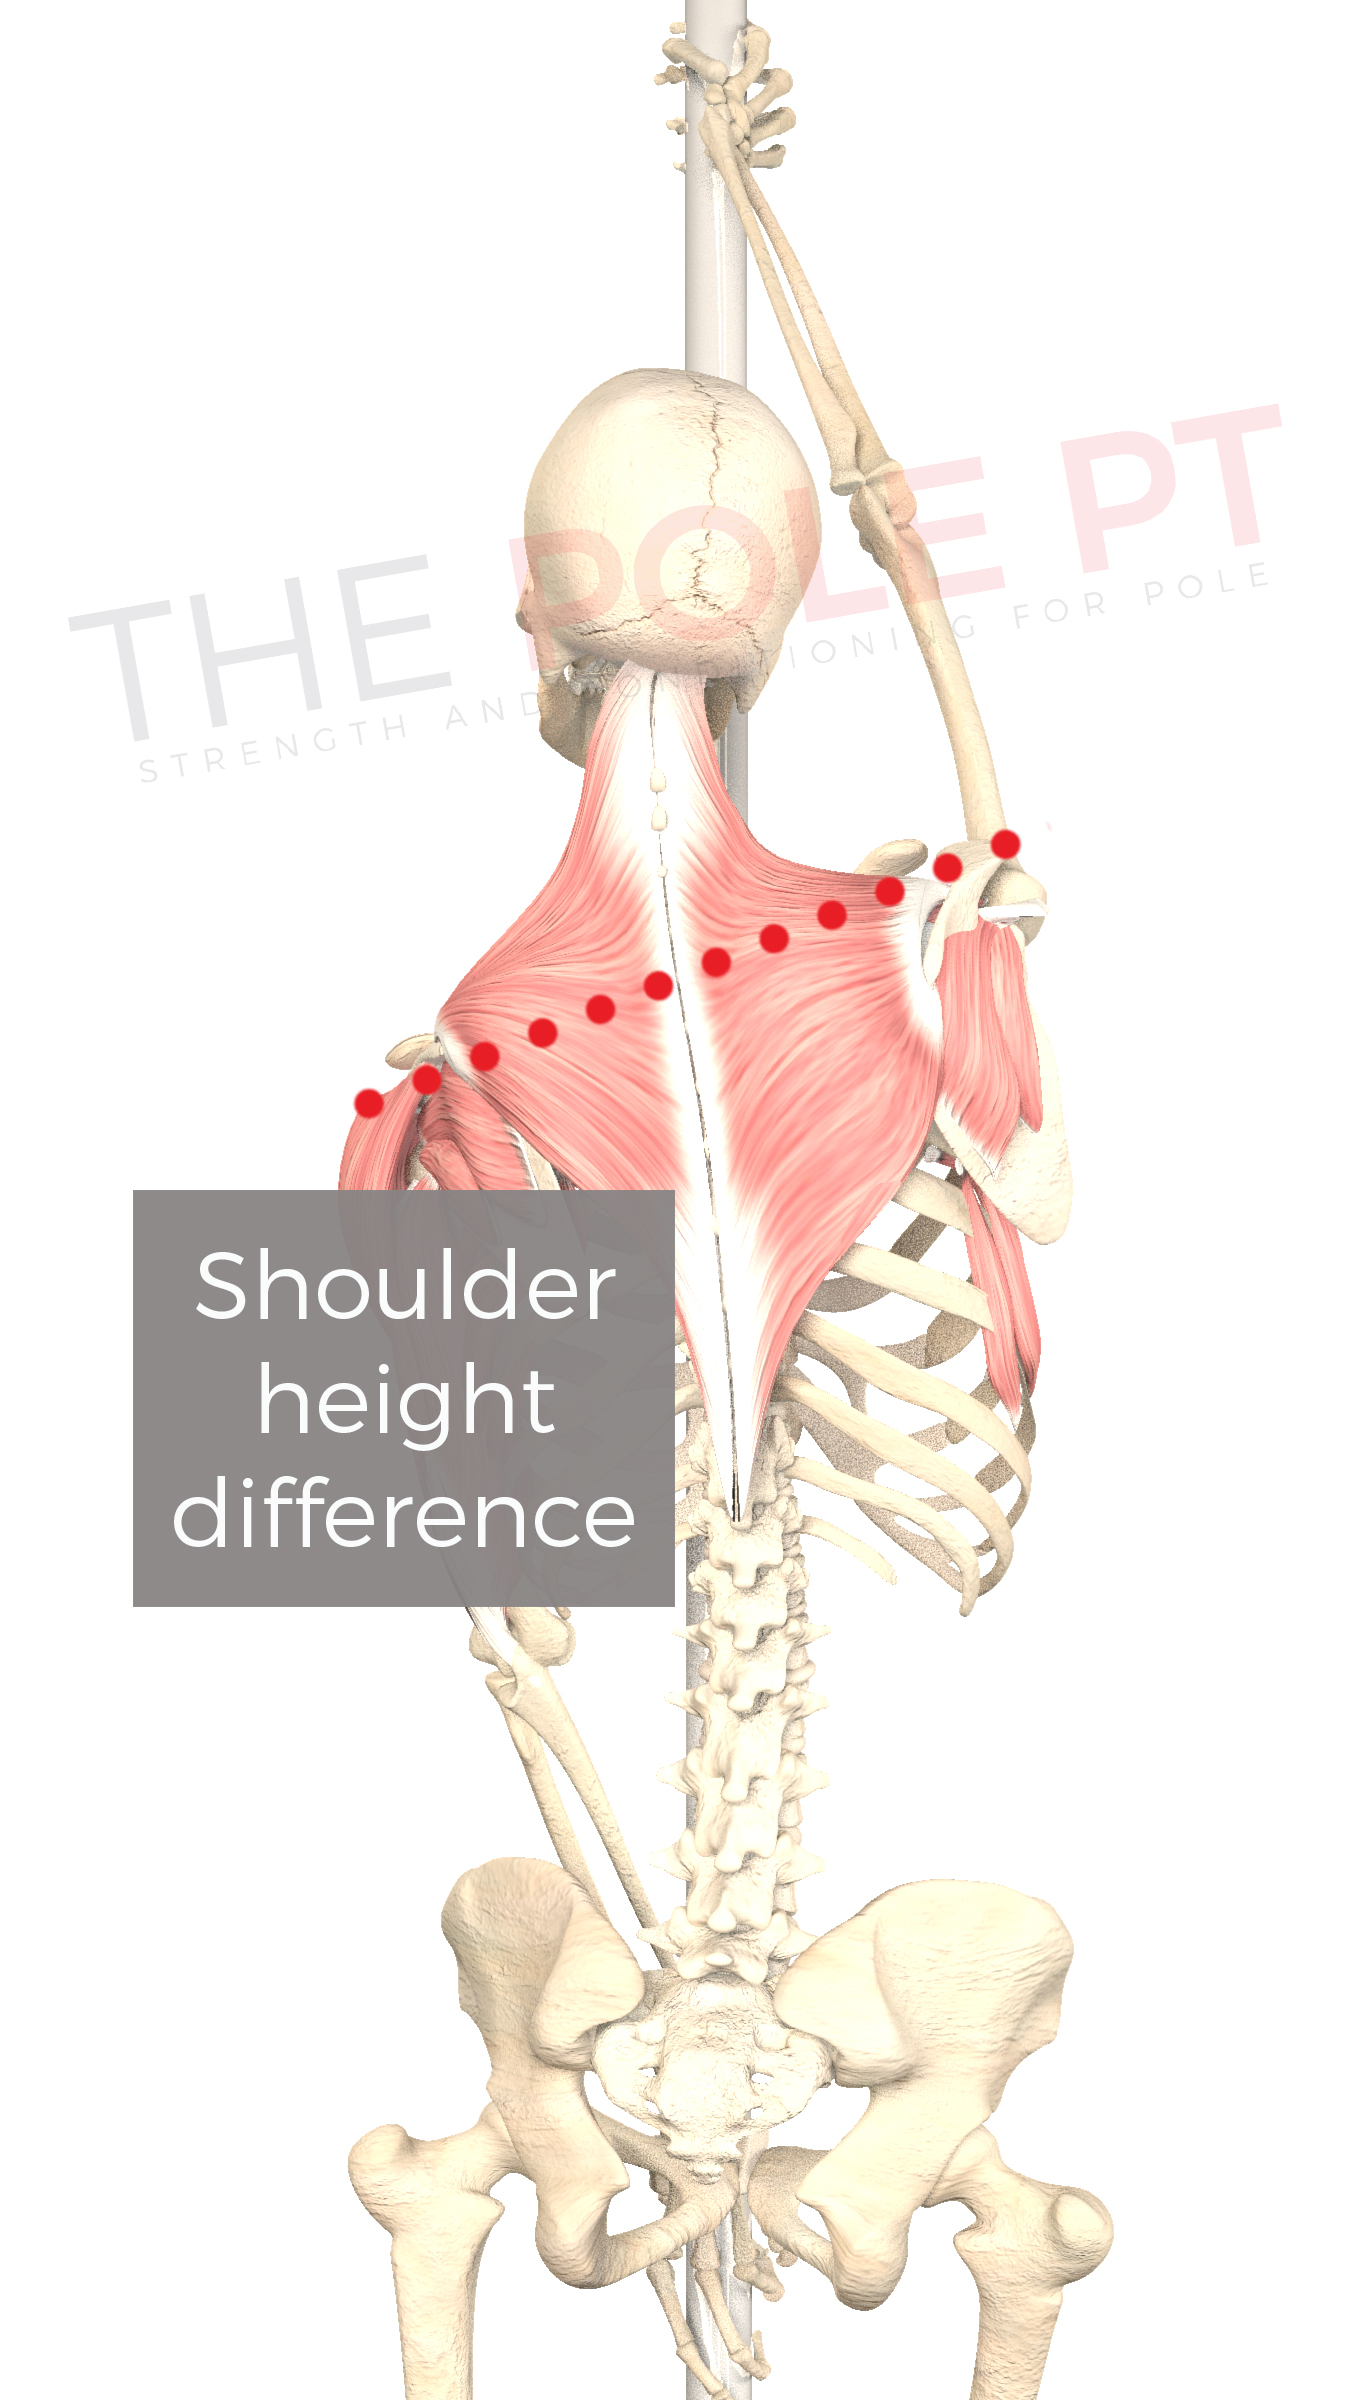
One final nerdy note: because the pole is vertical and we’re doing something different with each arm, it means our shoulders won’t be level. The top shoulder blade is upwardly rotated and the bottom shoulder blade is depressed and in slight protraction, so from the front or from behind, it will look like one shoulder is higher than the other.
Okay, enough! Onward to the tips…
Split Grip Tip #1 Strengthen off the pole!
My first tip kinda goes without saying. I mean, it’s basically my entire raison d’etre: strengthen the different elements OFF the pole!
Doing strength work away from the pole means we can isolate the different components and target our strength work to the areas we need it most. It also gives us chance to focus on the basics of engagement of the isometric pull and push in much simpler positions than when we’re actually doing the split grip on the pole.
Here are a couple of example exercises for that, including the cues I usually use.
Split grip top arm exercise: Active hang hold
If you struggle to get that engagement of ‘pointing the elbows forwards’ (external rotation engagement of the shoulder), try this same exercise in a chin-up position with palms facing in – that can make it easier to find that external rotation engagement we’re aiming for.
Psst. If you want to know more about overhead pull and shoulder engagement in pole (and the ‘why’ behind the cues I’ve used here), you can find more on that here!
Split grip bottom arm exercise: Isometric straight arm push
A note on wrist and grip strength
As I mentioned above, if you don’t already include wrist and grip strength work, that can also be useful when building strength and preparing (over time) for hands-only holds like the split grip!
Here are some examples: Wrist curls, wrist hammer curls, forearm rotations. These kinds of exercises also work great in low volume incorporated into warm ups. You can alternatively perform similar movements using a resistance band like this: Wrist warm up sequence with band.
Split Grip Tip #2 Use pole progressions!
We can and should be using progressions ON the pole to gradually build strength and work on the engagement of that push and pull until we’re ready to start loading it fully with both feet off the floor!
Here’s an example that isolates the active push for the bottom arm.
And here’s a split grip progression that incorporates both the push and the pull. I’d recommend trying the ‘off’ the pole exercises first – you’ll see how the engagement cues run through both the ‘off’ and ‘on’ the pole movements!
In these progressions, notice that we’re pushing ‘down’ as well as ‘forwards’ with that bottom arm. I encourage you to explore the difference in engagement if you push only forwards, or only downwards – and how different it feels when you combine both together.
When we use split grip on the pole, the amount of ‘push’ needed and the direction of it will vary depending on whether we’re doing a static hold or a spin. With the momentum of a spin, we may only need a light push forwards into the pole, whereas if we’re holding a static position, that push will probably be more active and focused on a downward push to give a little more support and active engagement around the position.
Split Grip Tip #3 Build gradually!
When you’re ready to start using the full grip on the pole, avoid doing too much too soon! I know, it’s exciting – you’ve just got that new skill and you wanna put it in Every. Single. Combo. But just hold yourself back, keep the volume low and build it up gradually over time, it’s always the best long term strategy!
Remember that our tendons and ligaments take a bit more time to adapt than our muscles. So even if you feel that your muscles are strong enough, your tendons and ligaments may need to go at a slower pace.
- Cut down the volume by reducing the amount of split grip moves you’re doing, both in individual sessions and also across your entire training block.
- Use alternative grips (like a forearm grip) on the bottom arm to perform some of your usually ‘split grip-based’ tricks – it still requires the overhead pull and the active ‘push’ through the bottom arm, but adds variety and can help to reduce the load on the bottom wrist and elbow.
Split Grip Tip #4 Adjusting the bottom hand positioning
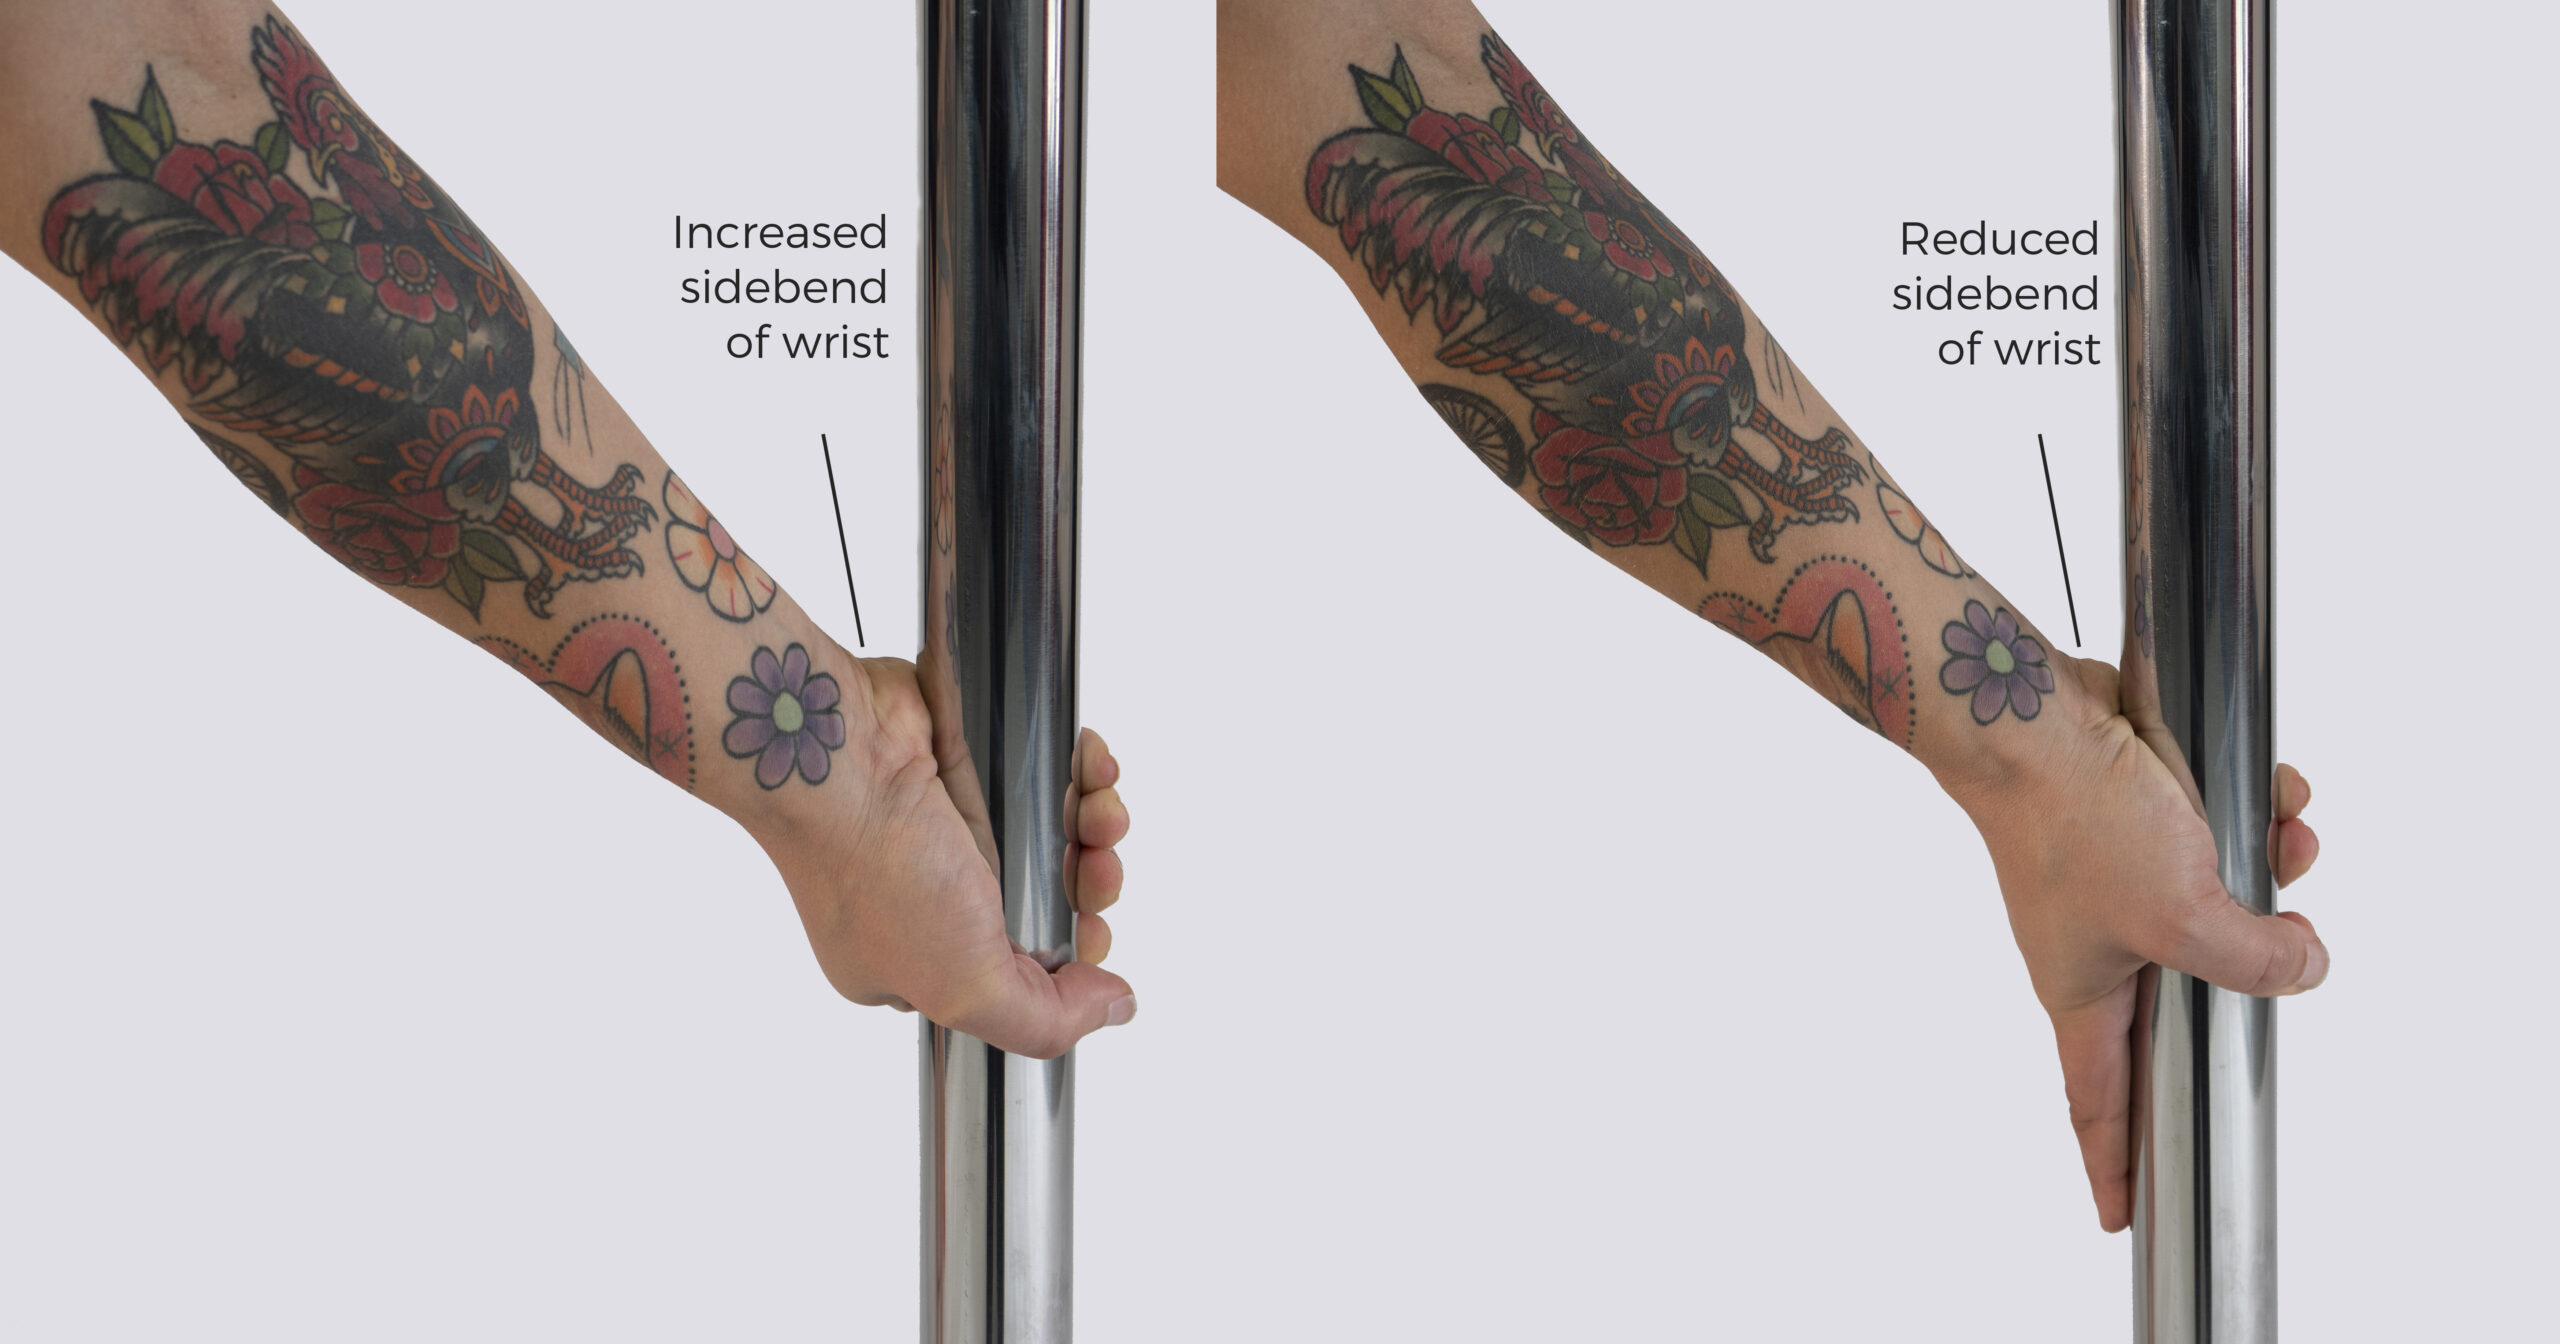
Small adjustments to the positioning of the bottom hand can make a big difference to how your split grip feels, depending which elements you’re struggling with – and what type of trick you’re working on.
For example, if you have your hand fully wrapped around the pole, this may increase the amount of side bend in your wrist. Conversely, reducing that ‘wrap’ and putting your wrist into a more neutral position can reduce some of the more lateral force on the wrist and will feel more comfortable for most people.
Split Grip Tip #5 Maintain control of your entry and exit!
Don’t try to jump or hop into split grip! Take your time to build strength and understand the engagement of the push and pull so you can move into it with control.
Similarly, check you’re not disengaging and dumping all your weight into your bottom arm as you’re coming out of the move. Bring your feet back to the floor or back to the pole to take some of your bodyweight away from your upper body before you disengage the push and pull.
Split Grip Tip #6 A note on hyperextending elbows
The question of hyperextending elbows comes up a lot with split grip and here’s my take on it…
Staying active and strong in both that top arm pull and the bottom arm push is important whether you tend to hyperextend your elbows or not; but if you are a hyperextender, this focus on engagement and control of the position can be a little more nuanced in a couple of ways:
- It might take you a little longer to build the strength! Because you have increased range of motion at the elbow, and often it can be difficult to control and maintain engagement through that full range, the additional effort needed to stablise the position places a greater demand on your elbow flexors and stabilisers. This means you might need to progress a little slower when building strength for moves like split grip. But, generally, the process is still the same: use logical progressions and build the load and volume gradually over time, focusing on active engagement and strength!
- You might need some more personalised cues! One of the most common cues is to maintain a small bend in the bottom arm; this is also sometimes cued as ‘keeping some bicep engagement’ in that bottom arm. These kinds of cues are simply designed to help you maintain control and engagement around your elbow joint, to help you avoid disengaging into a locked-out elbow position. Whether that locked-out elbow position SHOULD be avoided or not is a whole other topic and depends on the individual. But if you think your hyperextension is causing issues in your split grip, especially if you’re experiencing pain, I’d recommend getting some personalised cues and advice from a physio for YOUR body. They’ll be able to tell you whether these kinds cues are appropriate for you or not!
Welp, that’s a wrap on what turned into a bit of an epic split grip deep-dive! Thanks for coming to my Ted Talk haha! I hope you’ve found some useful little nuggets along the way!
PS… Want to know how to create your own pole-specific training programme to build strength for pole? I got you! My book Strength and Conditioning for Pole is available now in ebook download or paperback!
Join my mailing list for free training advice direct to your inbox!
…including my FREE EBOOK “Grip Gainz – Grip Training for Pole Athletes” – with training drills and programming to help you achieve a vice-like pole grip.
I hate spam, too! When you join my mailing list, I’ll also notify you about new blogs and Pole PT updates that I think you might be interested in, but I’ll keep it to a minimum! You can unsubscribe at any time!